Tech Provider Portal
Introduction
This user guide provides an overview of the deema Tech Provider Portal, designed to help Tech Provider efficiently manage their network of sub-merchants within the deema platform.
It covers all key features — from onboarding and managing sub-merchants, to reviewing documents, tracking performance, monitoring settlements, and ensuring compliance across all linked accounts.
The guide aims to help Tech Provider understand how to use the portal effectively, maintain visibility over their sub-merchants’ activities, and ensure smooth and compliant operations throughout their network.
How to Use
Switching views
The Tech Provider Portal is structured into two main views — Tech Provider View and Merchant View — providing flexibility for managing sub-merchants and overseeing their activities within the deema platform.
Tech Provider View This is the main management dashboard where Tech Provider can view, add, and manage their sub-merchants. From this view, Tech Providers can:
- Review sub-merchant details and onboarding status.
- Add new sub-merchants directly.
Merchant View This view allows Tech Provider to act on behalf of a specific sub-merchant to monitor or control their account. From here, Tech Provider can:
- Access the merchant’s transactions and settlements.
- Review their orders and payment history.
- Ensure proper configuration and compliance at the sub-merchant level.
Together, these two views give Tech Provider full visibility and control — from overseeing their network of sub-merchants at a high level to managing each individual account when needed.
Sub-merchants
Sub-merchants list
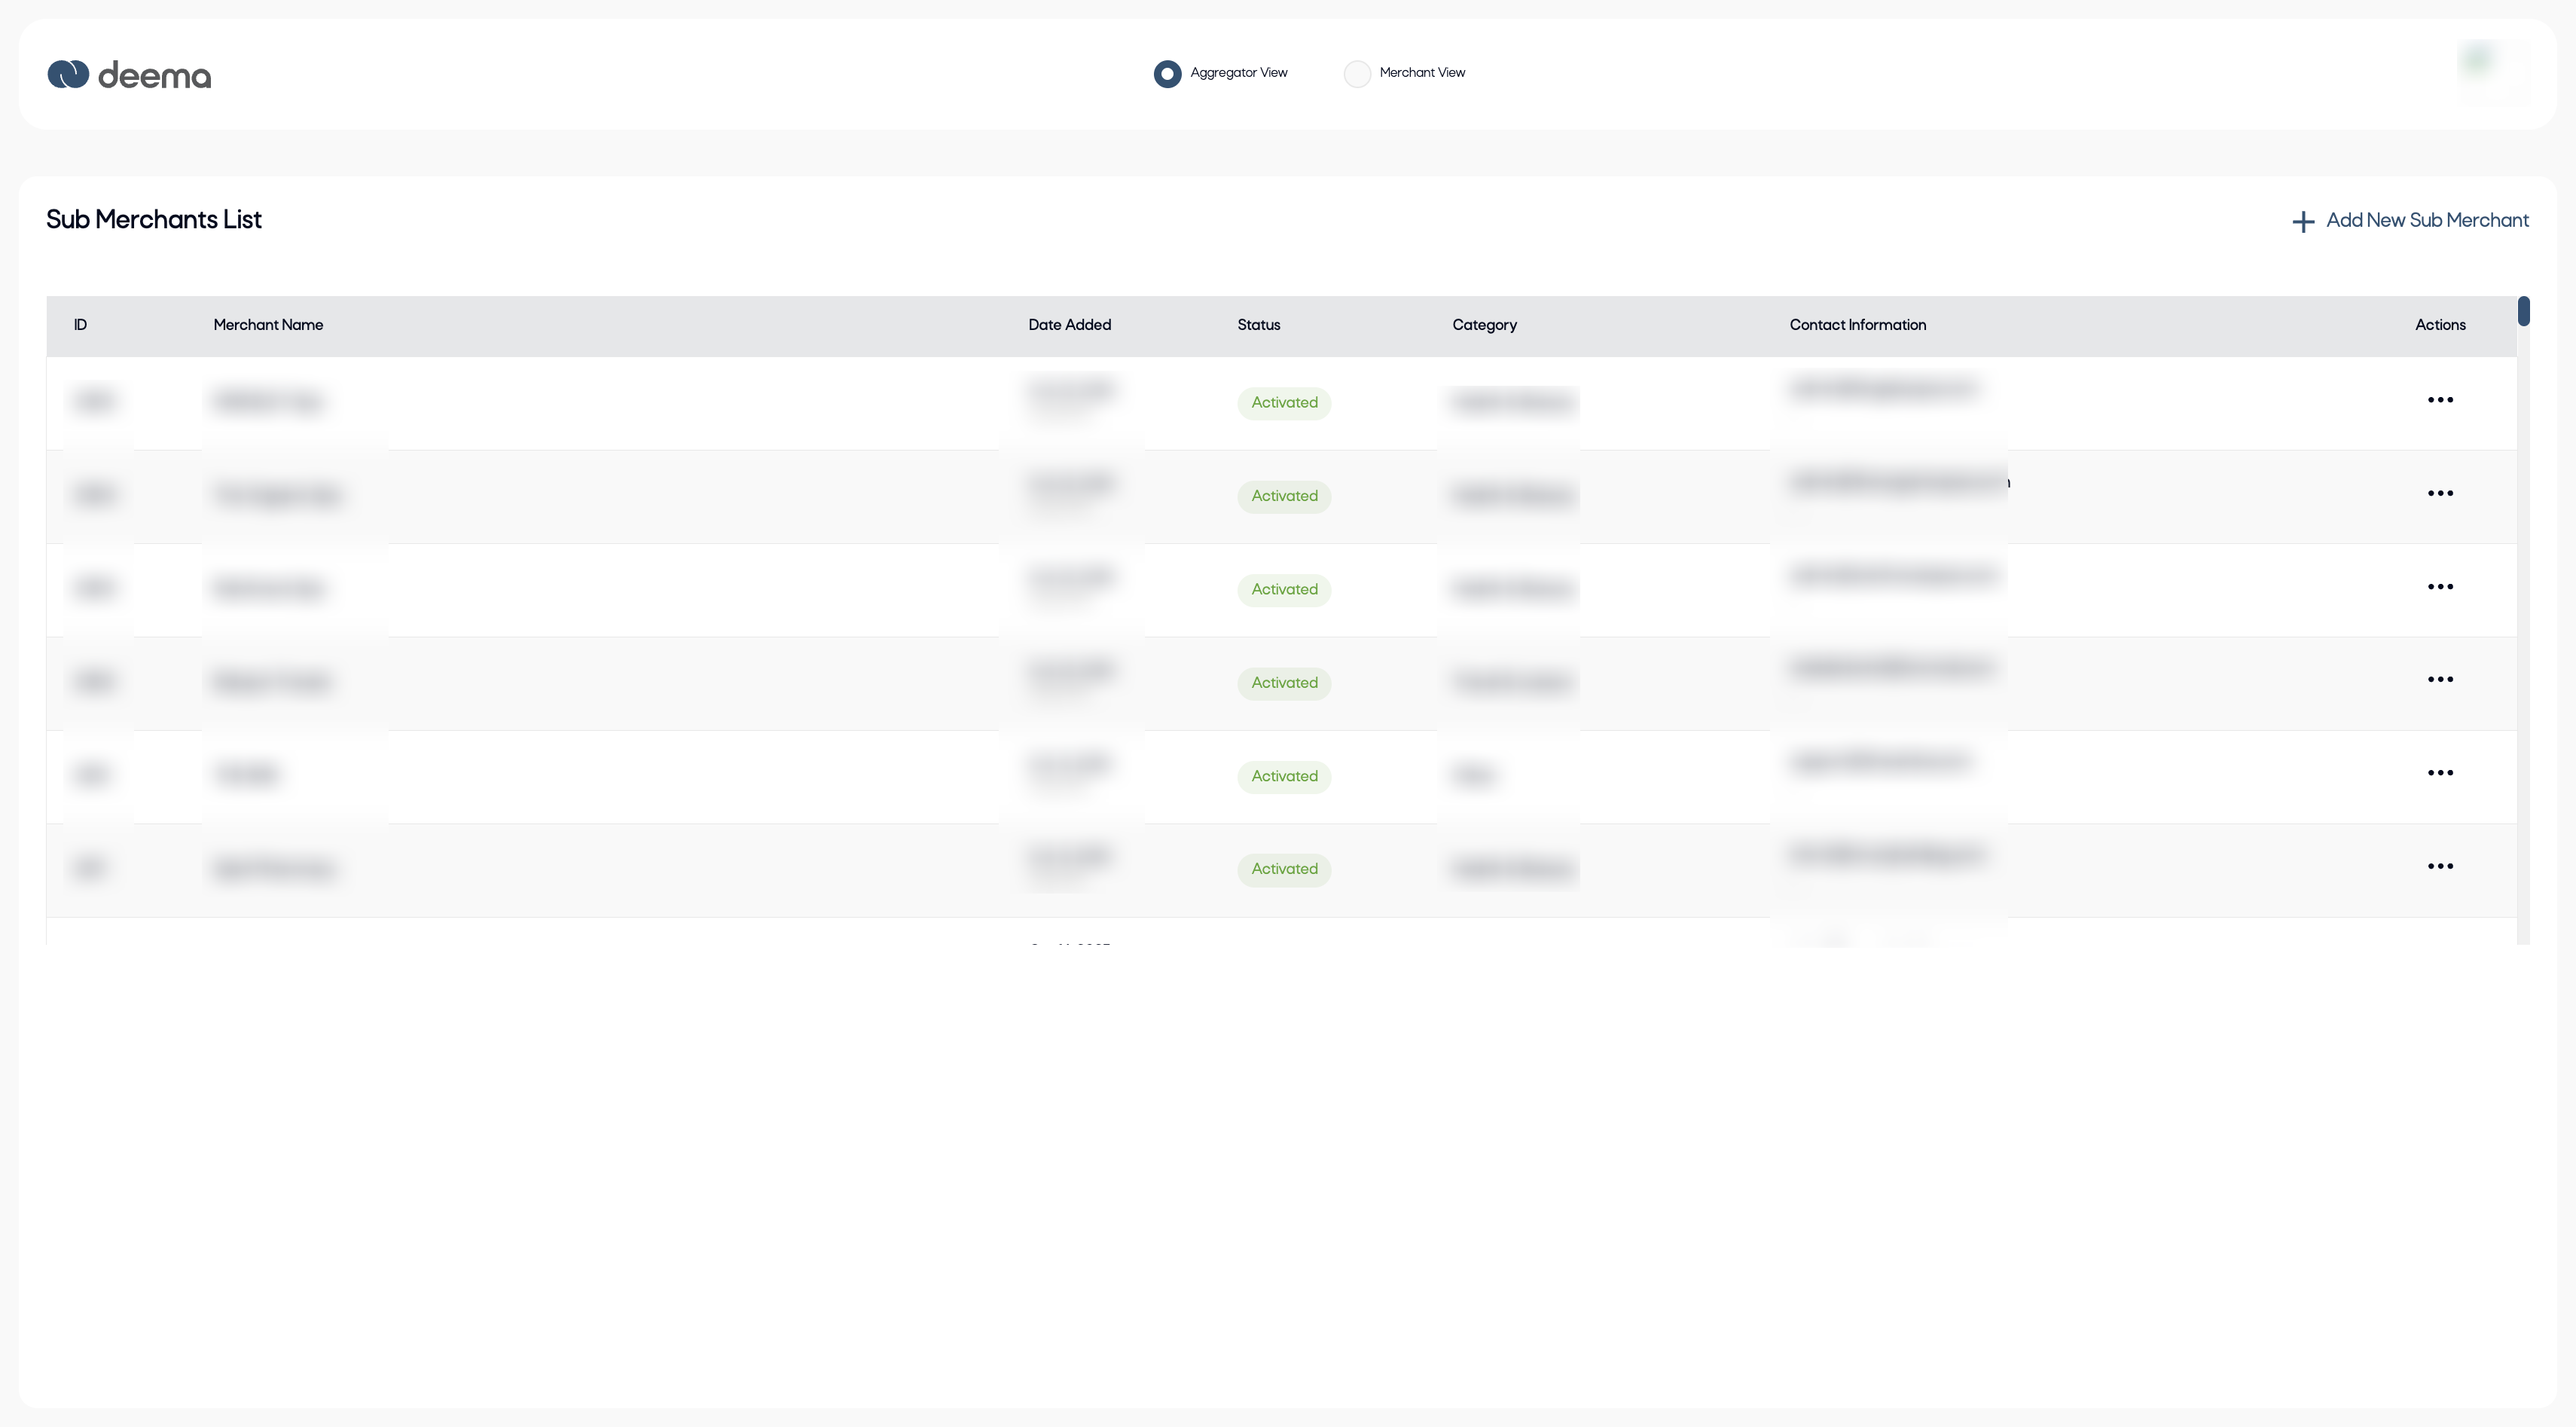
The Sub-Merchants List is the main dashboard under the Tech Provider View. It displays all sub-merchants registered under the tech provider’s account and provides quick access to their key details and management actions.
Each row in the list represents a sub-merchant and includes the following information:
- ID – The unique system-generated identifier for each sub-merchant.
- Merchant Name – The registered name of the sub-merchant.
- Date Added – The date and time when the sub-merchant was onboarded.
- Status – The current activation status (e.g., Activated, Pending, Suspended).
- Category – The business category or sector the sub-merchant operates in (e.g., Health & Beauty, Travel & Leisure).
- Contact Information – The primary email or contact details for the sub-merchant’s admin.
- Actions – The menu (⋯) where the tech provider can view details, edit information, or manage the sub-merchant’s account.
At the top right, the “Add New Sub-Merchant” button allows the tech provider to register a new sub-merchant directly from this page.
This section helps tech providers maintain full visibility and control over their network of sub-merchants, ensuring smooth onboarding, monitoring, and management.
Sub-merchant details
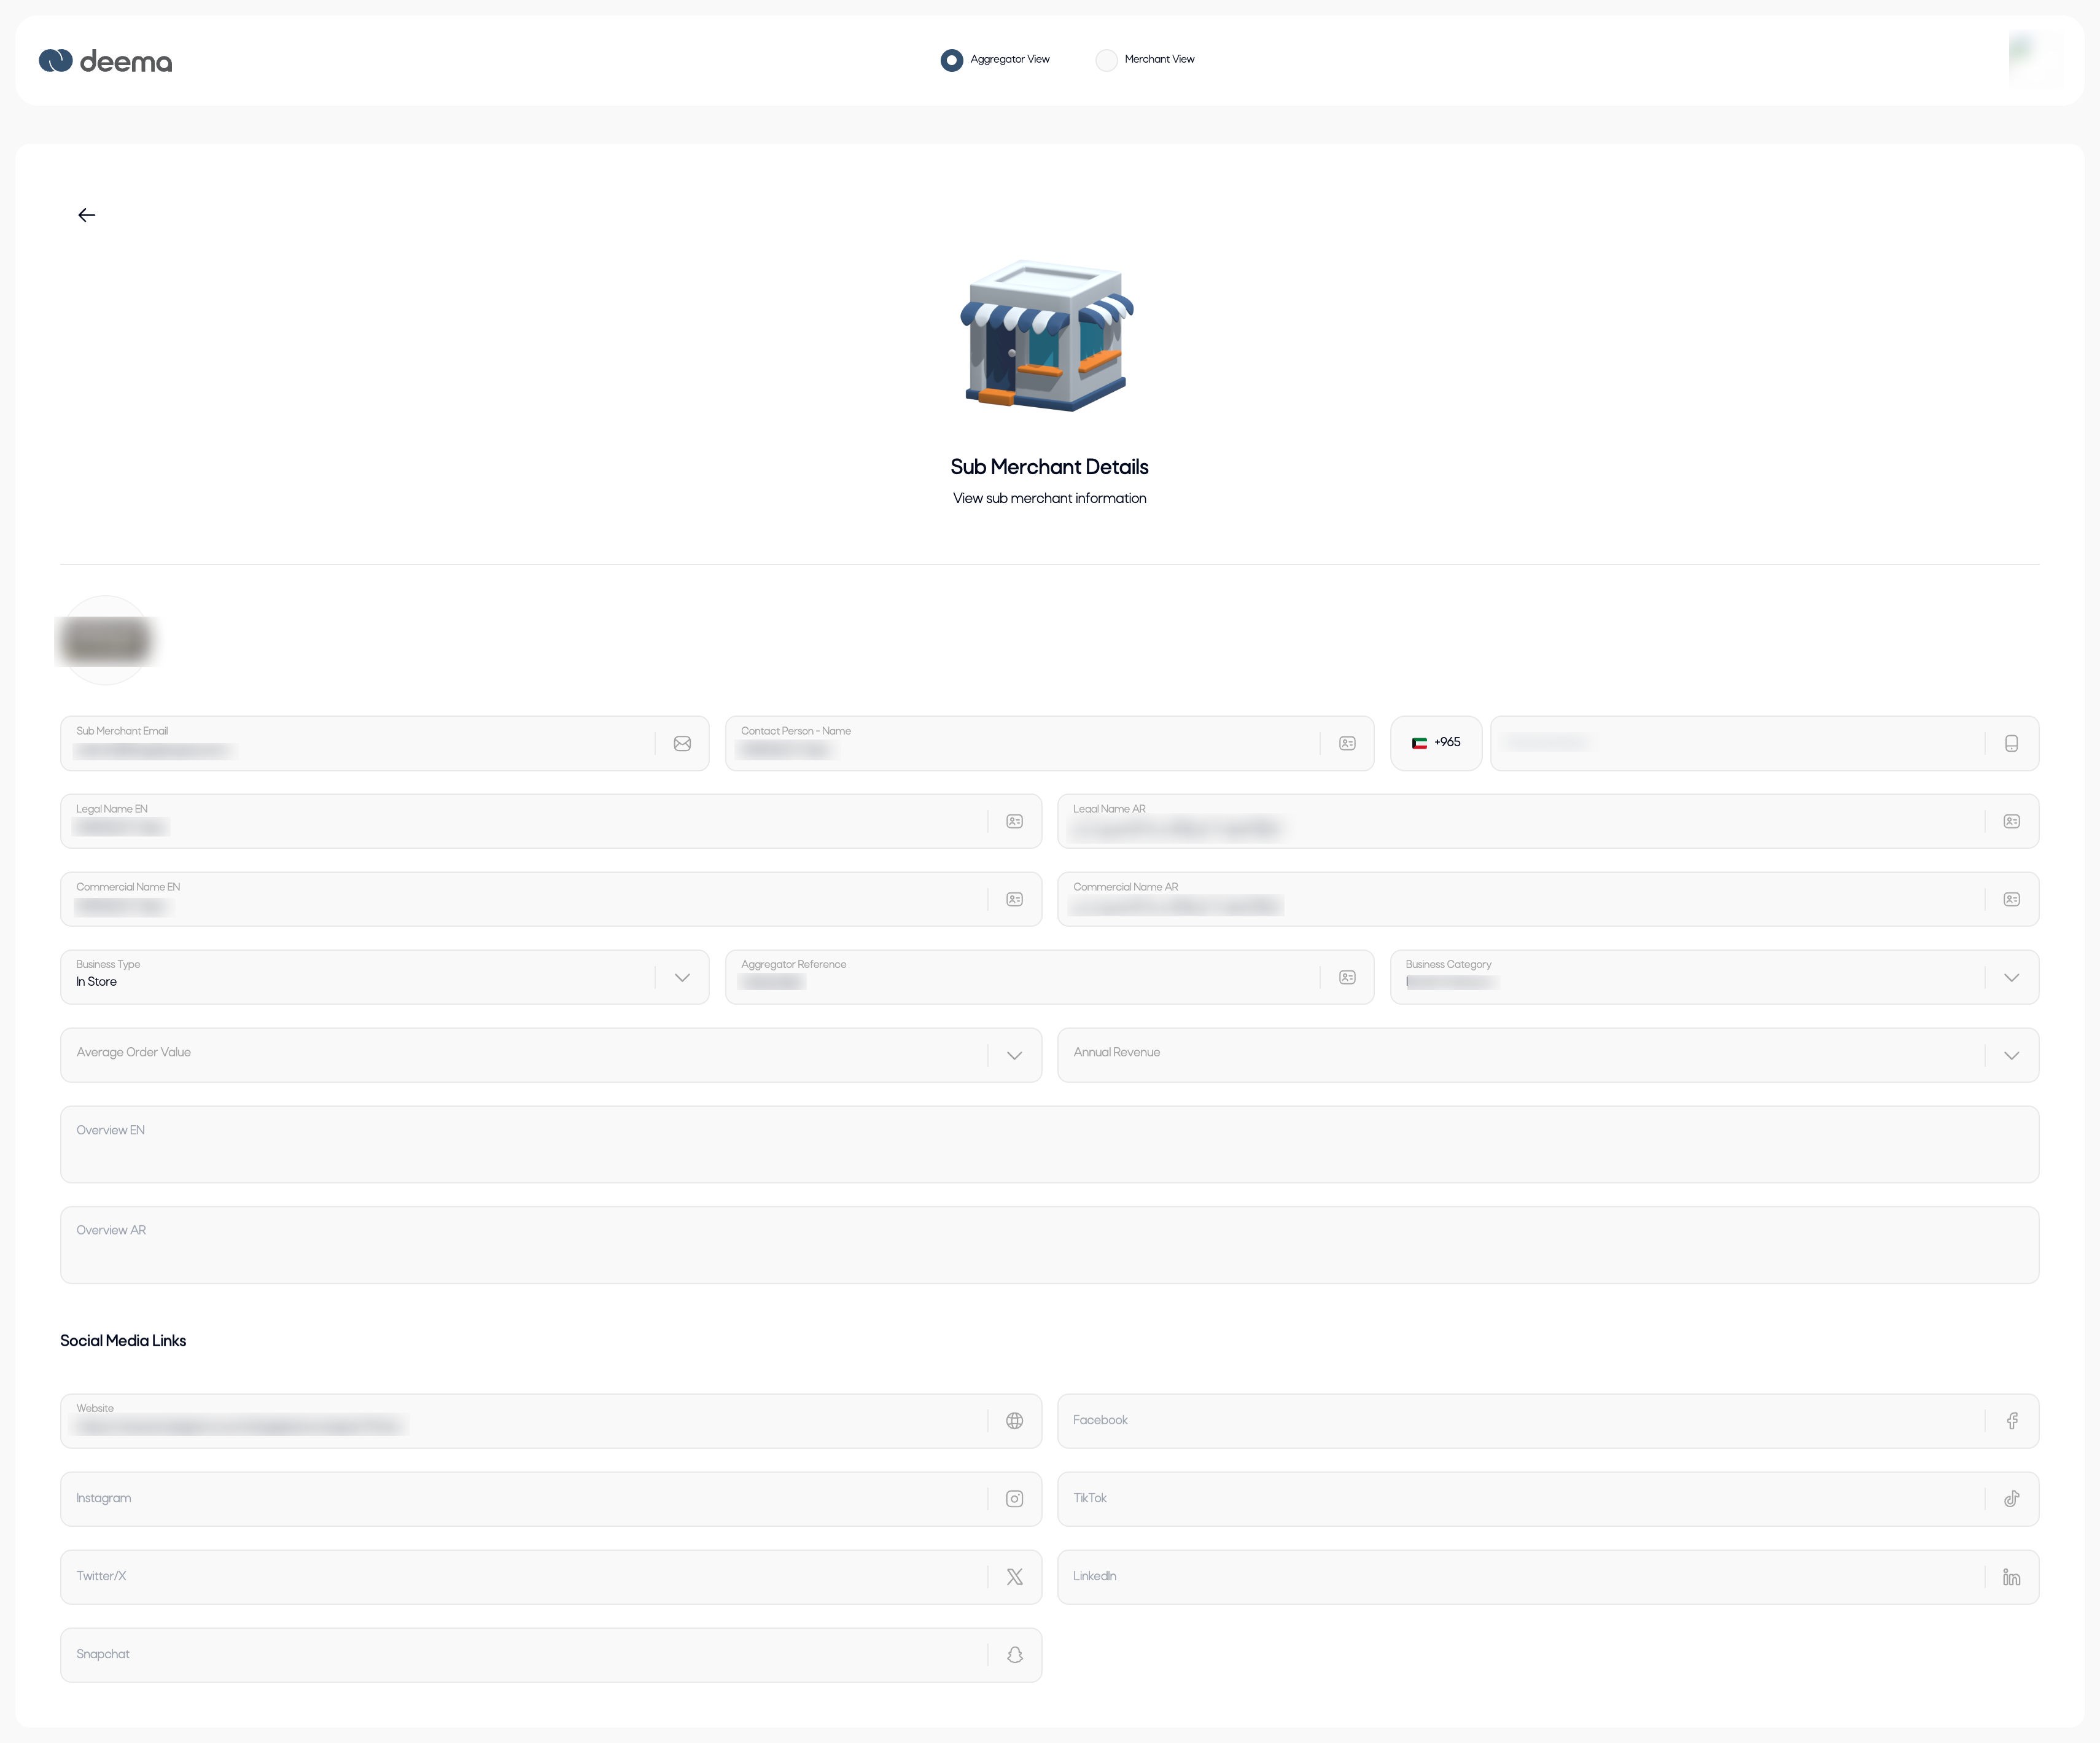
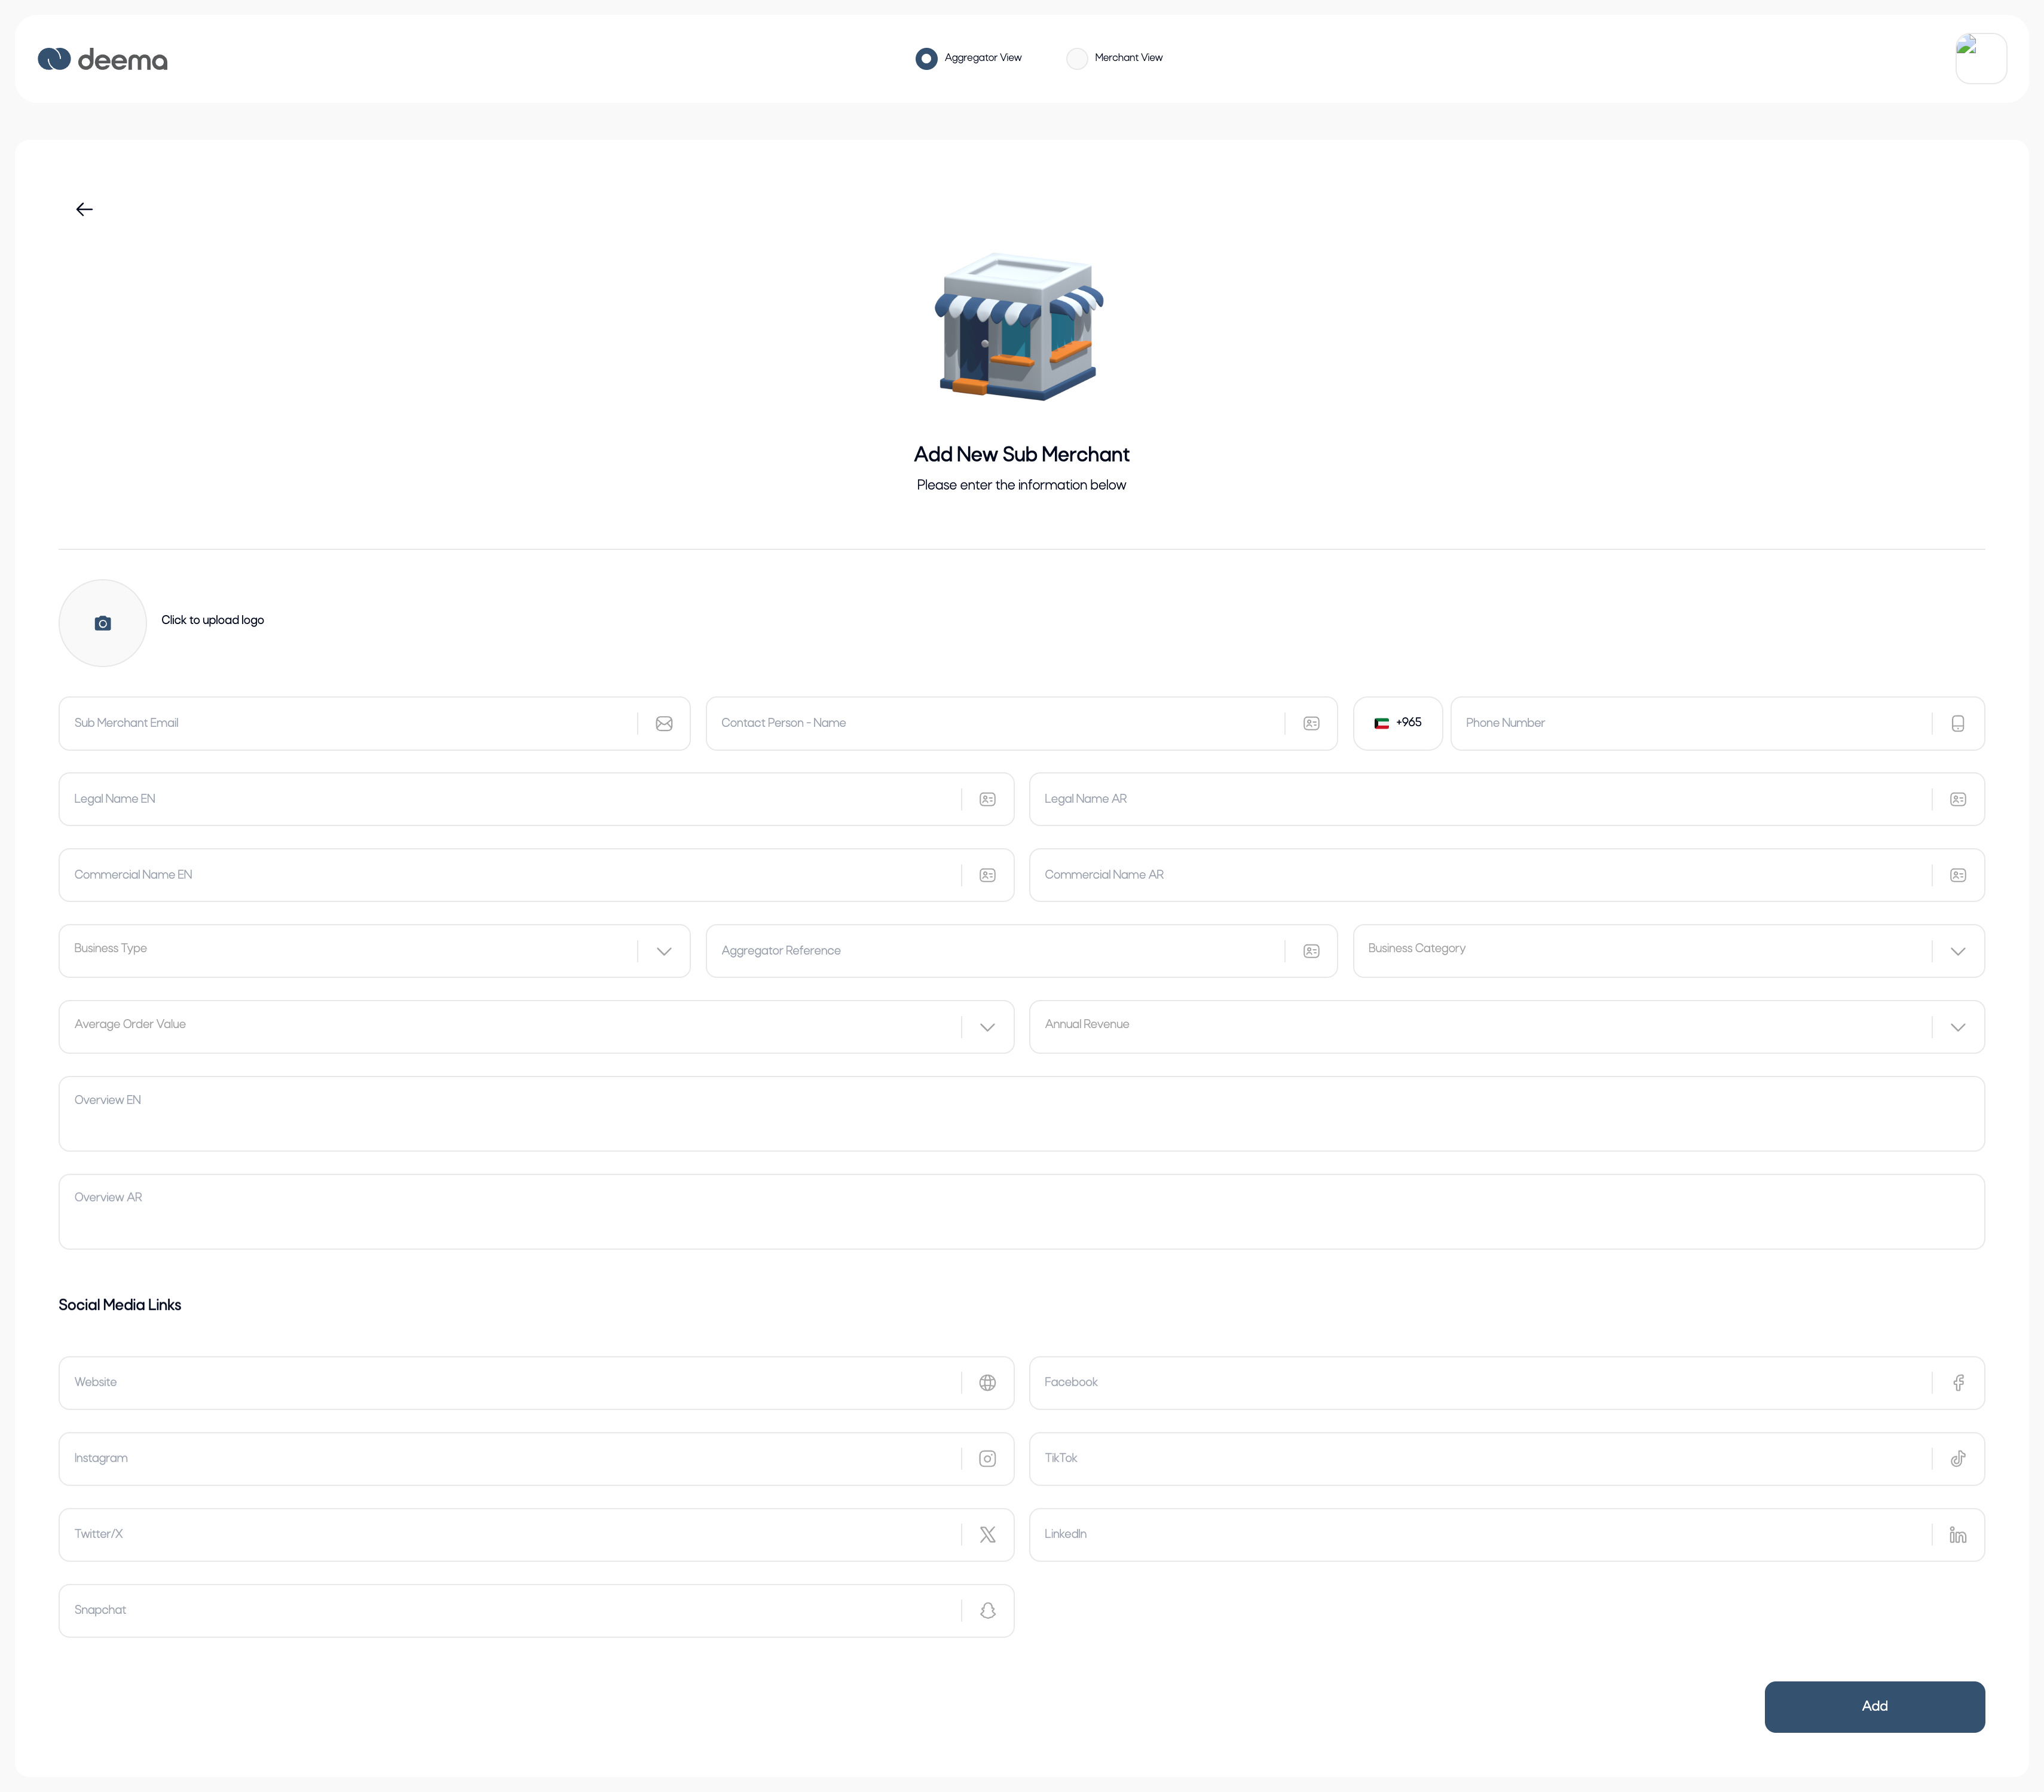
The Add New Sub-Merchant page allows tech providers to onboard new merchants directly under their network within the deema platform. It collects all key business and contact details required for registration and compliance verification.
This page is divided into several sections to ensure accurate and complete onboarding:
- Basic Information
- Sub-Merchant Email – The primary contact email for the sub-merchant’s administrator.
- Contact Person Name & Phone Number – The full name and mobile number of the authorized representative.
- Legal Name (EN/AR) – The official registered name of the business in both English and Arabic.
- Commercial Name (EN/AR) – The brand or trading name visible to customers.
- Business Details
- Business Type – Defines the operating model (e.g., In-Store, Online, both).
- Business Category – Classifies the business sector such as Health & Beauty, Travel & Leisure, Retail, etc. you can select up to 3 categories for each sub-merchant
- Aggregator Reference – A unique internal identifier linking the sub-merchant to the tech provider.
- Average Order Value / Annual Revenue – to provide financial context for monitoring and reporting.
- **Overview (EN/AR) **– A short description of the business, shown in both languages.
- Social Media Links
Tech providers can enrich the sub-merchant profile by adding links to their online presence:
- Website
- Instagram / TikTok / Twitter (X)
- Facebook / LinkedIn / Snapchat
After completing all required details, click Save to finalize the onboarding process. The sub-merchant will appear in the Sub-Merchants List with the status Pending until the account is reviewed and activated.
Orders
In the Merchant View, tech providers can act on behalf of any sub-merchant under their network. At the top of the page, a dropdown menu allows the tech provider to select which sub-merchant to control. Once selected, the portal automatically switches context, displaying that sub-merchant’s data — including orders, branches, and user management.
This feature gives tech providers full visibility and operational control over their sub-merchants, enabling them to monitor transactions, manage users, and support daily activities as if logged in directly to the merchant’s account.
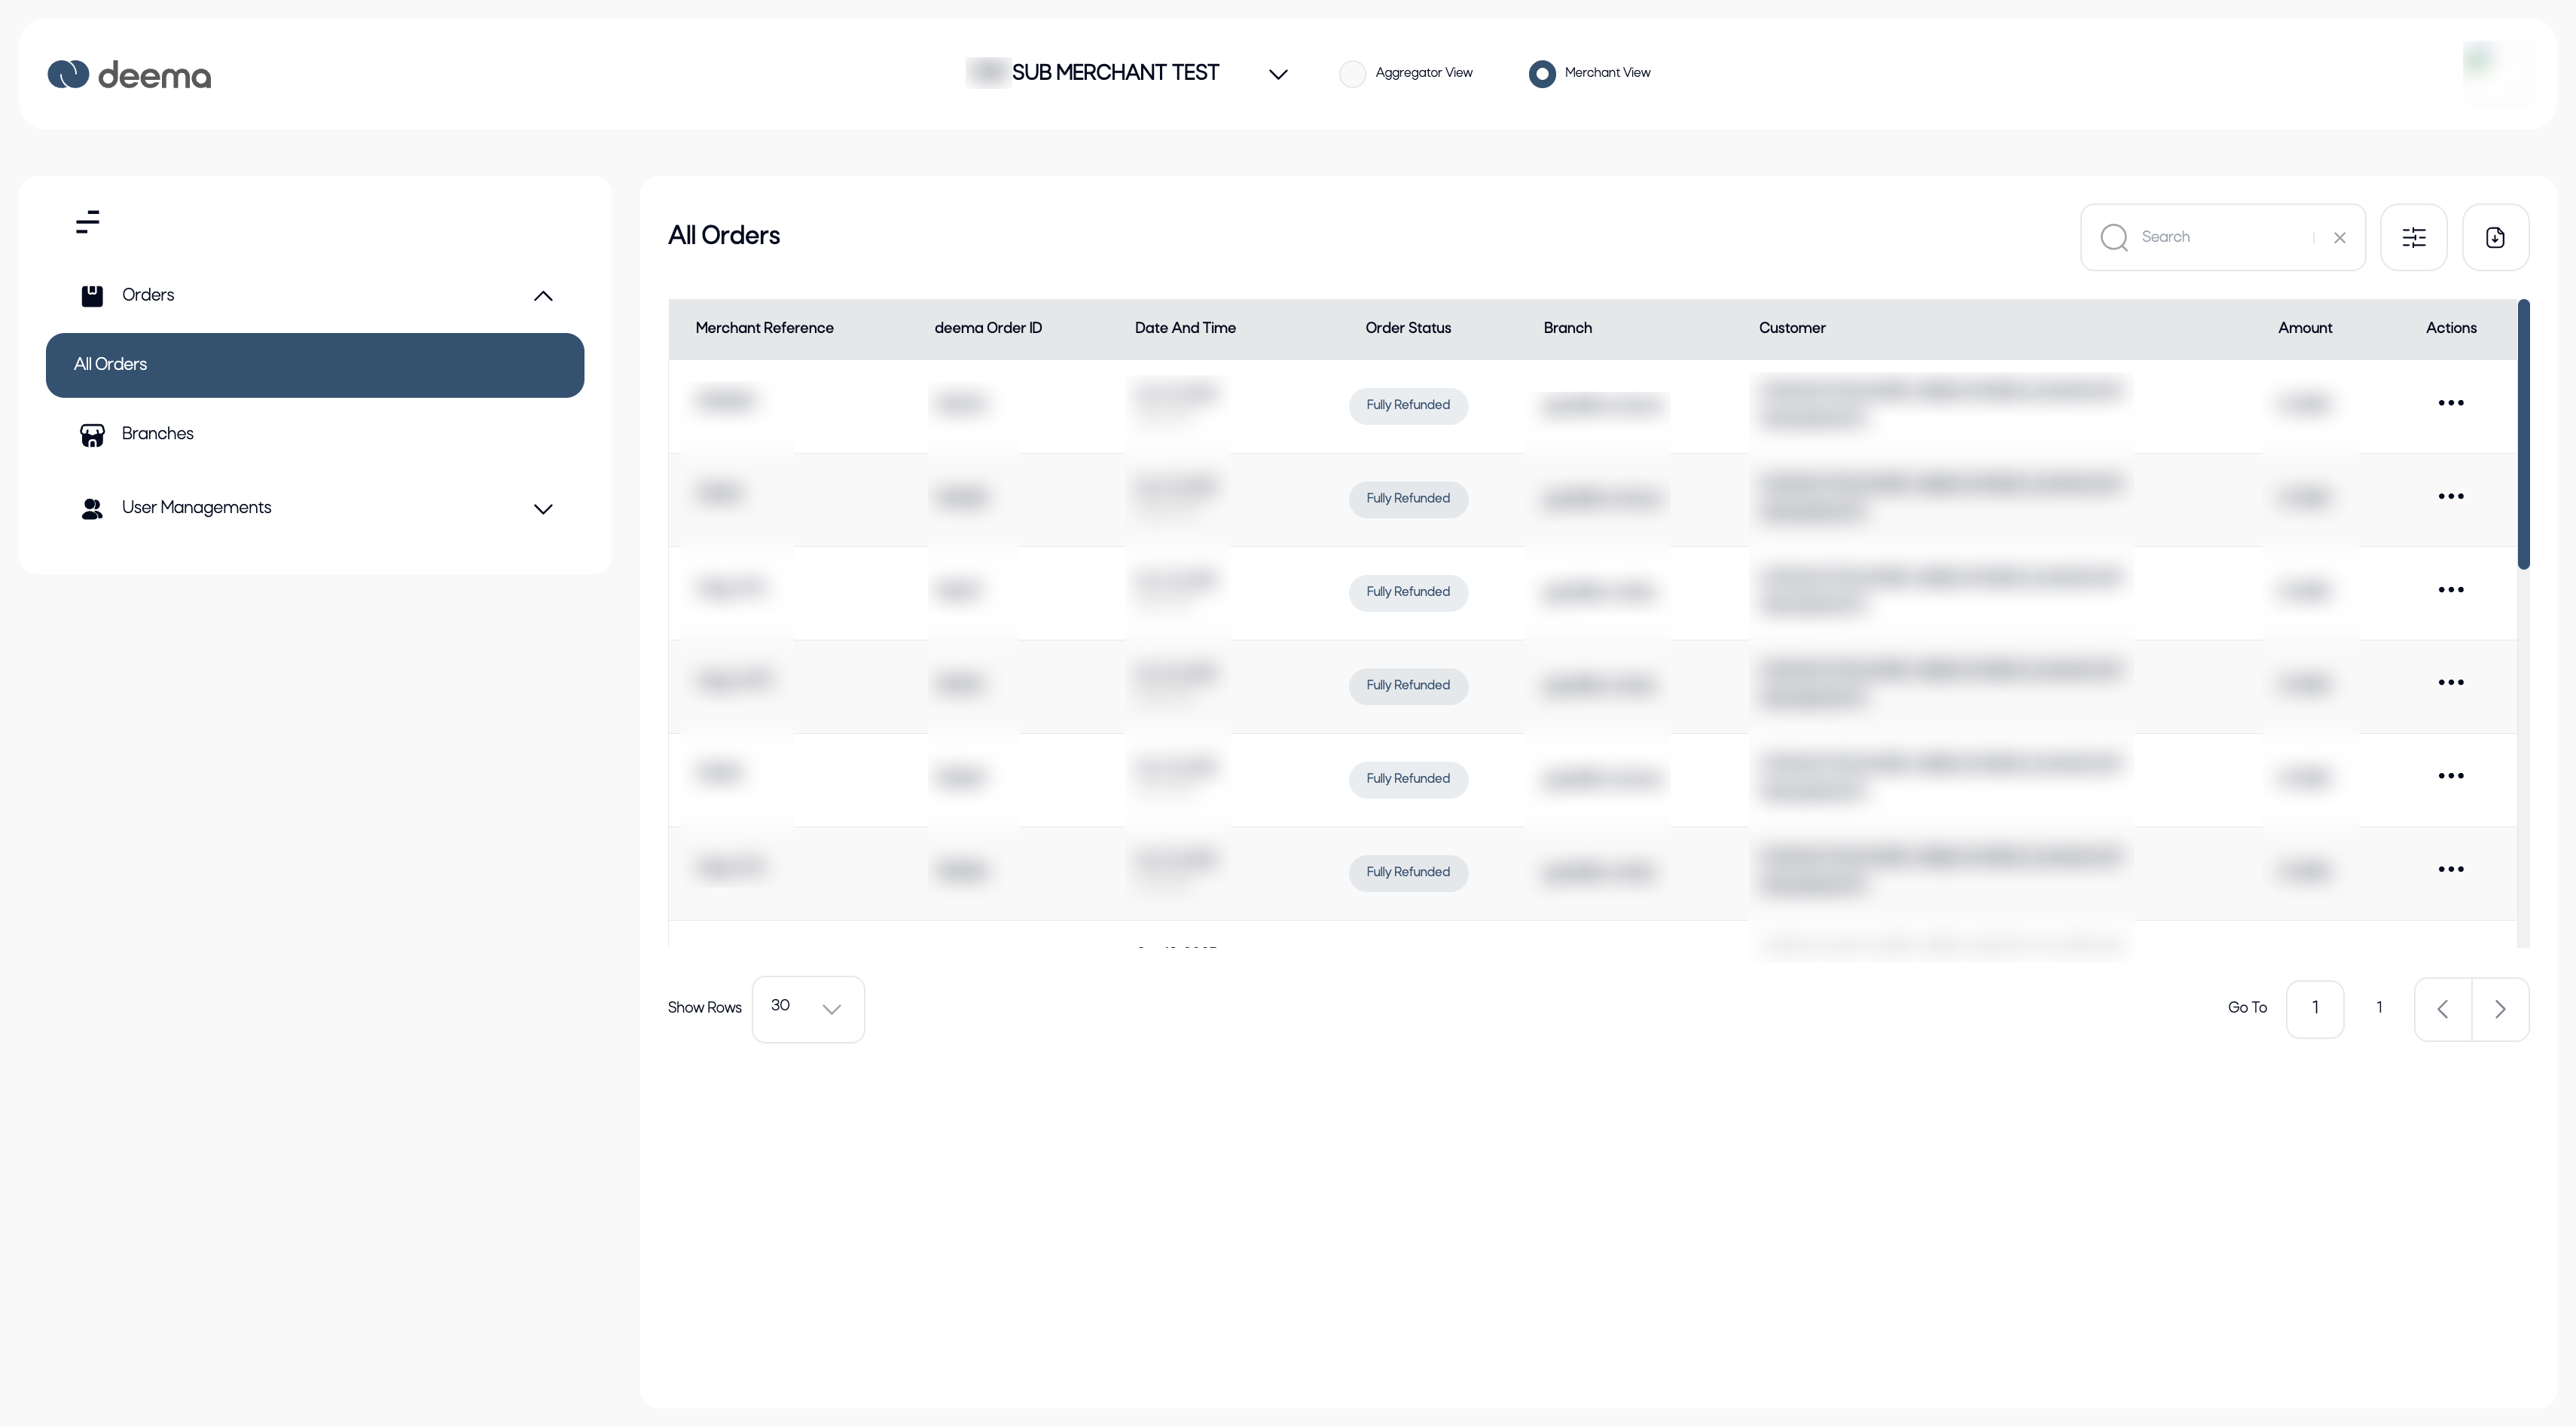
The Orders page provides a detailed overview of all customer transactions made through the selected sub-merchant. It serves as the main hub for reviewing payment activity, tracking order statuses, and managing refunds or disputes.
Key Sections:
- Orders Menu – Located in the left sidebar under Orders → All Orders, this section displays the complete list of transactions for the selected sub-merchant.
- Search & Filters – Use the search bar or filters to quickly locate specific orders by reference number, customer, or date.
Order Table Columns:
- Merchant Reference – The sub-merchant’s internal reference number for the order.
- deema Order ID – The system-generated ID assigned by deema.
- Date and Time – When the order was created or processed.
- Order Status – The current state of the transaction (e.g., Pending, Captured, Fully Refunded).
- Branch – The branch where the order originated, if applicable.
- Customer – Displays the customer’s identifying information.
- Amount – The total transaction value.
- Actions – The (⋯) menu for viewing detailed order information.
Order Statuses
Each order in the list includes a status label that reflects its current state in the payment lifecycle:
| Status | Description |
|---|---|
| Pending | The order has been created but payment is not yet completed. |
| Fully Captured | The payment has been fully processed and captured successfully. |
| Fully Refunded | The entire payment amount was refunded to the customer. |
| Partially Refunded | Only a portion of the payment was refunded. |
| Payment Canceled | The customer cancelled the payment or entered wrong payment credentials. |
| Declined by Regulator | The transaction was rejected by the financial regulator. |
| Declined by Deema | The transaction was declined by deema. |
The Orders page helps tech providers monitor the financial and operational performance of their sub-merchants in real time — ensuring accuracy, transparency, and quick resolution of any issues.
Order details page
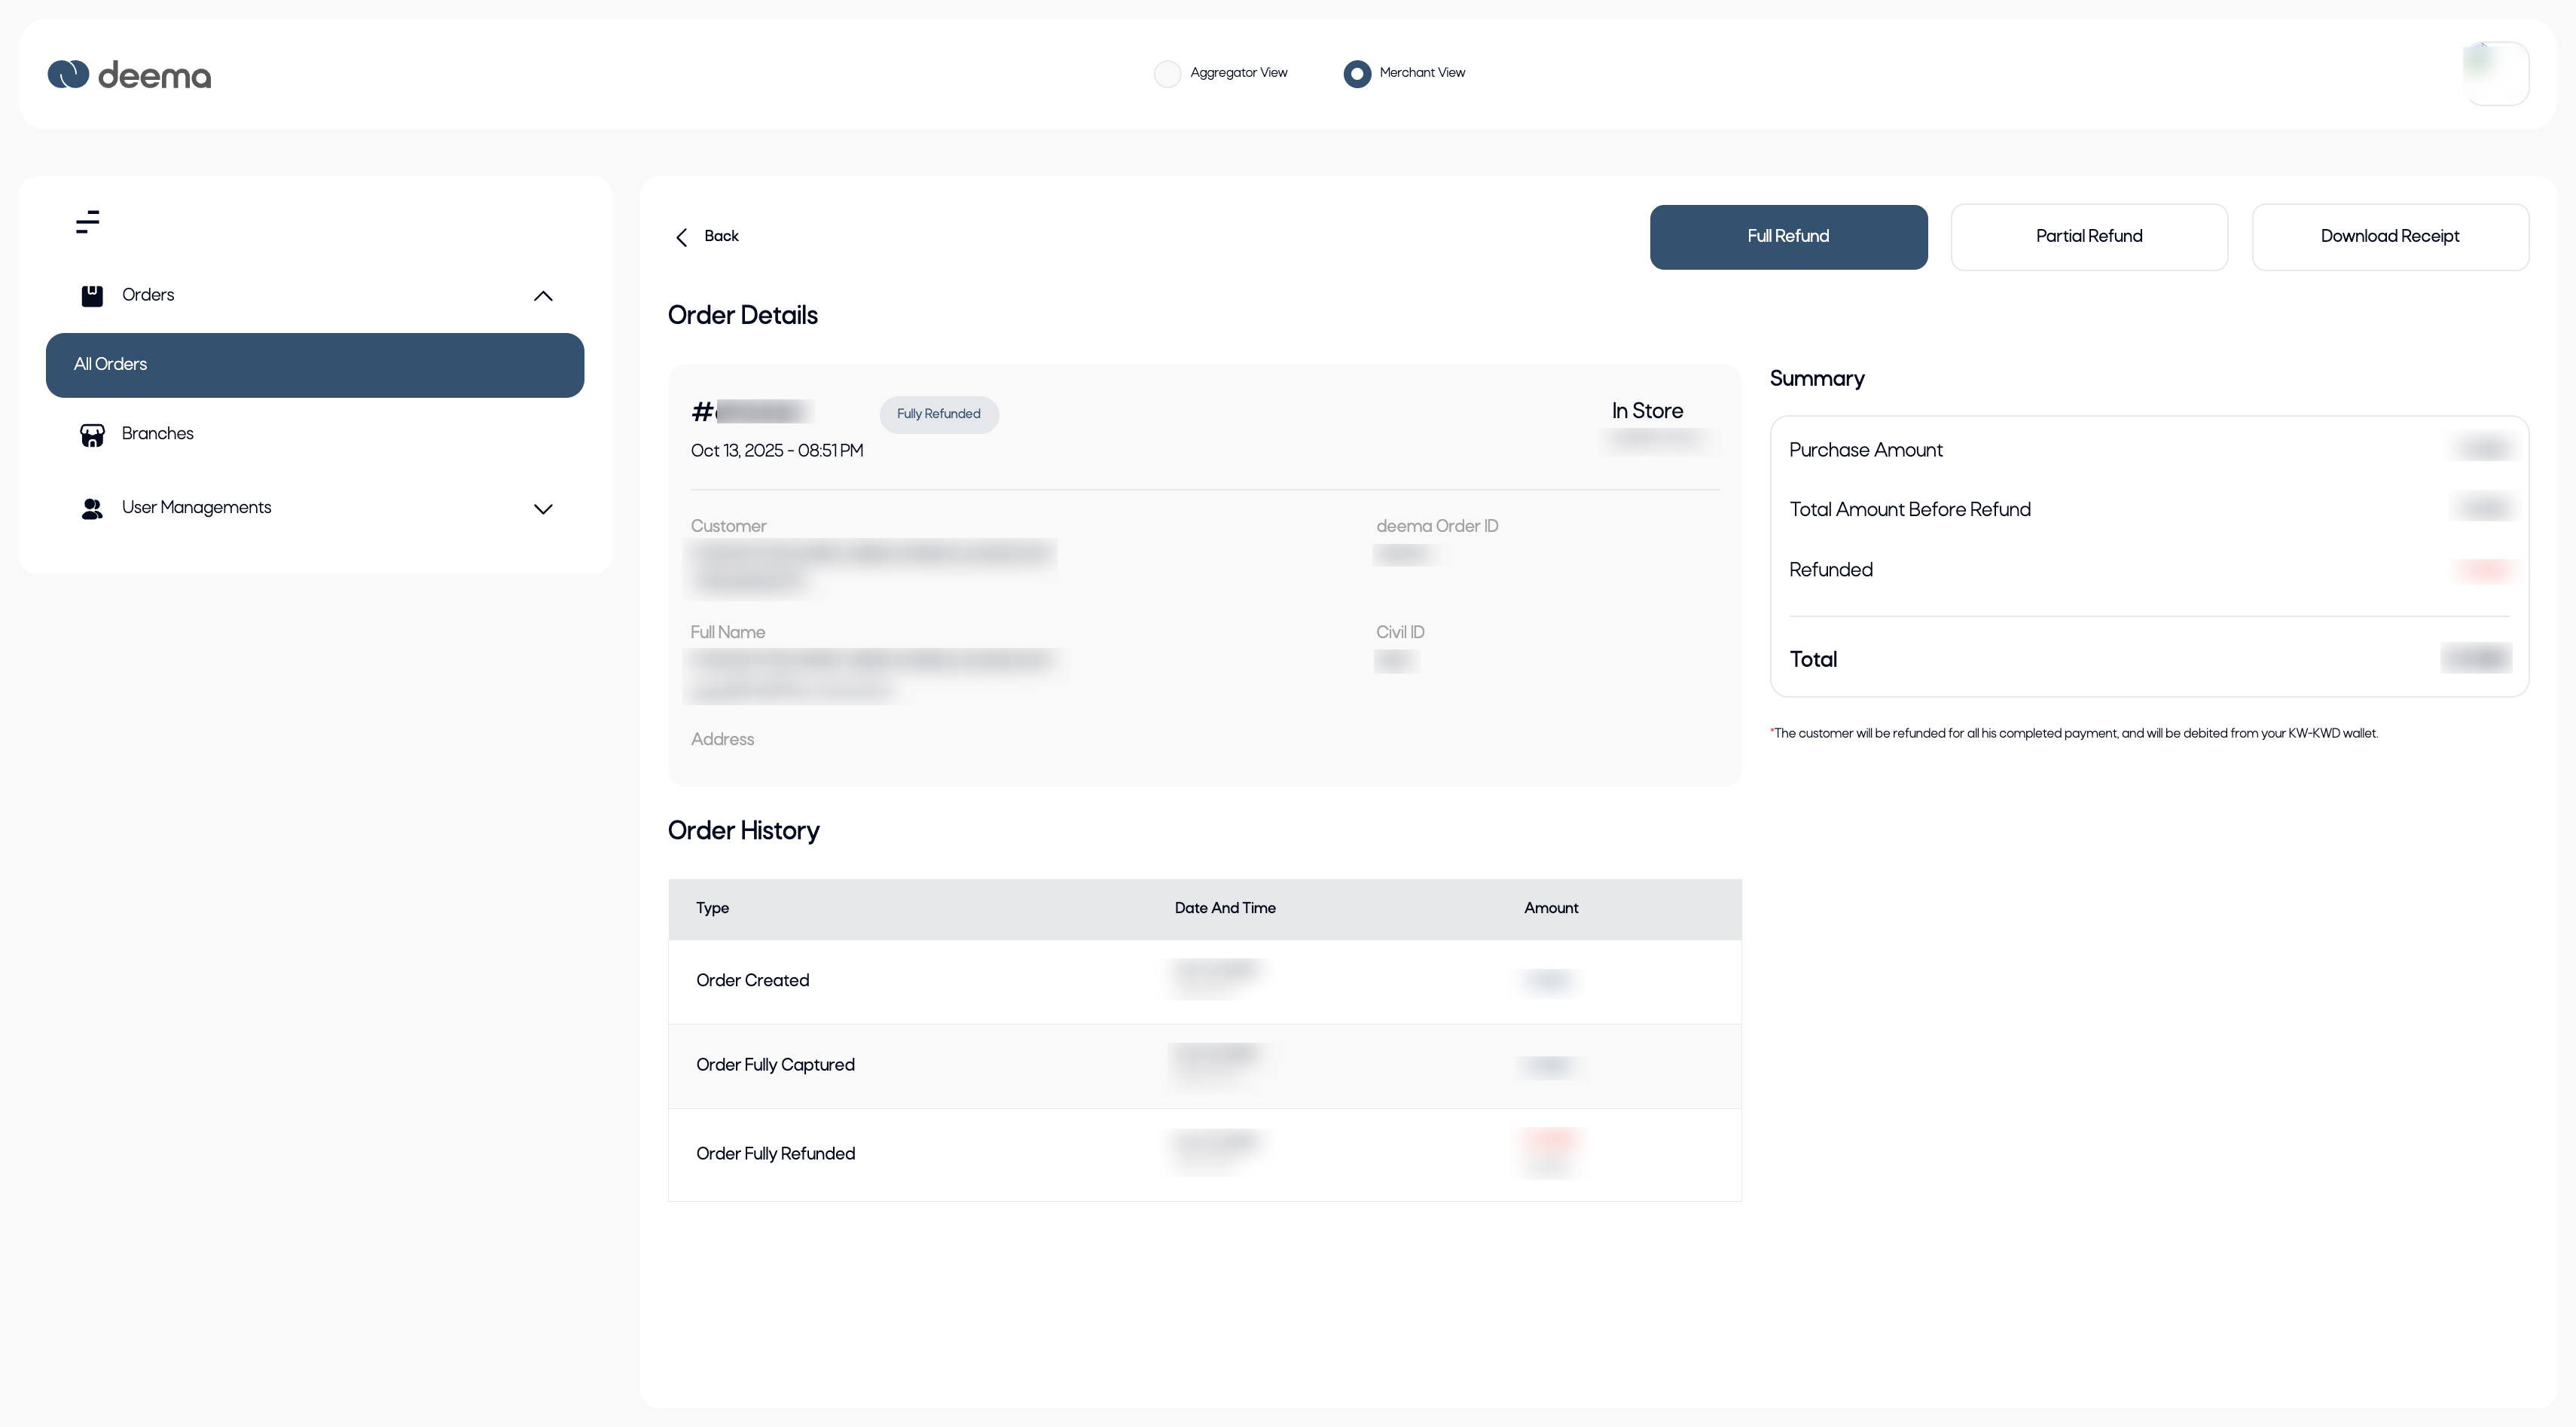
The Order Details page provides a complete overview of a single transaction for the selected sub-merchant. It allows the tech provider to review the order’s information, monitor its history, and perform actions such as issuing refunds or downloading receipts.
- Order Summary Section
Located at the top of the page, this section displays the essential details of the order:
- Order ID and Status – Shows the unique order reference and its current status (e.g., Captured, Fully Refunded, Partially Refunded).
- Date and Time – Indicates when the order was placed.
- Business Type – Displays whether the transaction occurred In Store or Online along with the branch name.
- Customer Details – Includes customer name, contact information, and Civil ID for identification.
- deema Order ID – The unique identifier assigned by deema for backend tracking.
- Address – Customer’s registered address if provided during checkout.
- Actions Section
On the top-right side, tech providers have access to the following quick actions:
- Full Refund – Refunds the entire amount to the customer.
- Partial Refund – Allows refunding a specific portion of the transaction.
- Download Receipt – Generates a digital receipt for record-keeping or customer sharing.
- Summary Panel
This panel on the right side presents a financial breakdown of the transaction:
- Purchase Amount – Original order amount.
- Total Amount Before Refund – The total prior to any refunds.
- Refunded – The refunded portion of the transaction.
- Total – Final amount after applying refunds.
- Order History
At the bottom of the page, the Order History table logs all major events associated with the transaction, including:
- Order Created – When the order was initiated.
- Order Fully Captured – When the payment was successfully processed.
- Order Fully/Partially Refunded – When a refund action occurred.
Each event includes a timestamp and the corresponding amount, allowing tech providers to audit the full transaction lifecycle with complete transparency.
Branches
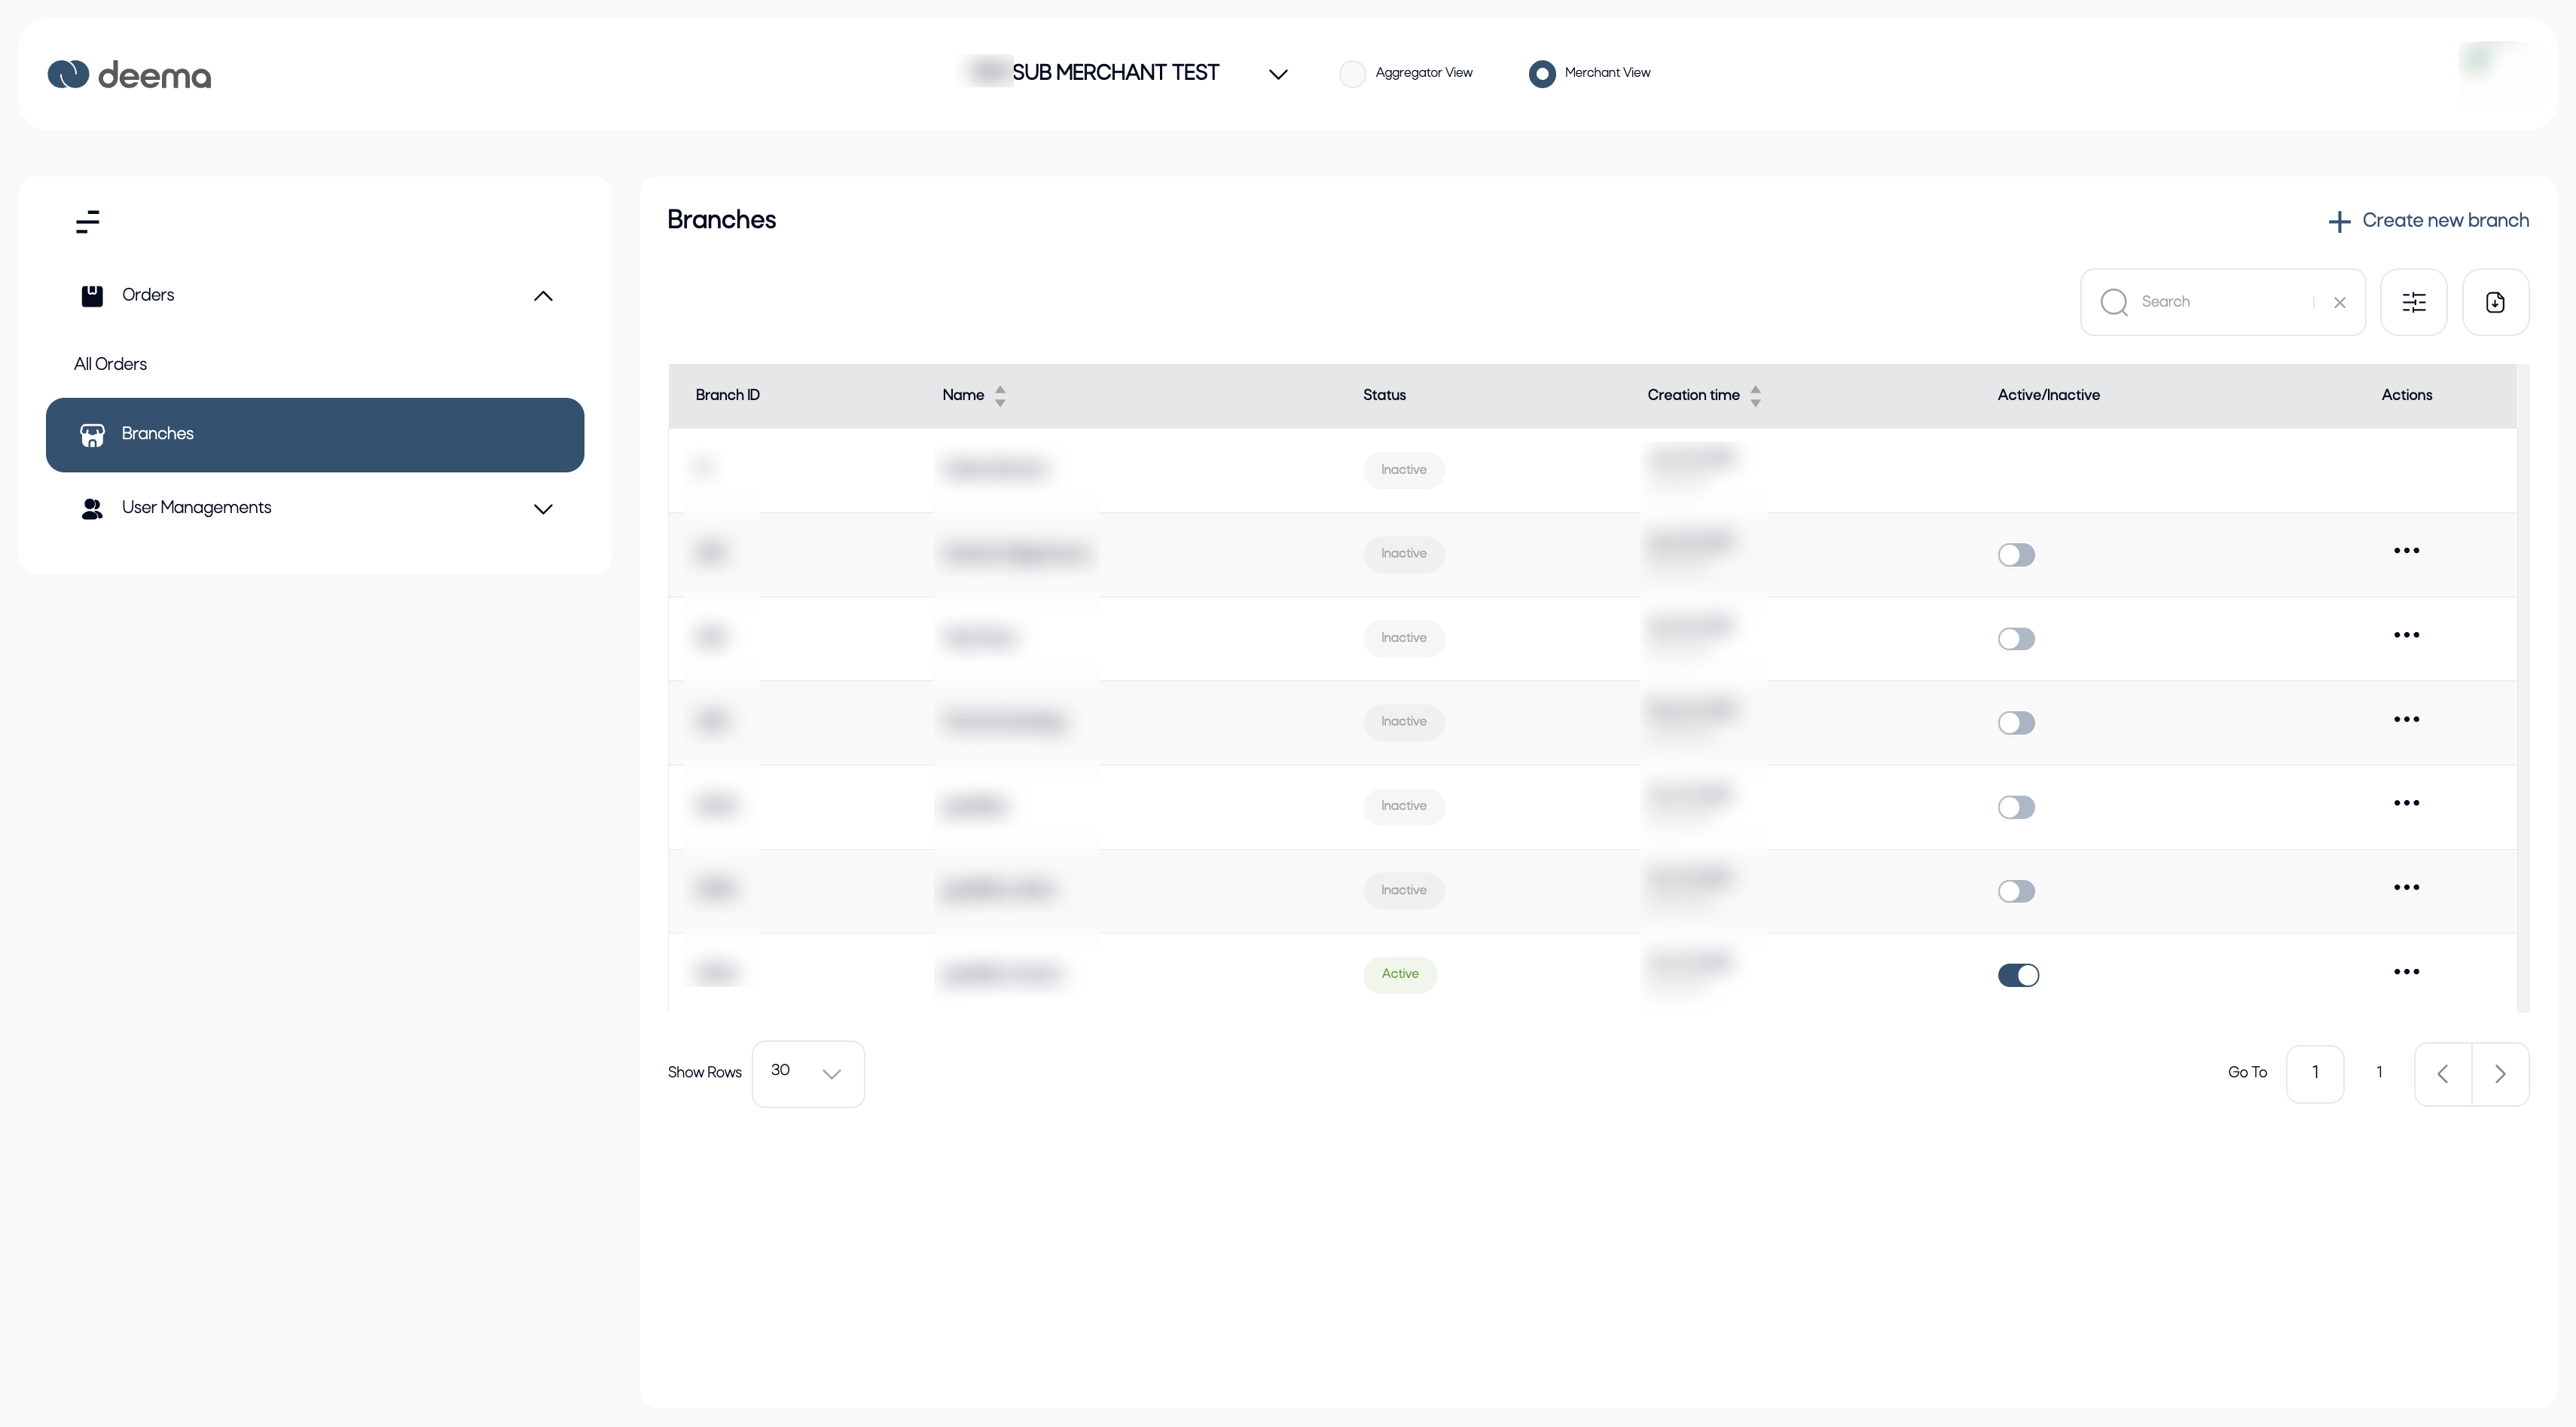
The Branches page allows tech providers to view and manage all branches registered under a selected sub-merchant. Each branch represents a physical or online business location that operates under the sub-merchant’s account.
This page provides a centralized view for monitoring branch activity, updating status, and creating new branches when needed.
Key Features:
Branch Table Overview: Each row displays essential branch details, including:
- Branch ID – The unique identifier for each branch.
- Name – The registered name of the branch.
- Status – Indicates whether the branch is Active or Inactive.
- Creation Time – Displays when the branch was added.
- Active/Inactive Toggle – Allows quick activation or deactivation of a branch.
- Actions – The (⋯) menu provides options to view or edit branch details.
Search and Filters: Use the search bar or filters at the top right to locate specific branches quickly by name or ID.
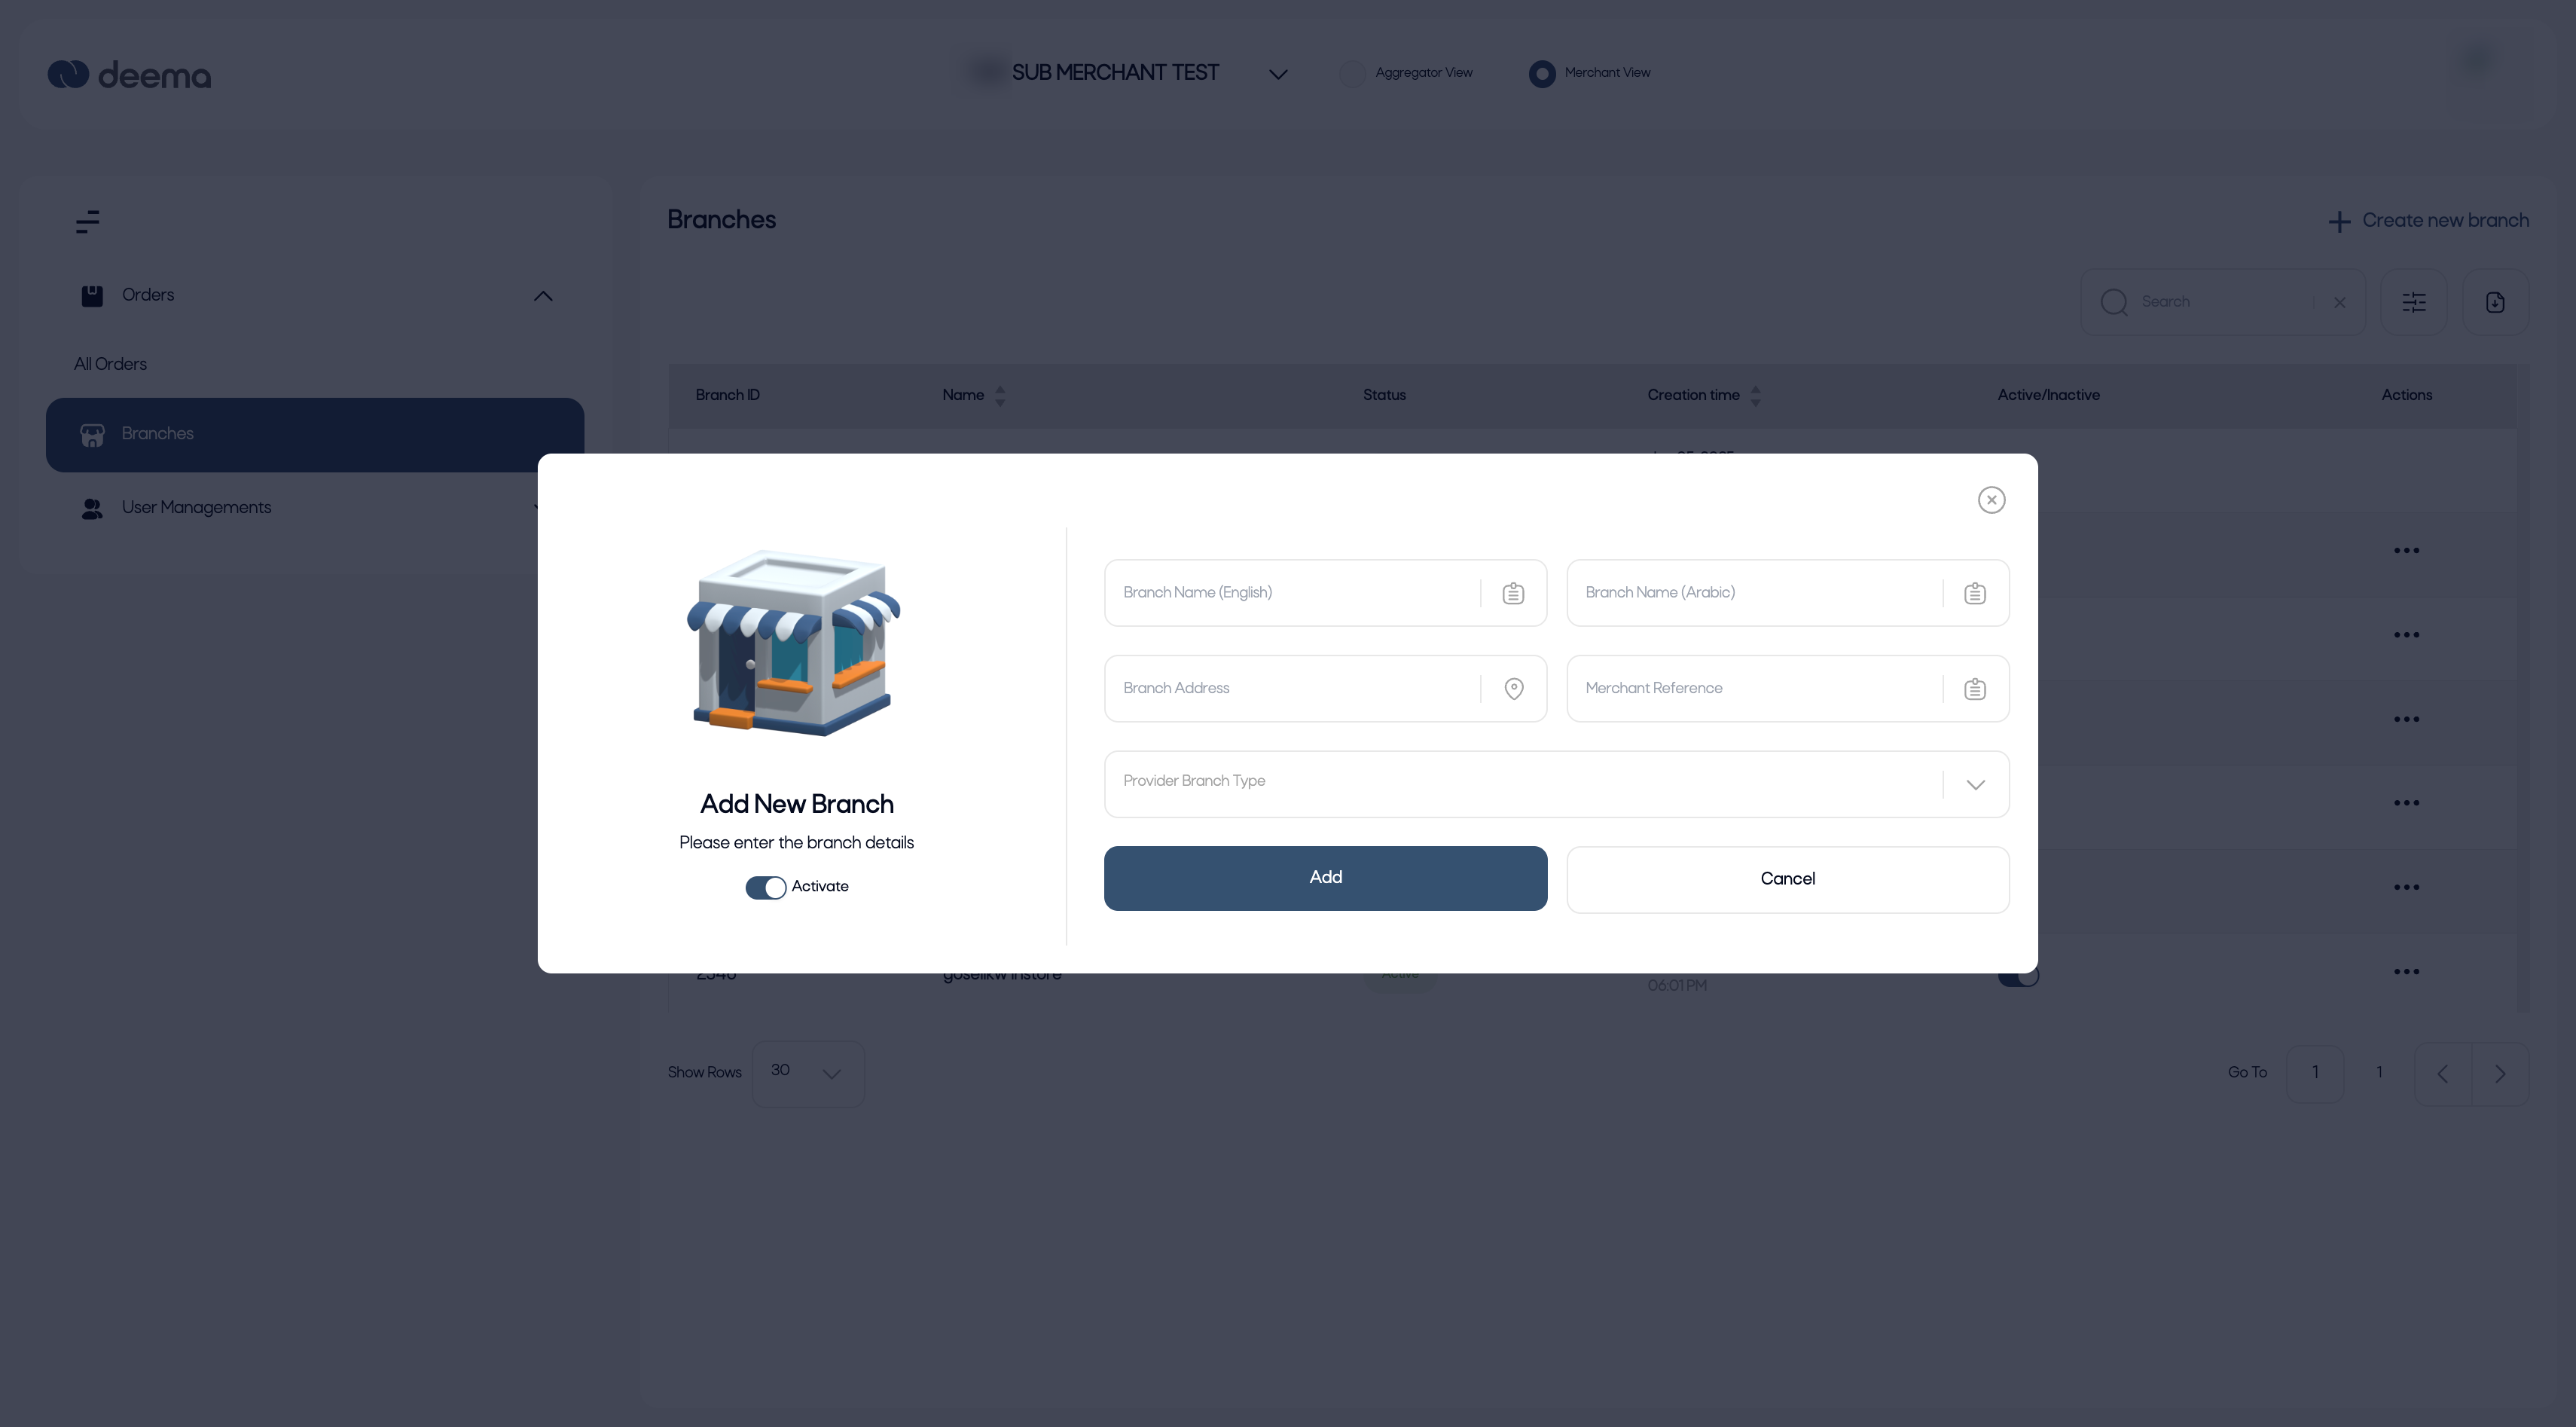
Create New Branch: The “+ Create new branch” button (top right) opens a form where tech providers can add a new branch for the selected sub-merchant. Each new branch must include essential information such as name, address, and operational type (e.g., In Store or Online).
Pagination and Display Controls: The page supports pagination and allows adjusting how many rows are visible at a time, providing flexibility for merchants with large branch networks.
The Branches page helps maintain accurate, up-to-date branch records and enables tech providers to control which locations are currently active for customer transactions.
Roles
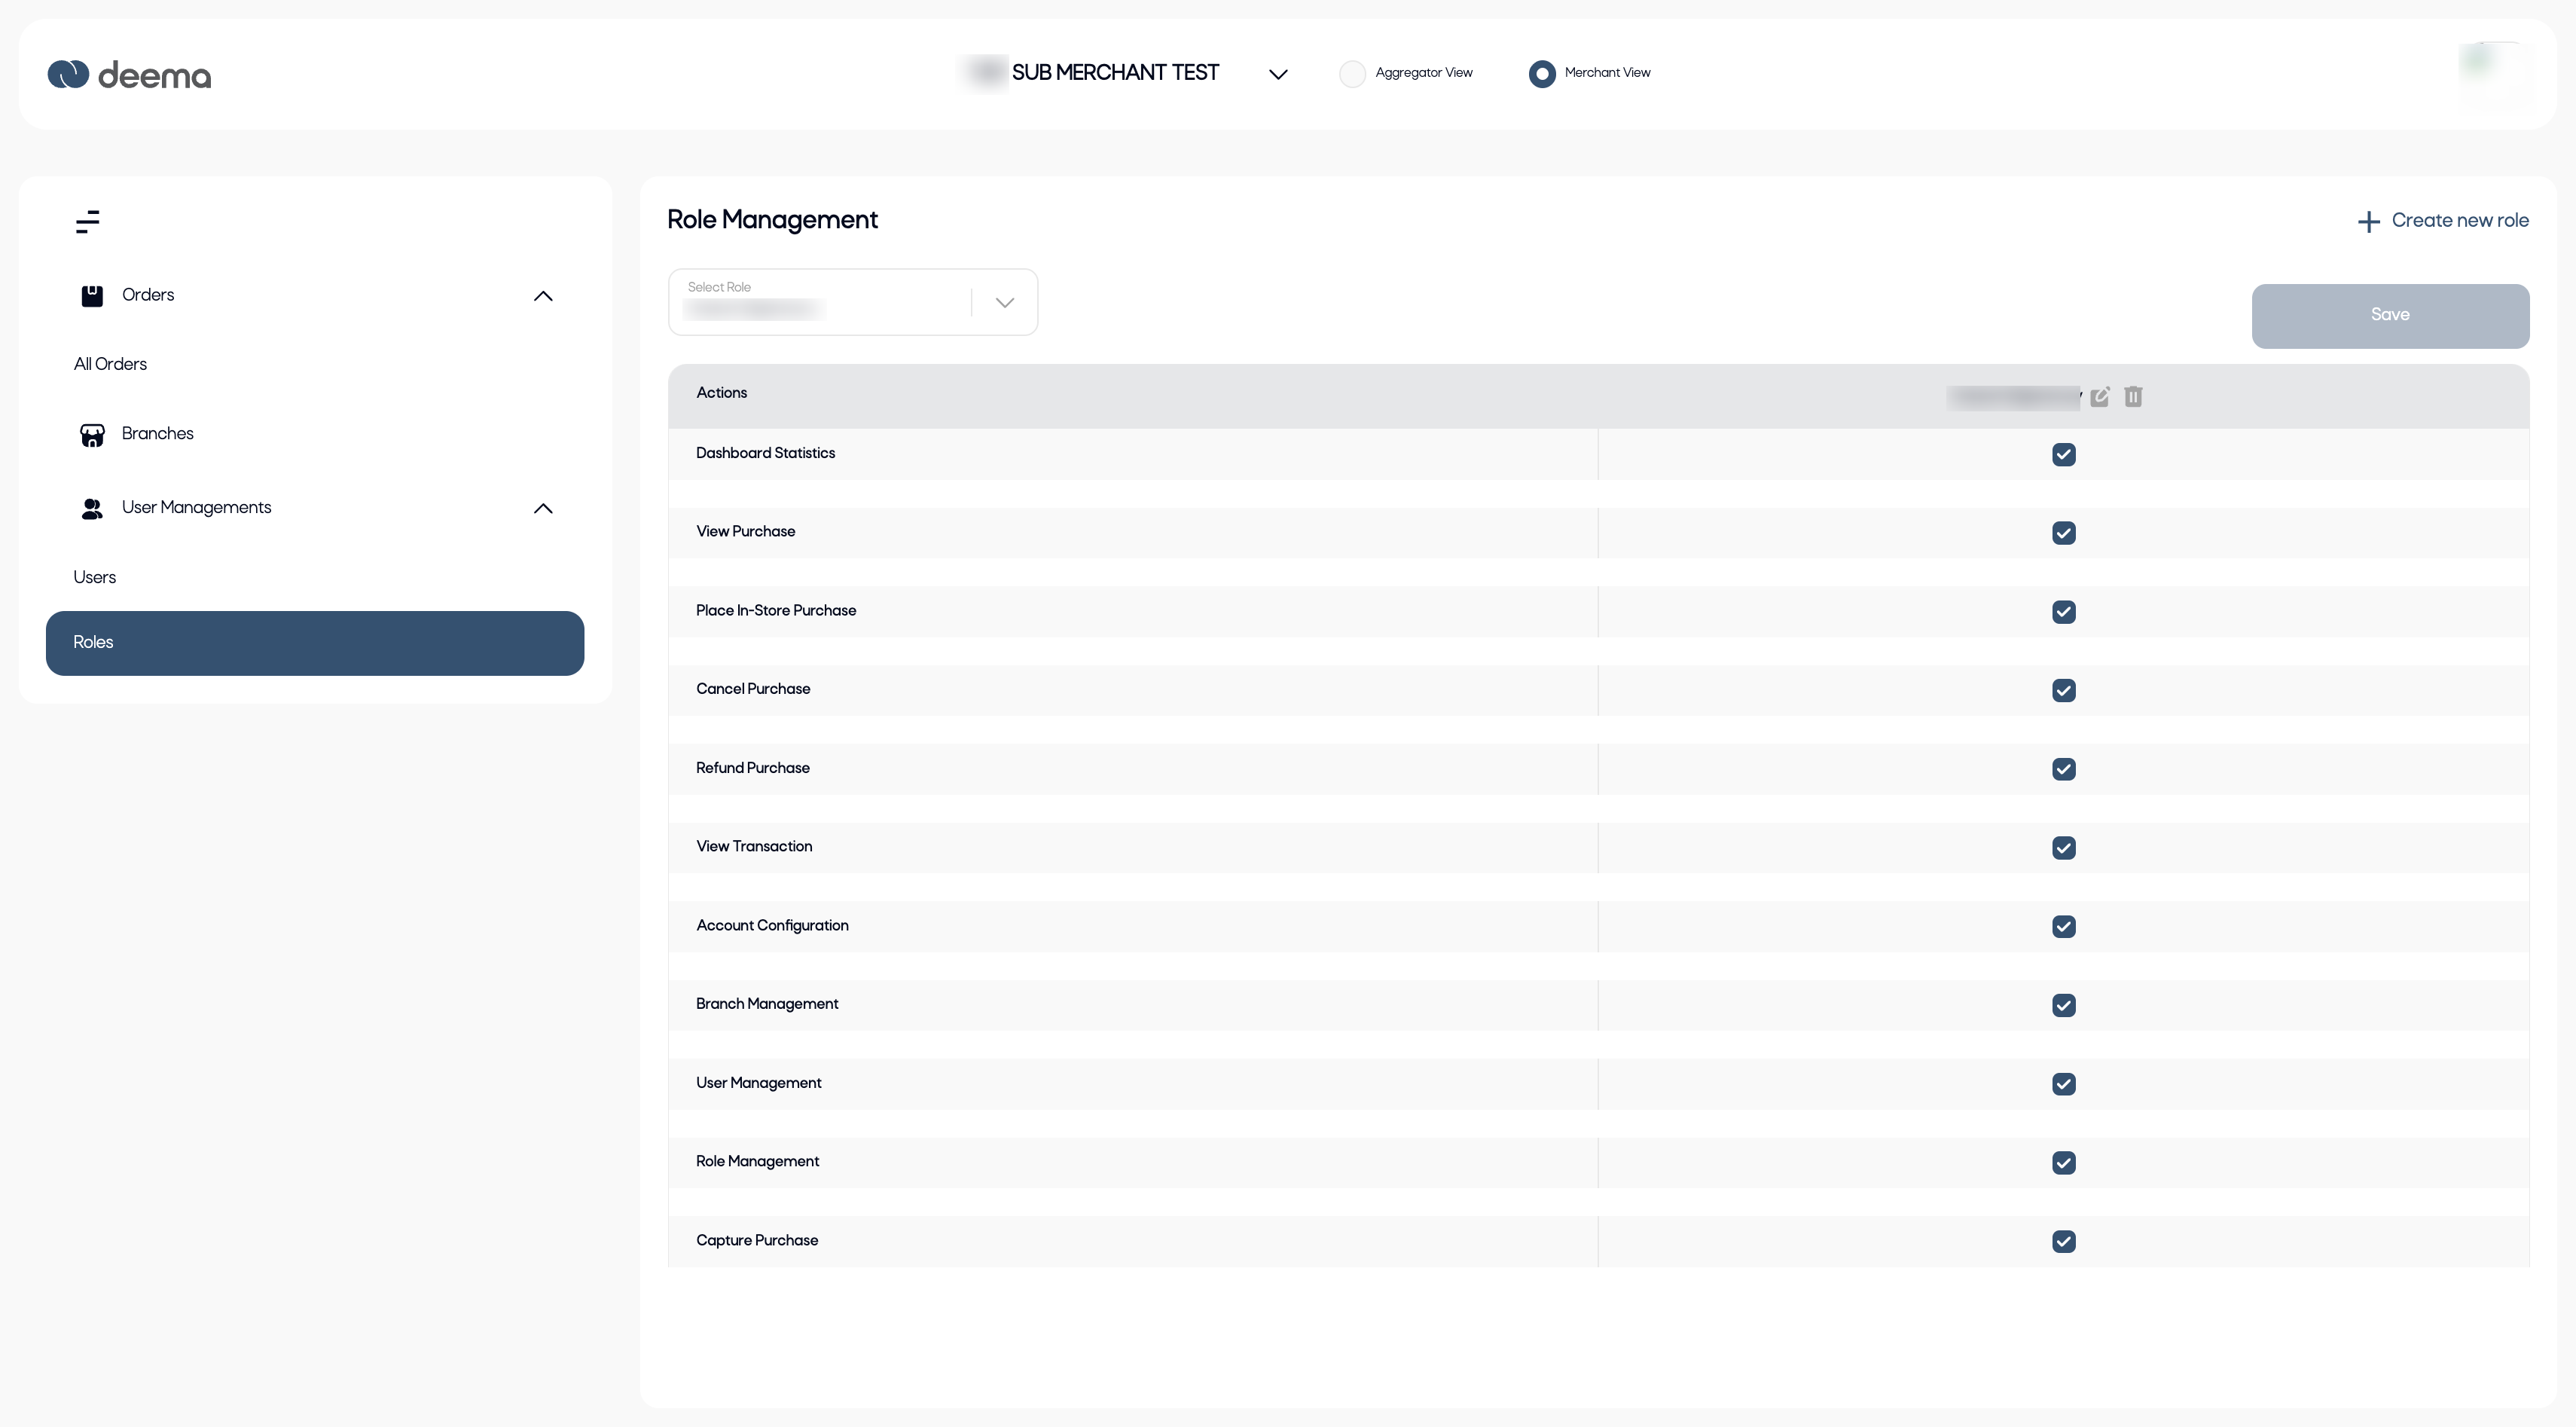
The Role Management page allows tech providers and sub-merchants to define and control user permissions within their account. It ensures that each user only has access to the features and data relevant to their role, maintaining both security and operational efficiency.
Key Features:
Select Role: At the top of the page, a dropdown menu lets you choose an existing role to view or edit its permissions.
Role Permissions Table: The table lists all available system actions, such as:
- Dashboard Statistics
- View Purchase / Place In-Store Purchase / Cancel Purchase / Refund Purchase
- View Transaction / Capture Purchase
- Account Configuration
- Branch Management
- User Management / Role Management
Each action has a checkbox to enable or disable permission for the selected role.
Create New Role: The “+ Create new role” button (top right) allows the creation of a new custom role. You can assign a name and define which permissions apply before saving it for future use.
Edit / Delete Role: Existing roles can be edited to modify permissions or deleted entirely if no longer needed.
Save Changes: Once permissions are configured, click Save to apply the updates immediately to all users assigned to that role.
This feature gives tech providers full control over access levels, ensuring that sensitive operations—such as refunds, account configuration, or financial actions—are restricted to authorized users only.
Users
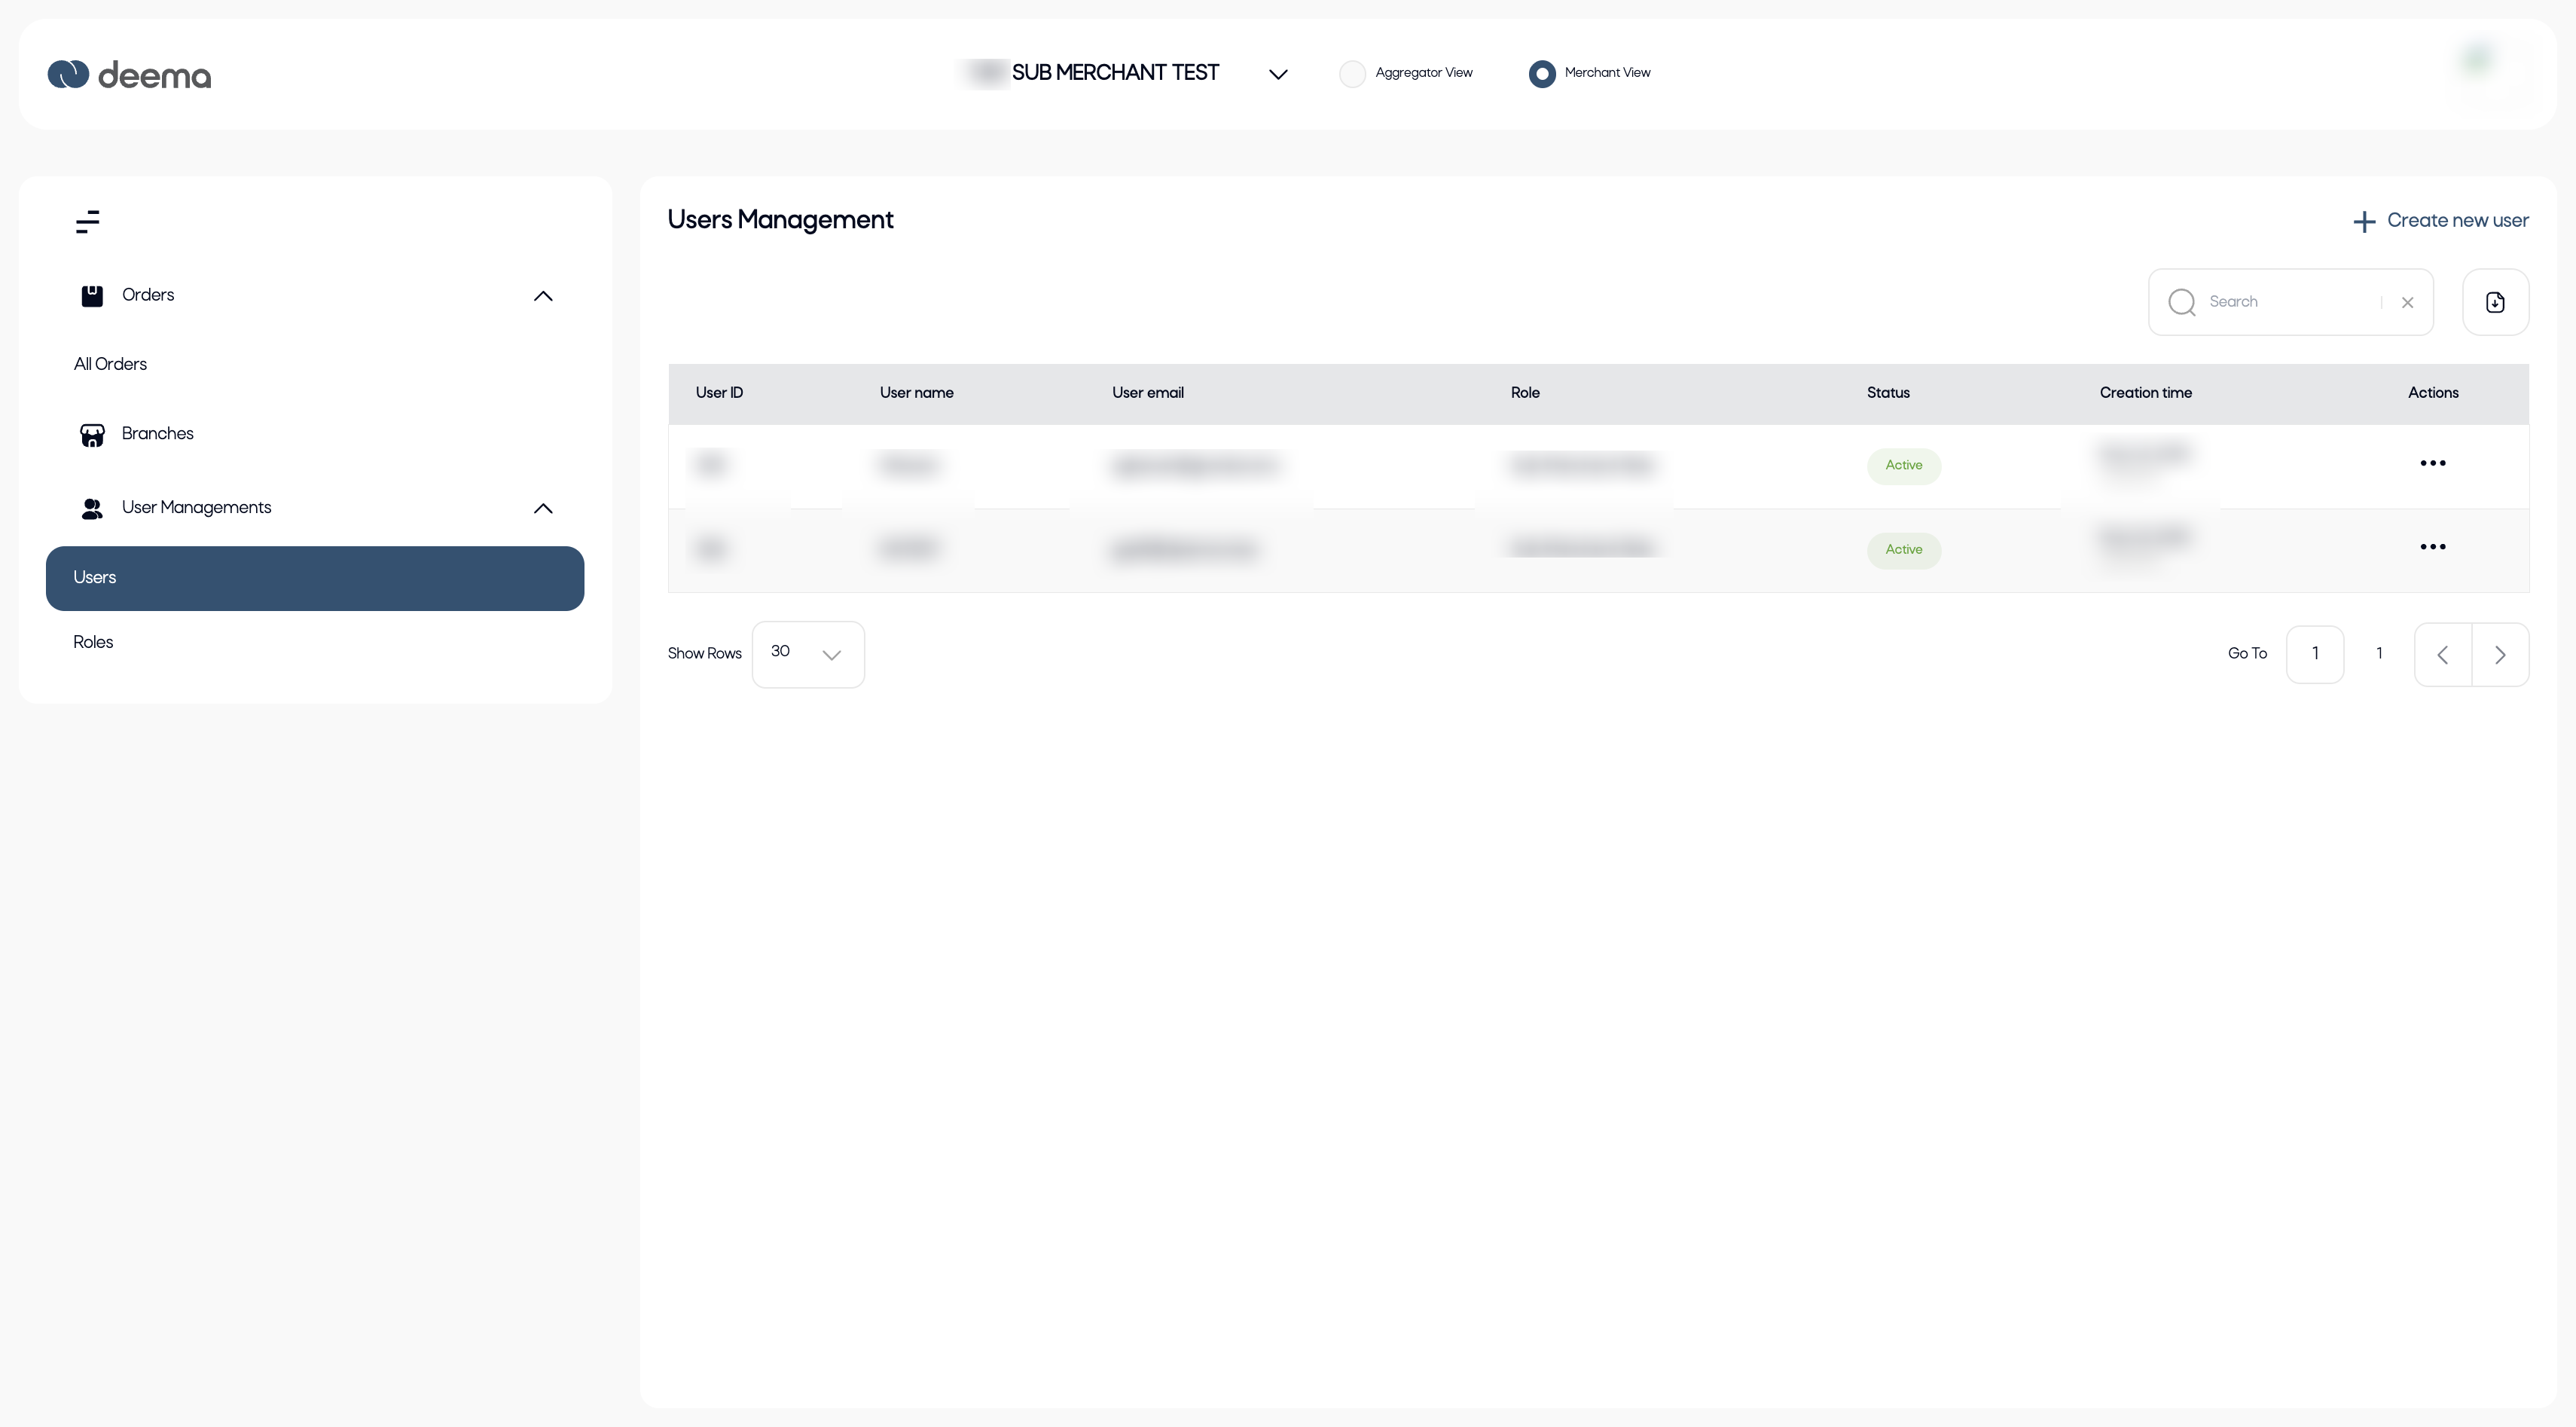
The Users Management page allows tech providers or sub-merchants to view, add, and manage user accounts within their organization. This ensures that the right people have access to the system with the appropriate permissions based on their assigned roles.
Key Features:
Users Table Overview: Each row in the table represents a user account and includes:
- **User ID **– A unique identifier assigned to each user.
- User Name – The name of the account holder.
- User Email – The email address used for login and communication.
- Role – The assigned role that determines the user’s permissions (defined in Role Management).
- Status – Displays whether the user is Active or Inactive.
- Creation Time – Indicates when the user account was created.
- Actions – The (⋯) menu allows administrators to edit or deactivate the user account.
Create New User: The “+ Create new user” button at the top right allows tech providers to onboard new users. When adding a user, you’ll need to:
- Enter the user’s name and email address.
- Assign a predefined role.
- Select a branch.
- Set the account status (Active/Inactive).
Search and Filter: Use the search bar to quickly locate a user by name, email, or role.
Pagination and Display Options: Control how many user records appear on the screen at a time for easier navigation.
The Users Management page provides a secure and organized way to handle user access, ensuring every team member has the right level of control and visibility within the deema platform.
Profile - Change Password
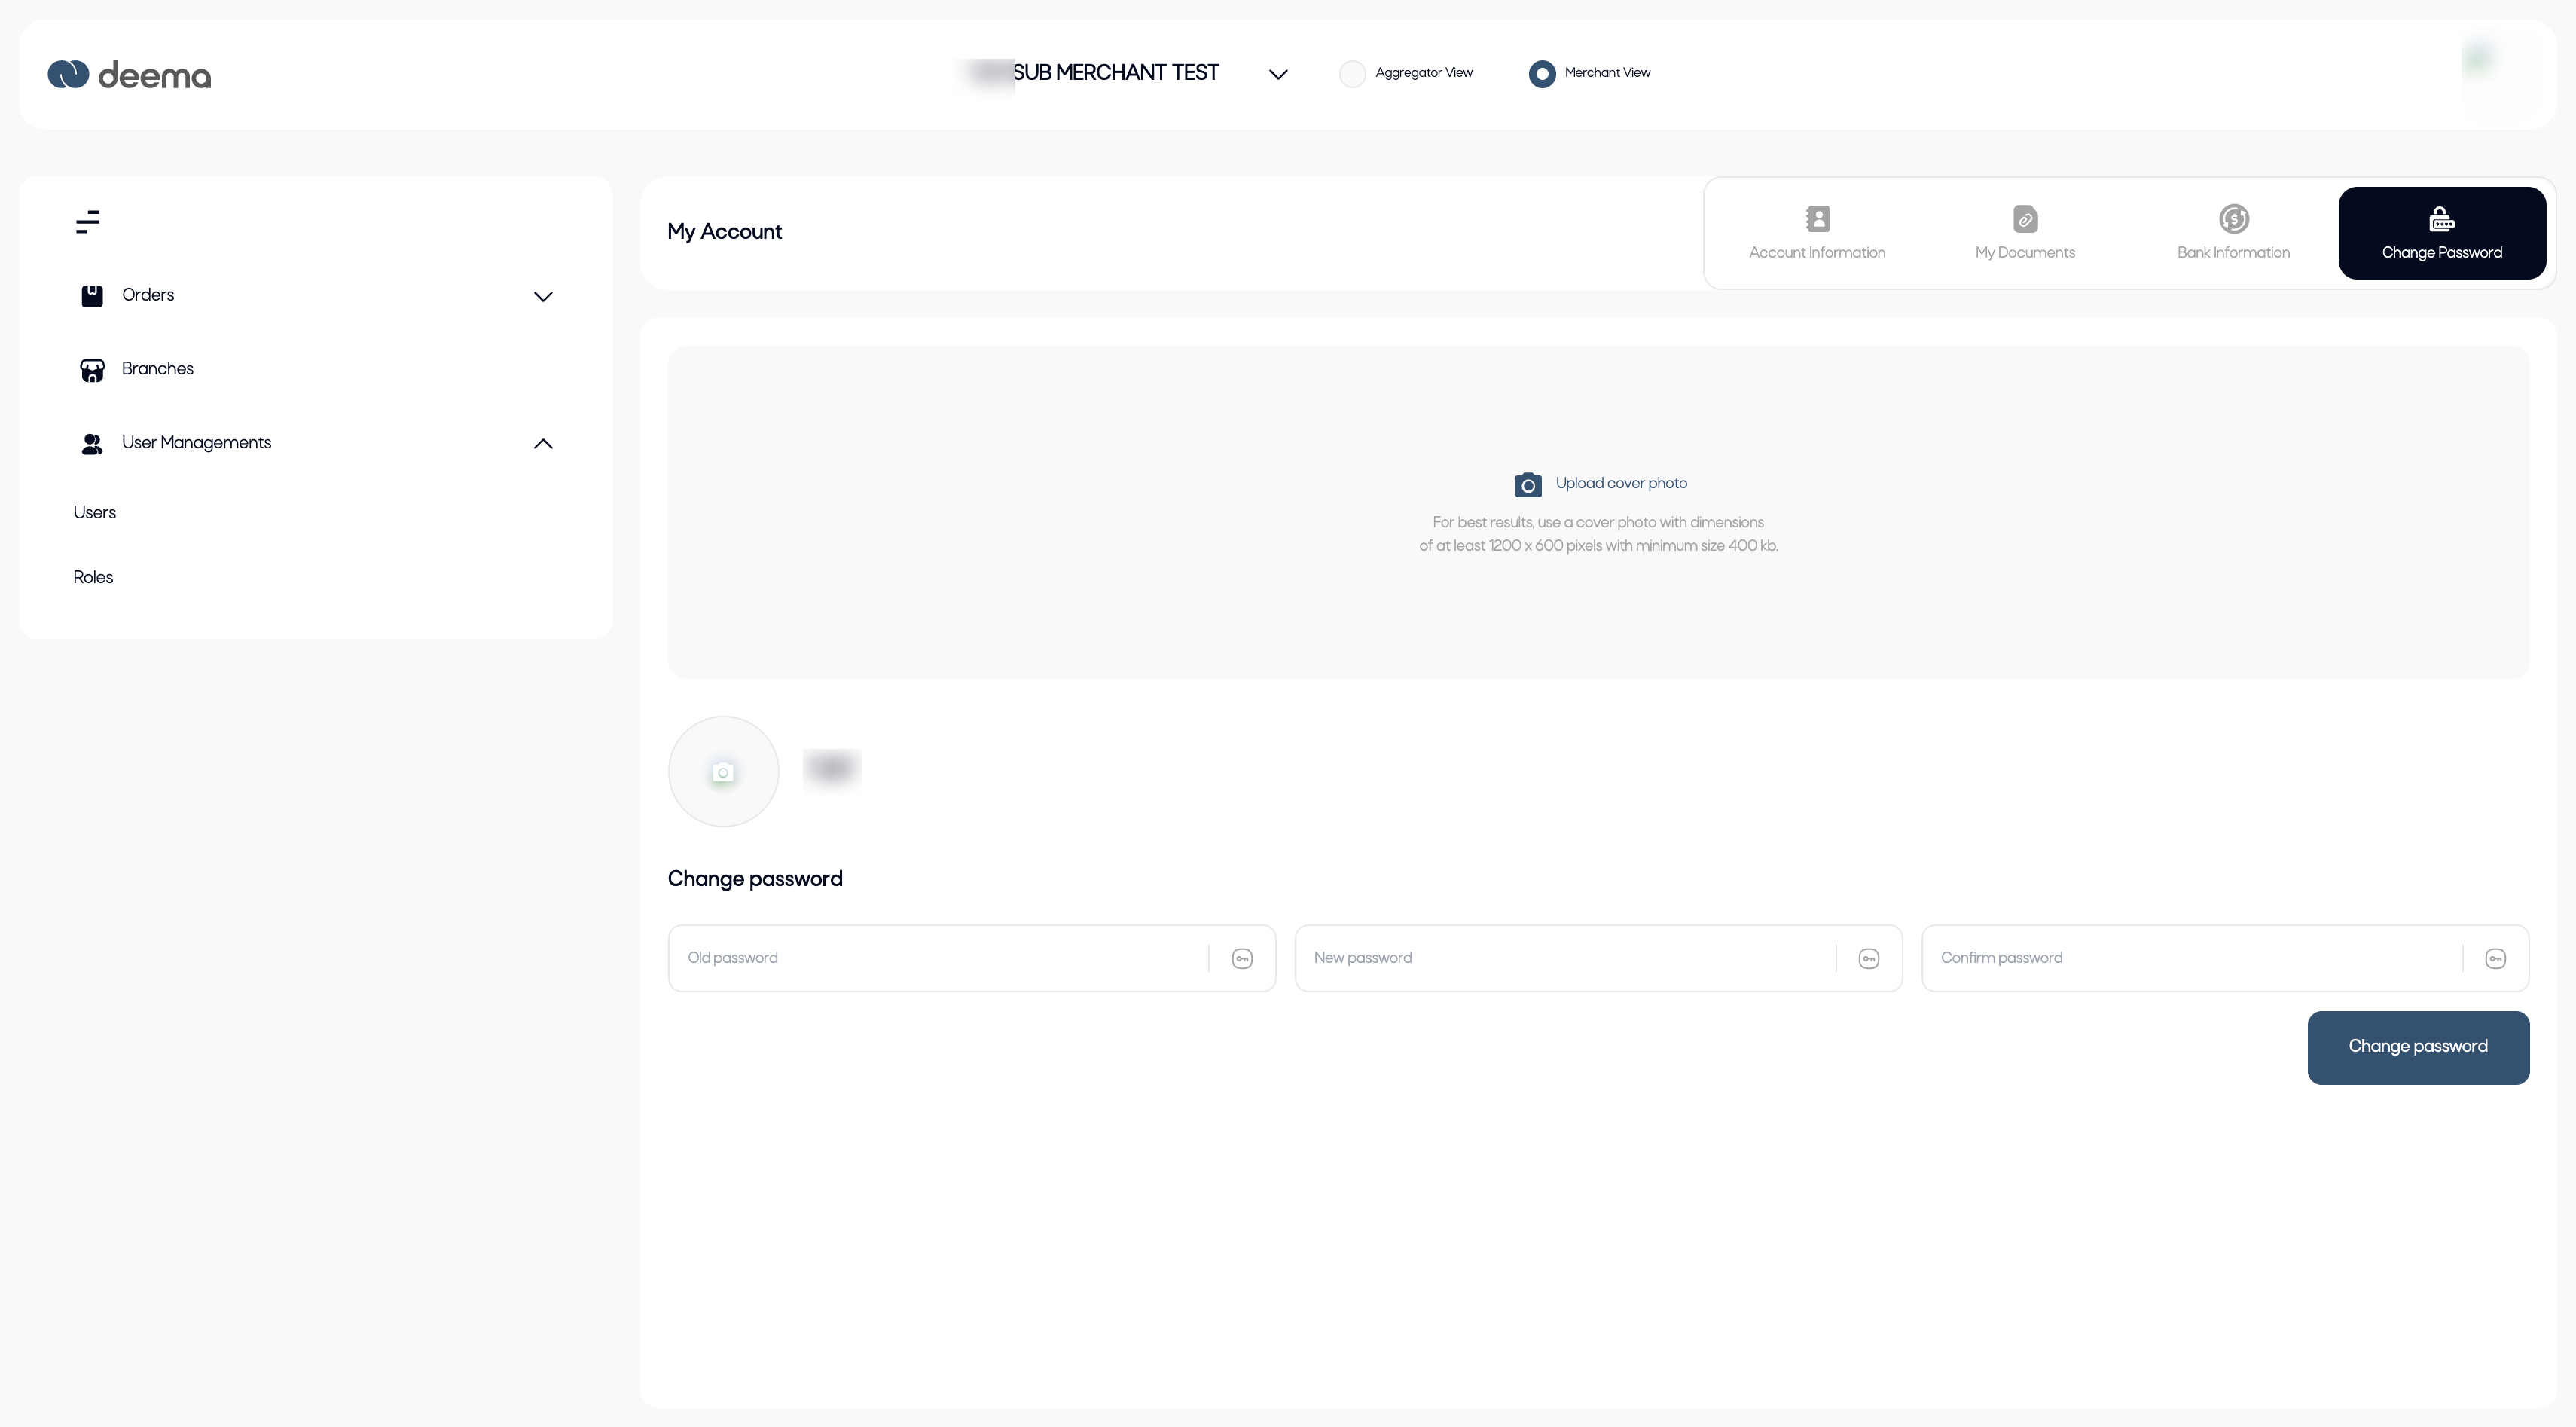
The Change Password section under My Account allows tech providers to securely update their login credentials for accessing the deema platform. This feature helps maintain account security and ensure that only authorized users can log in.
Accessing the Change Password Section
From the main sidebar, click on your profile icon and select My Account. Then, open the Change Password tab located at the top of the page.
How to Change Your Password:
- In the Old Password field, enter your current password.
- In the New Password field, enter your new password.
- Re-enter the new password in the Confirm Password field.
Click Change Password to save the update.
Once saved, your password will be updated immediately. You will need to use the new password the next time you log in to your account.
Tip: For better security, choose a strong password that includes uppercase and lowercase letters, numbers, and special characters.