Partner portal
This user guide provides an overview of the Deema Partner Portal, designed to help merchants efficiently manage their business operations within the Deema platform.
Introduction
This user guide provides an overview of the Deema Merchant Portal, designed to help merchants efficiently manage their business operations within the Deema platform.
It covers all key features — from onboarding and document submission to placing orders, viewing settlements, tracking orders, and monitoring settlements.
The guide aims to help merchants understand how to use the portal effectively, ensure compliance, and maintain a smooth experience for their customers.
How to use
Merchant Onboarding
The merchant registration and onboarding process in Deema Merchant Portal is designed to ensure a smooth and compliant setup for new merchants.
It consists of three main steps:
- Registration – The merchant creates an account using their business email, verifies it with an OTP, and sets a secure password.
- Onboarding V1 (Basic Information) – The merchant provides essential business details, including legal name, contact information, and business type.
- Onboarding V2 (Documents and Financial Information) – The merchant uploads required documents (licenses, IDs, ownership proofs) and enters settlement and banking details.
This process ensures that every merchant is verified and ready to operate securely on the Deema platform.
Step 1: Registration
The registration process allows new merchants to create their Deema account securely using three simple steps:
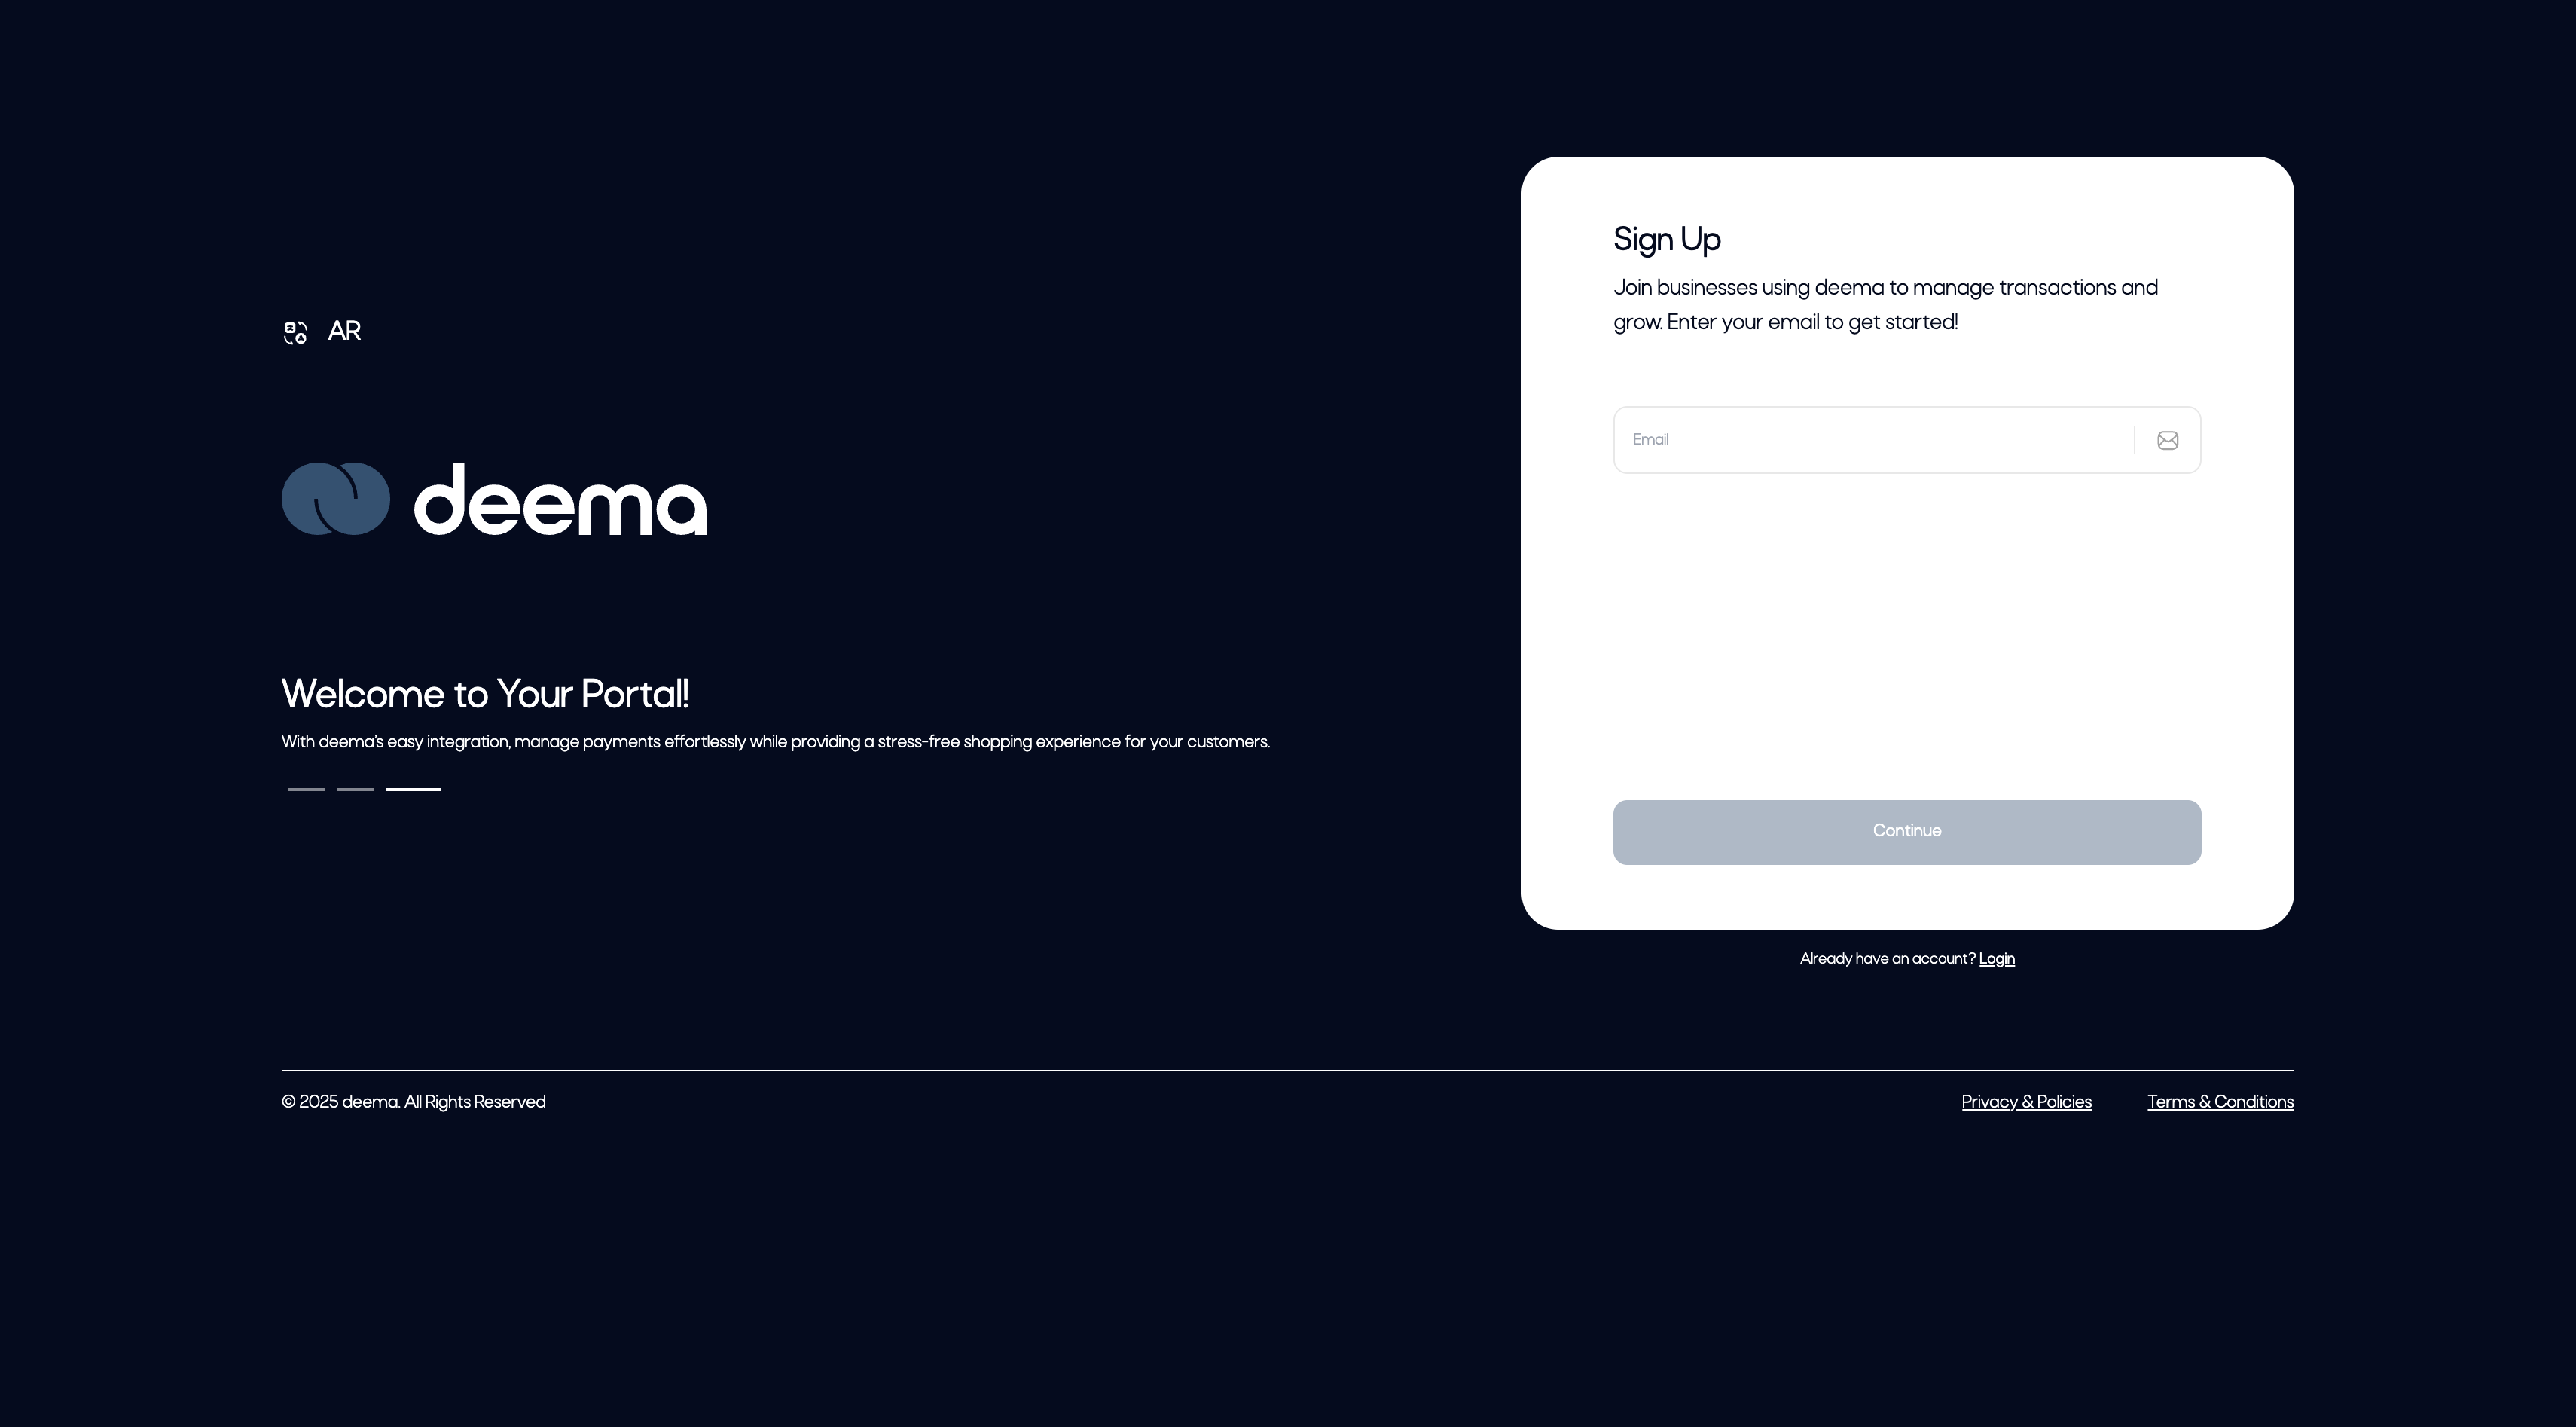
1. Enter Your Business Email
- On the Sign Up page, enter your business email address.
- Click Continue to proceed.
- This email will be used for login and all communication related to your Deema account.
Tip: Make sure to use an active business email, as it will be verified immediately.
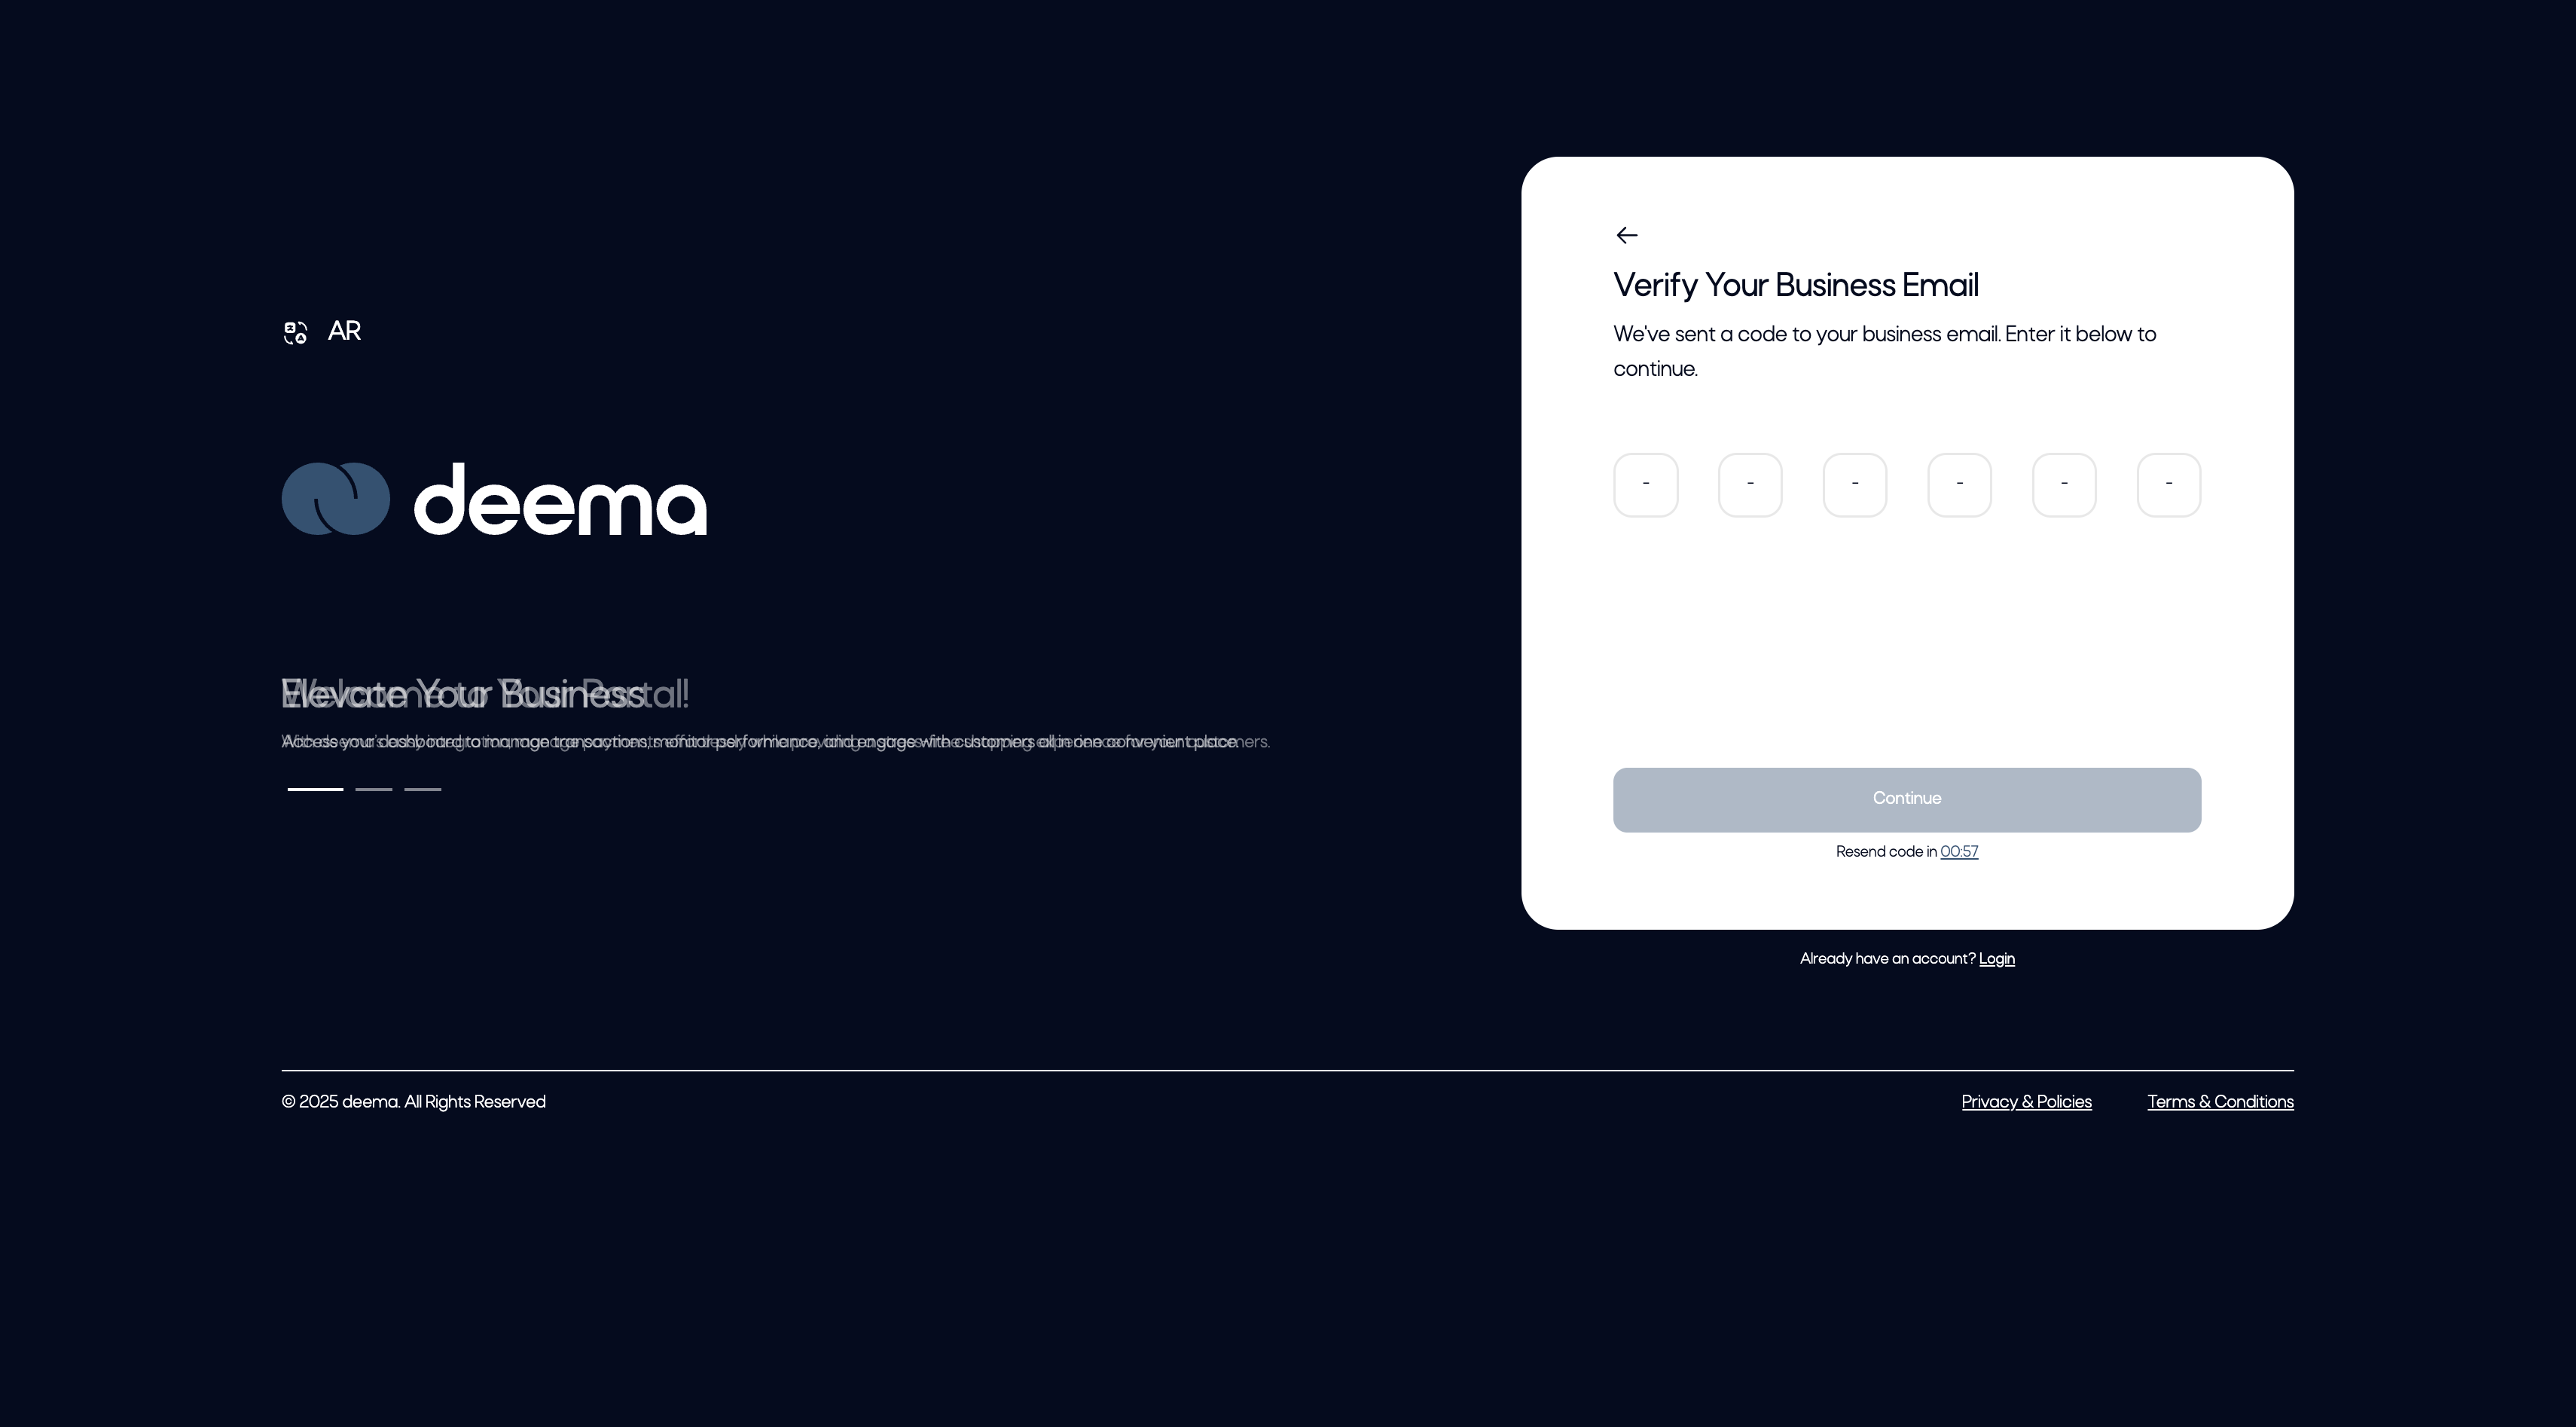
2. Verify Your Business Email
- A 6-digit verification code (OTP) will be sent to your email.
- Enter the code in the verification fields and click Continue.
- If you don’t receive the code, click Resend Code after the timer ends.
Note: The code expires after a short time for security purposes.
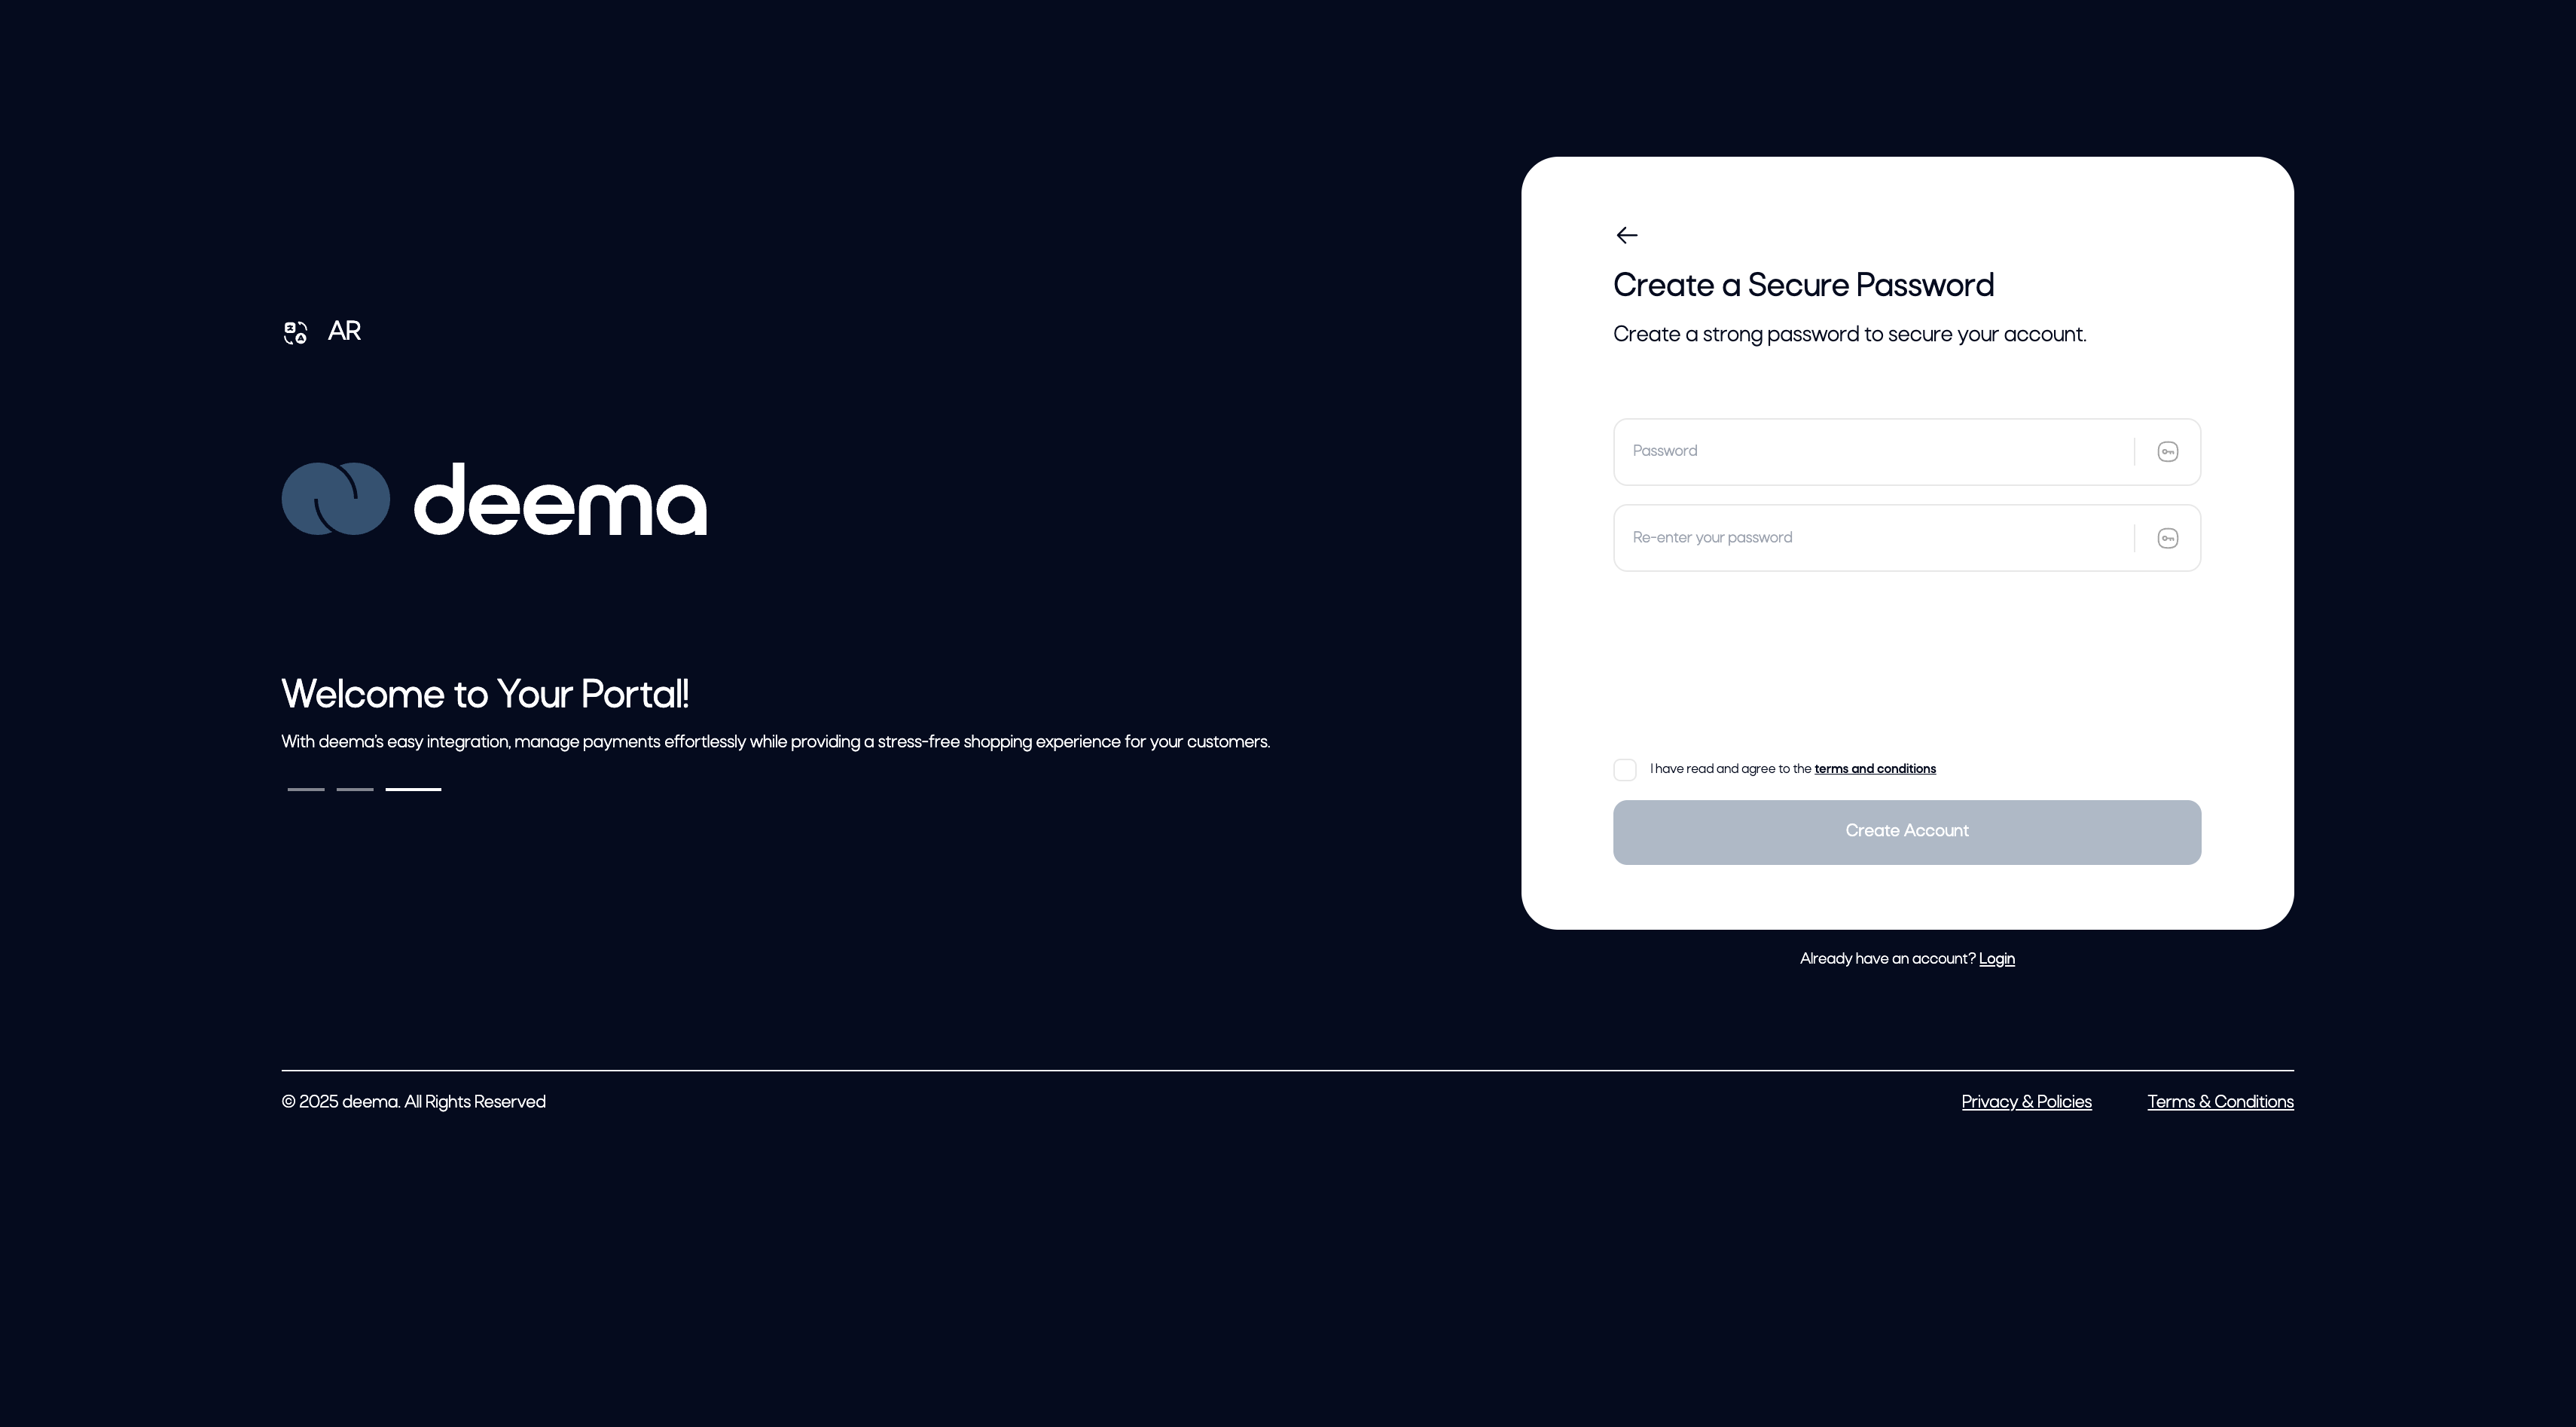
3. Create a Secure Password
- After verifying your email, you’ll be asked to create a password.
- Enter and confirm your password, then agree to the Terms & Conditions to complete registration.
- Click Create Account to finish.
Once registration is complete, you’ll be redirected to the Onboarding V1 screen to start entering your business information.
Onboarding V1 – Business Information
After successfully registering, merchants will proceed to the first onboarding phase, where they provide basic business details.
This step helps the Deema team verify your business and customize your merchant experience.
The onboarding consists of four simple steps:
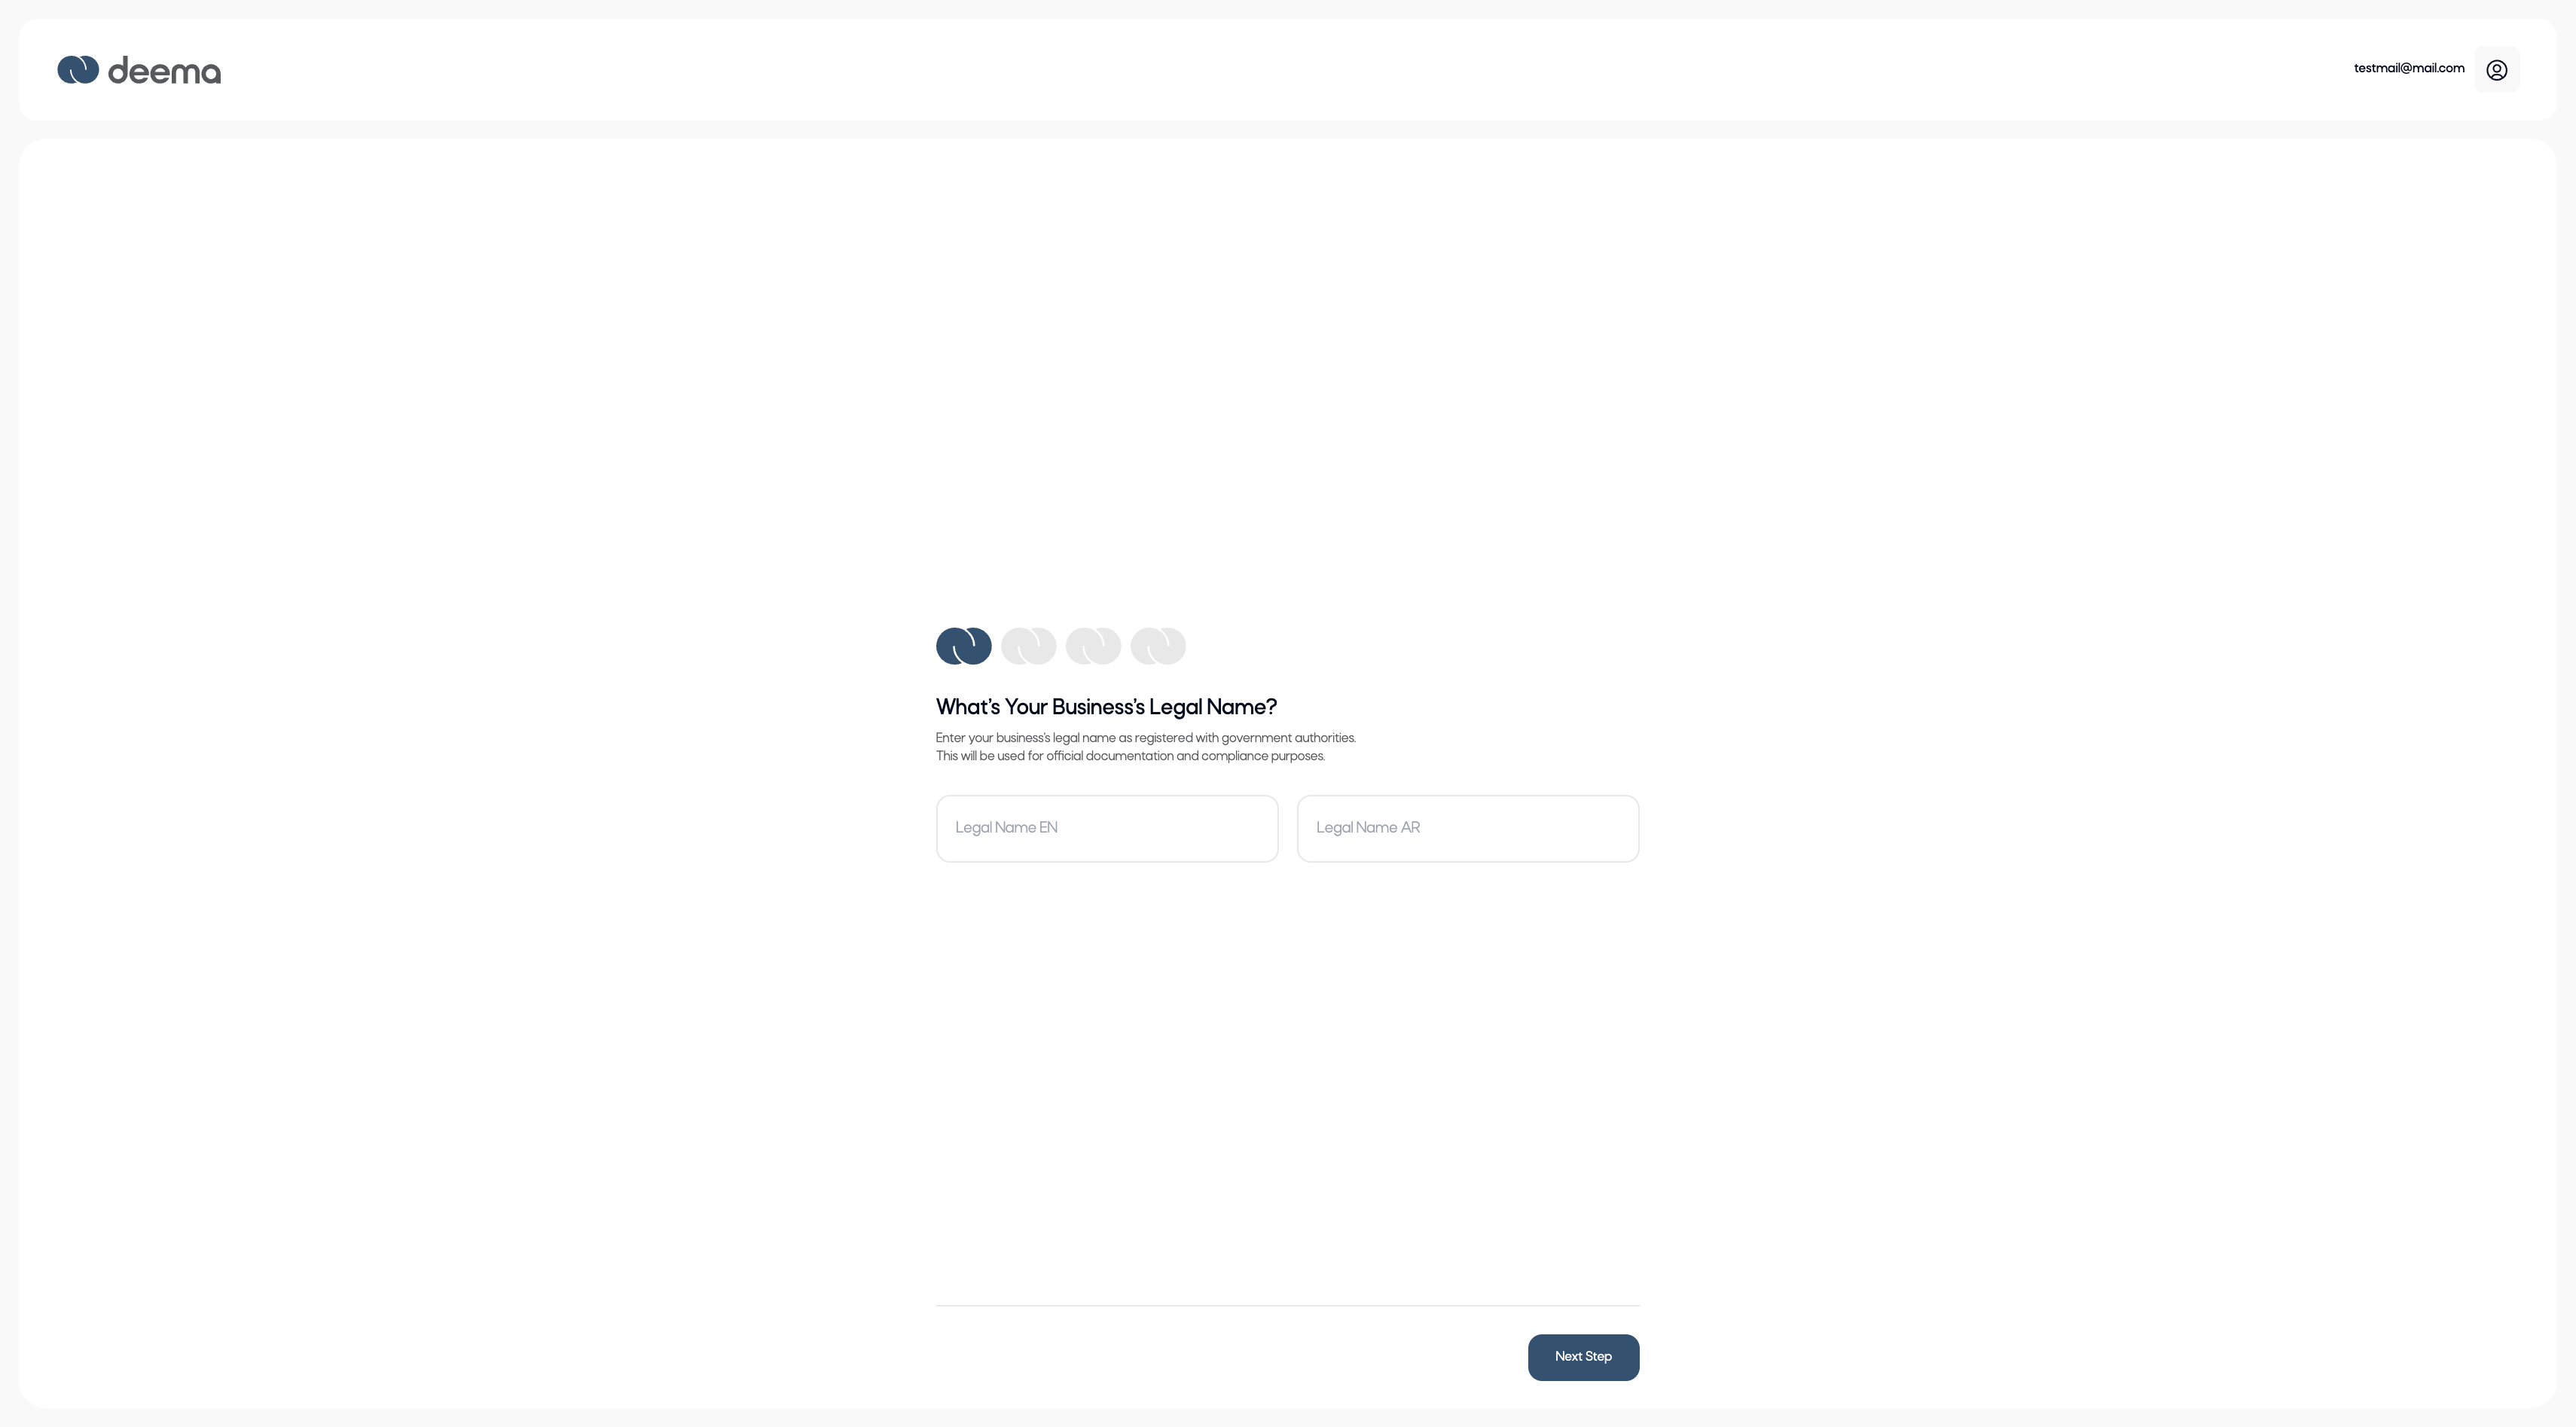
Step 1: Enter Your Business Legal Name
- Enter your Business Legal Name as it appears on your official registration documents.
- Fill in both fields:
- Legal Name (EN) – in English
- Legal Name (AR) – in Arabic
- This name will be used for compliance and all official documentation.
Click Next Step to continue.
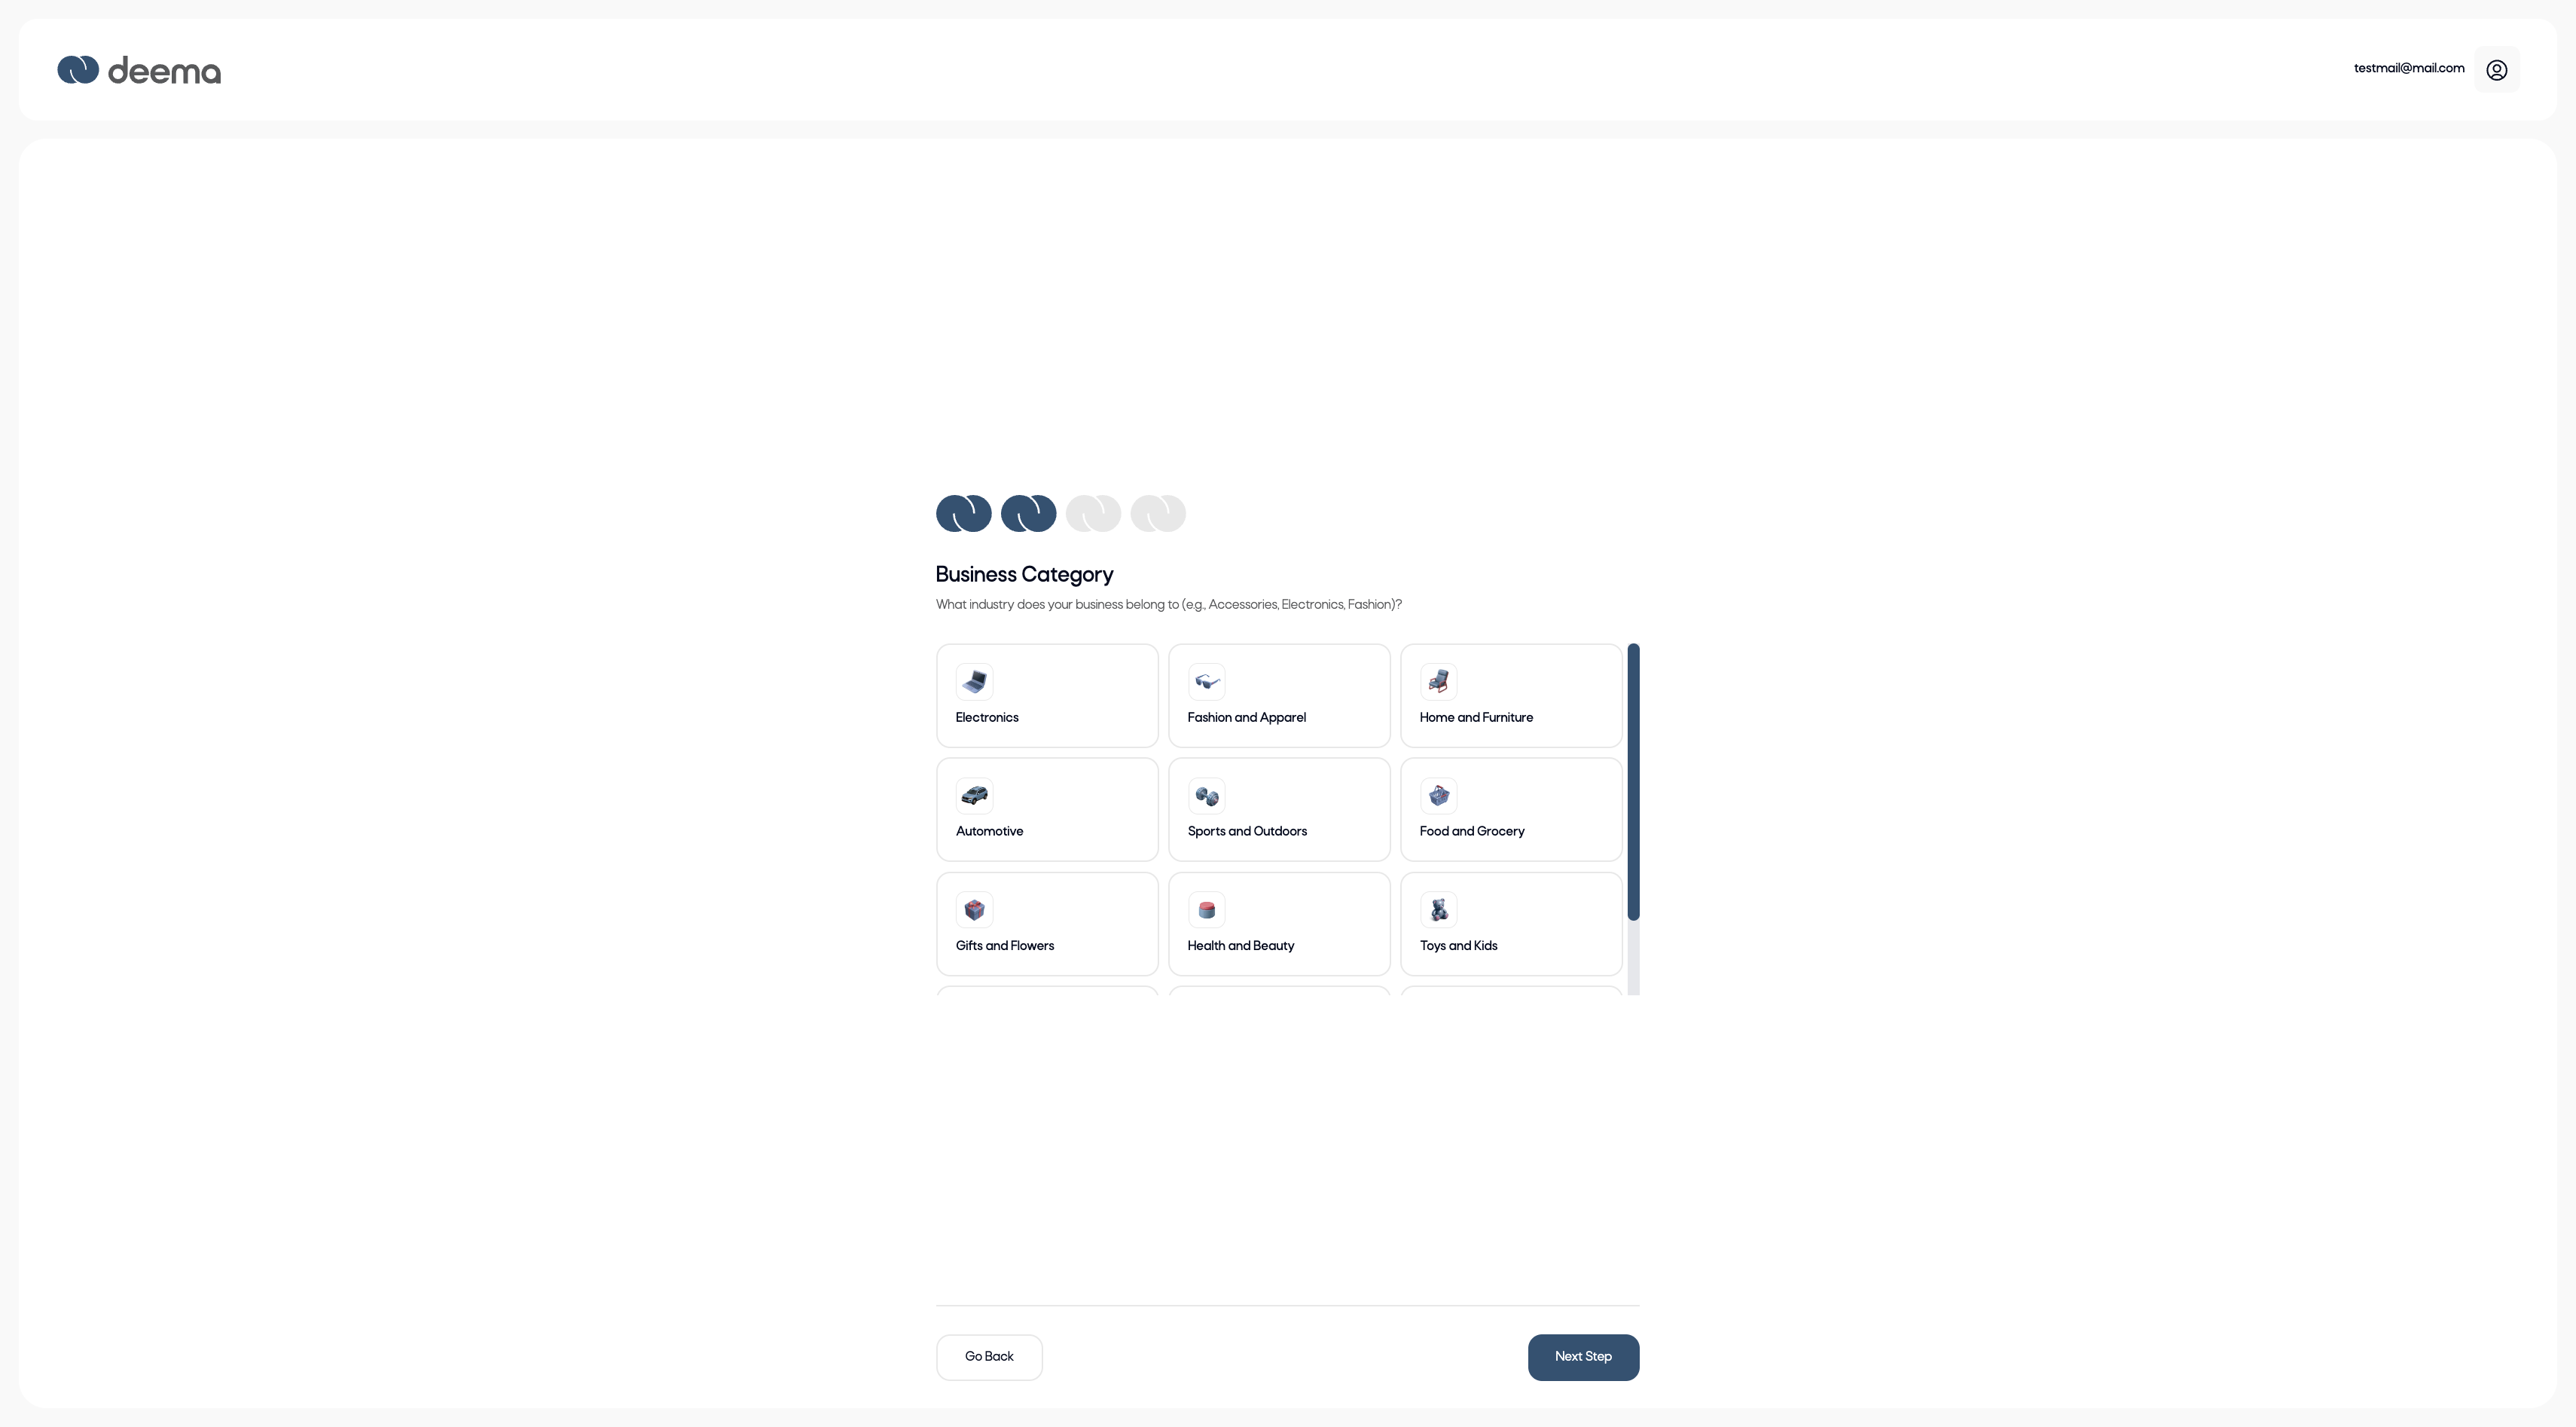
Step 2: Select Your Business Category
- Choose the industry your business belongs to (e.g., Electronics, Fashion, Home & Furniture, Food & Grocery, etc.).
- You may scroll through the available categories to find the most suitable one.
- This helps Deema understand your sector and assign relevant risk and compliance criteria.
Click Next Step to move forward.
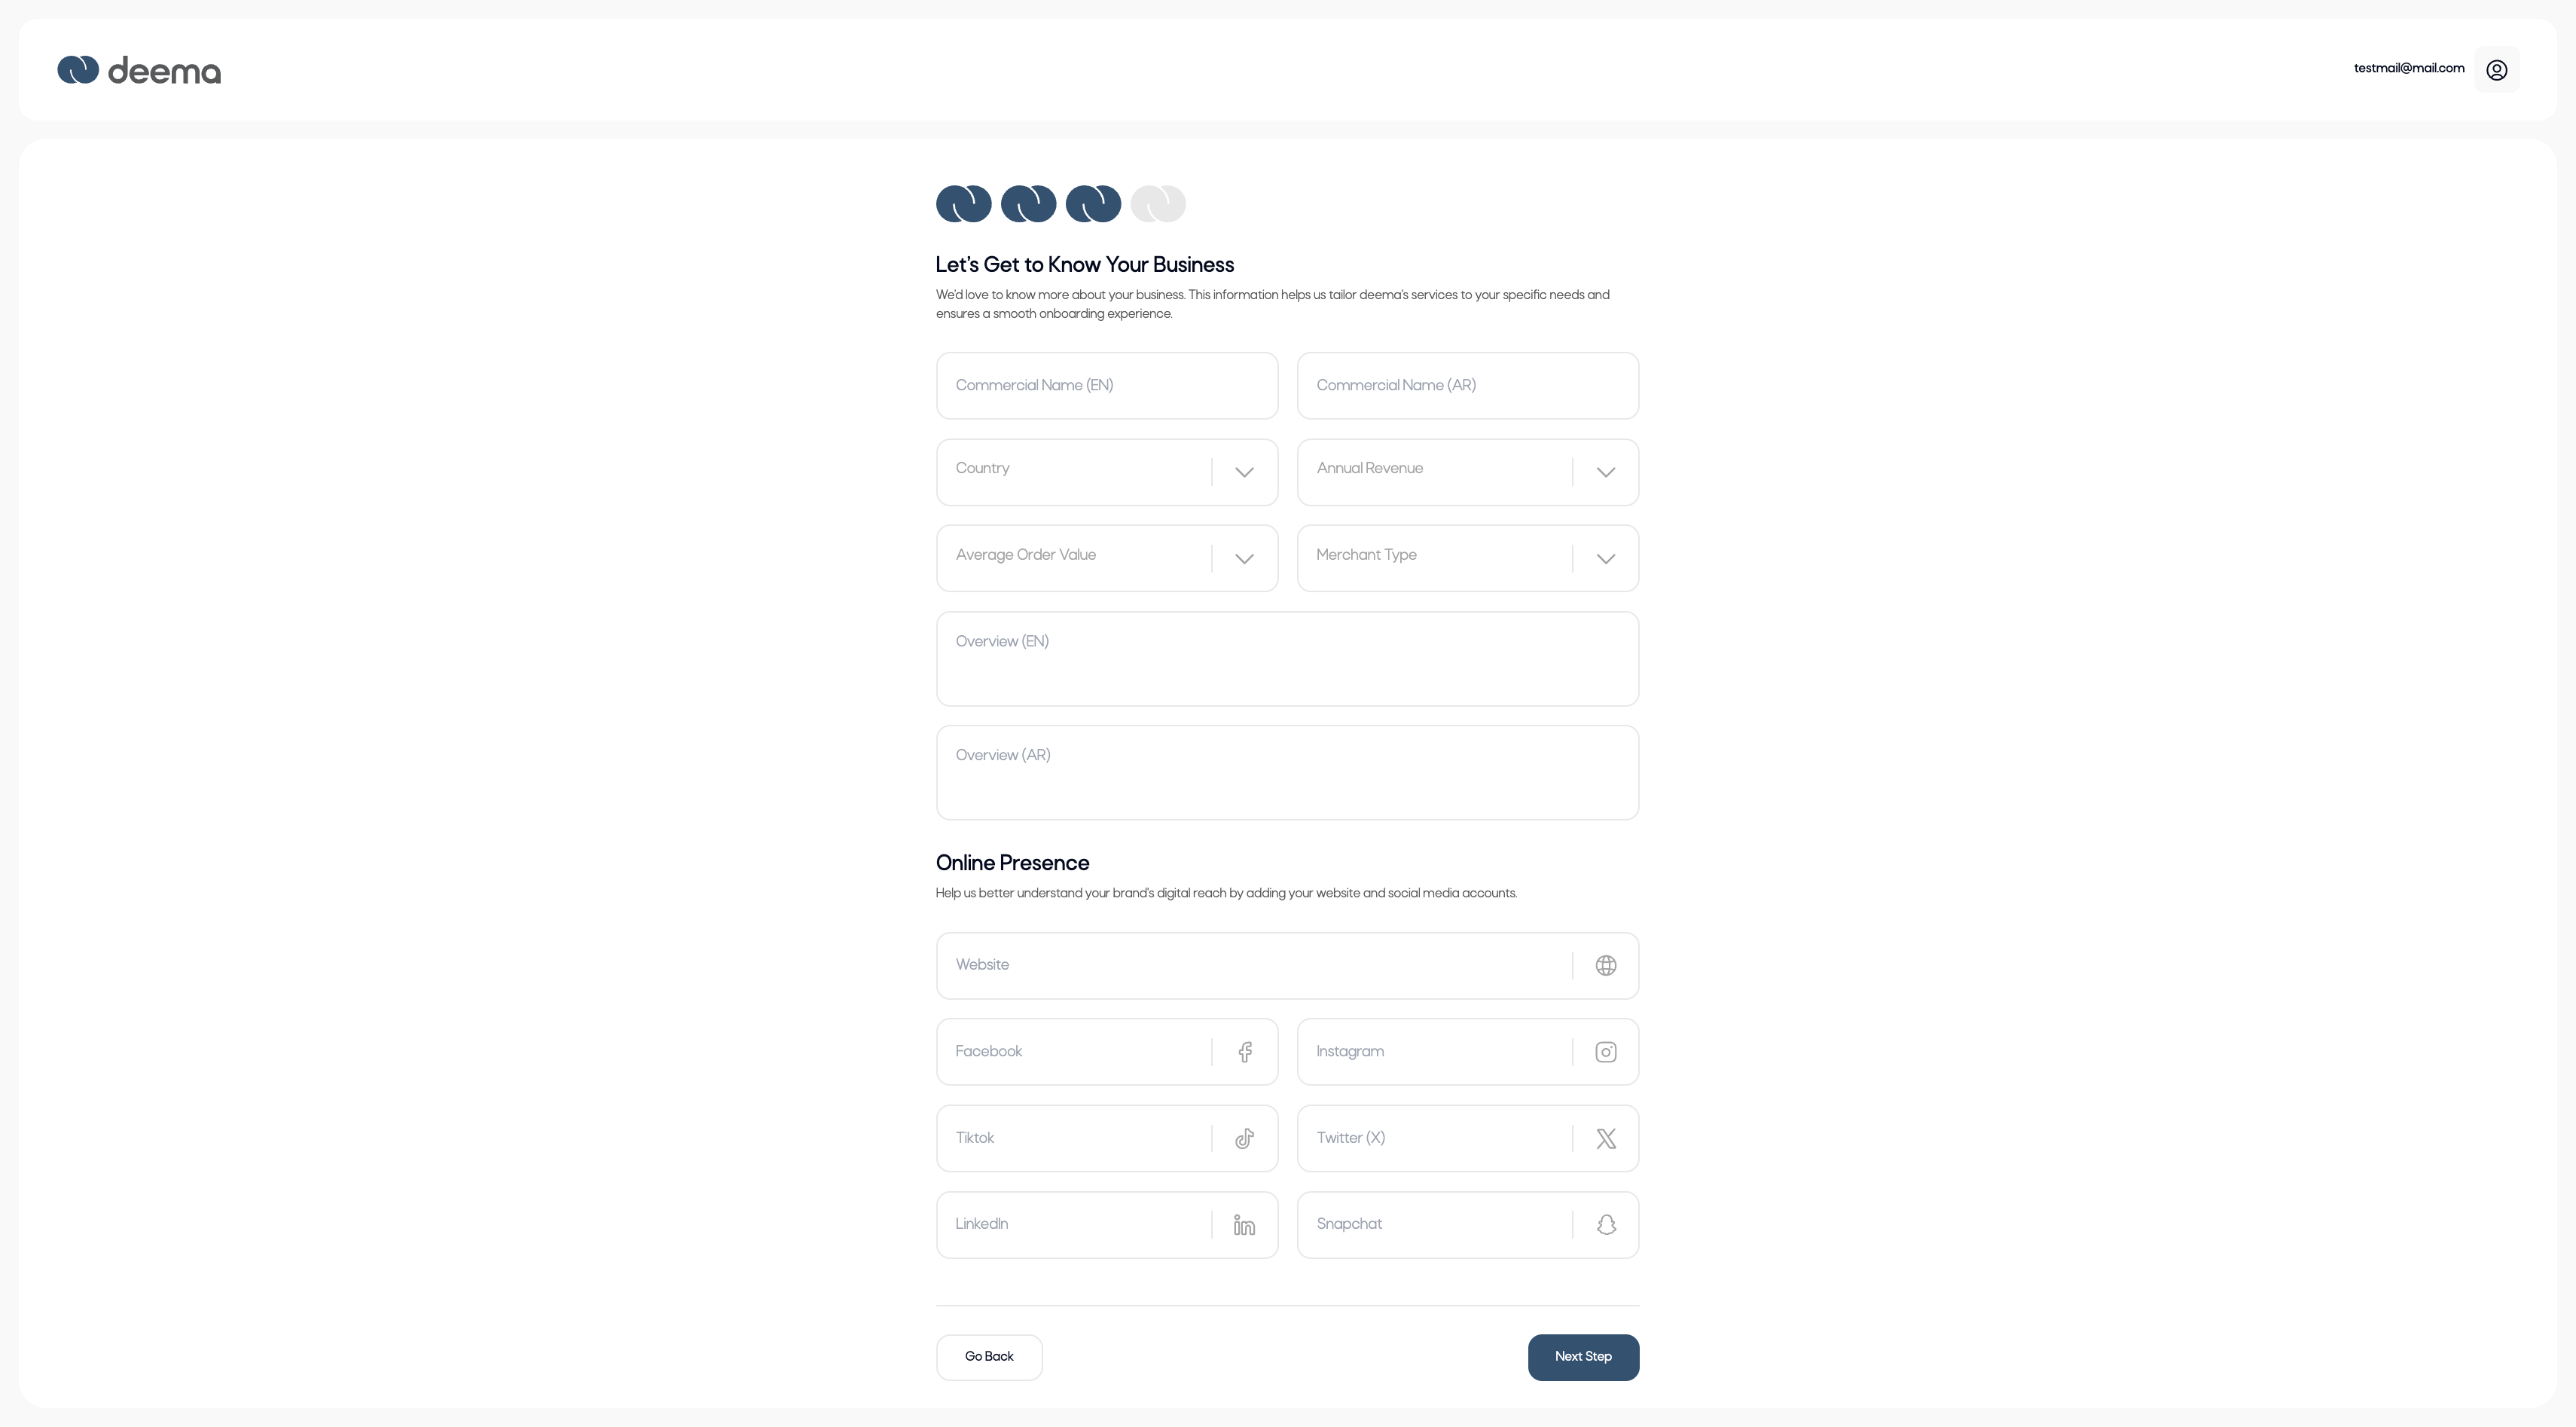
Step 3: Enter Business Details
This step captures detailed information about your business.
Fields include:
- Commercial Name (EN / AR) – Your business trading name as seen by customers.
- Country – Select the country where your business is registered.
- Annual Revenue – Choose the approximate annual revenue range.
- Average Order Value – Select the average value of customer orders.
- Merchant Type – Choose between:
- In-Store
- Online
- Both
If the merchant selects Online or Both, a Website field will appear (mandatory in this case).
Online Presence (optional):
You may also add your brand’s social media links (Facebook, Instagram, TikTok, Twitter/X, LinkedIn, Snapchat) to help the Deema team understand your digital footprint.
Click Next Step to proceed.
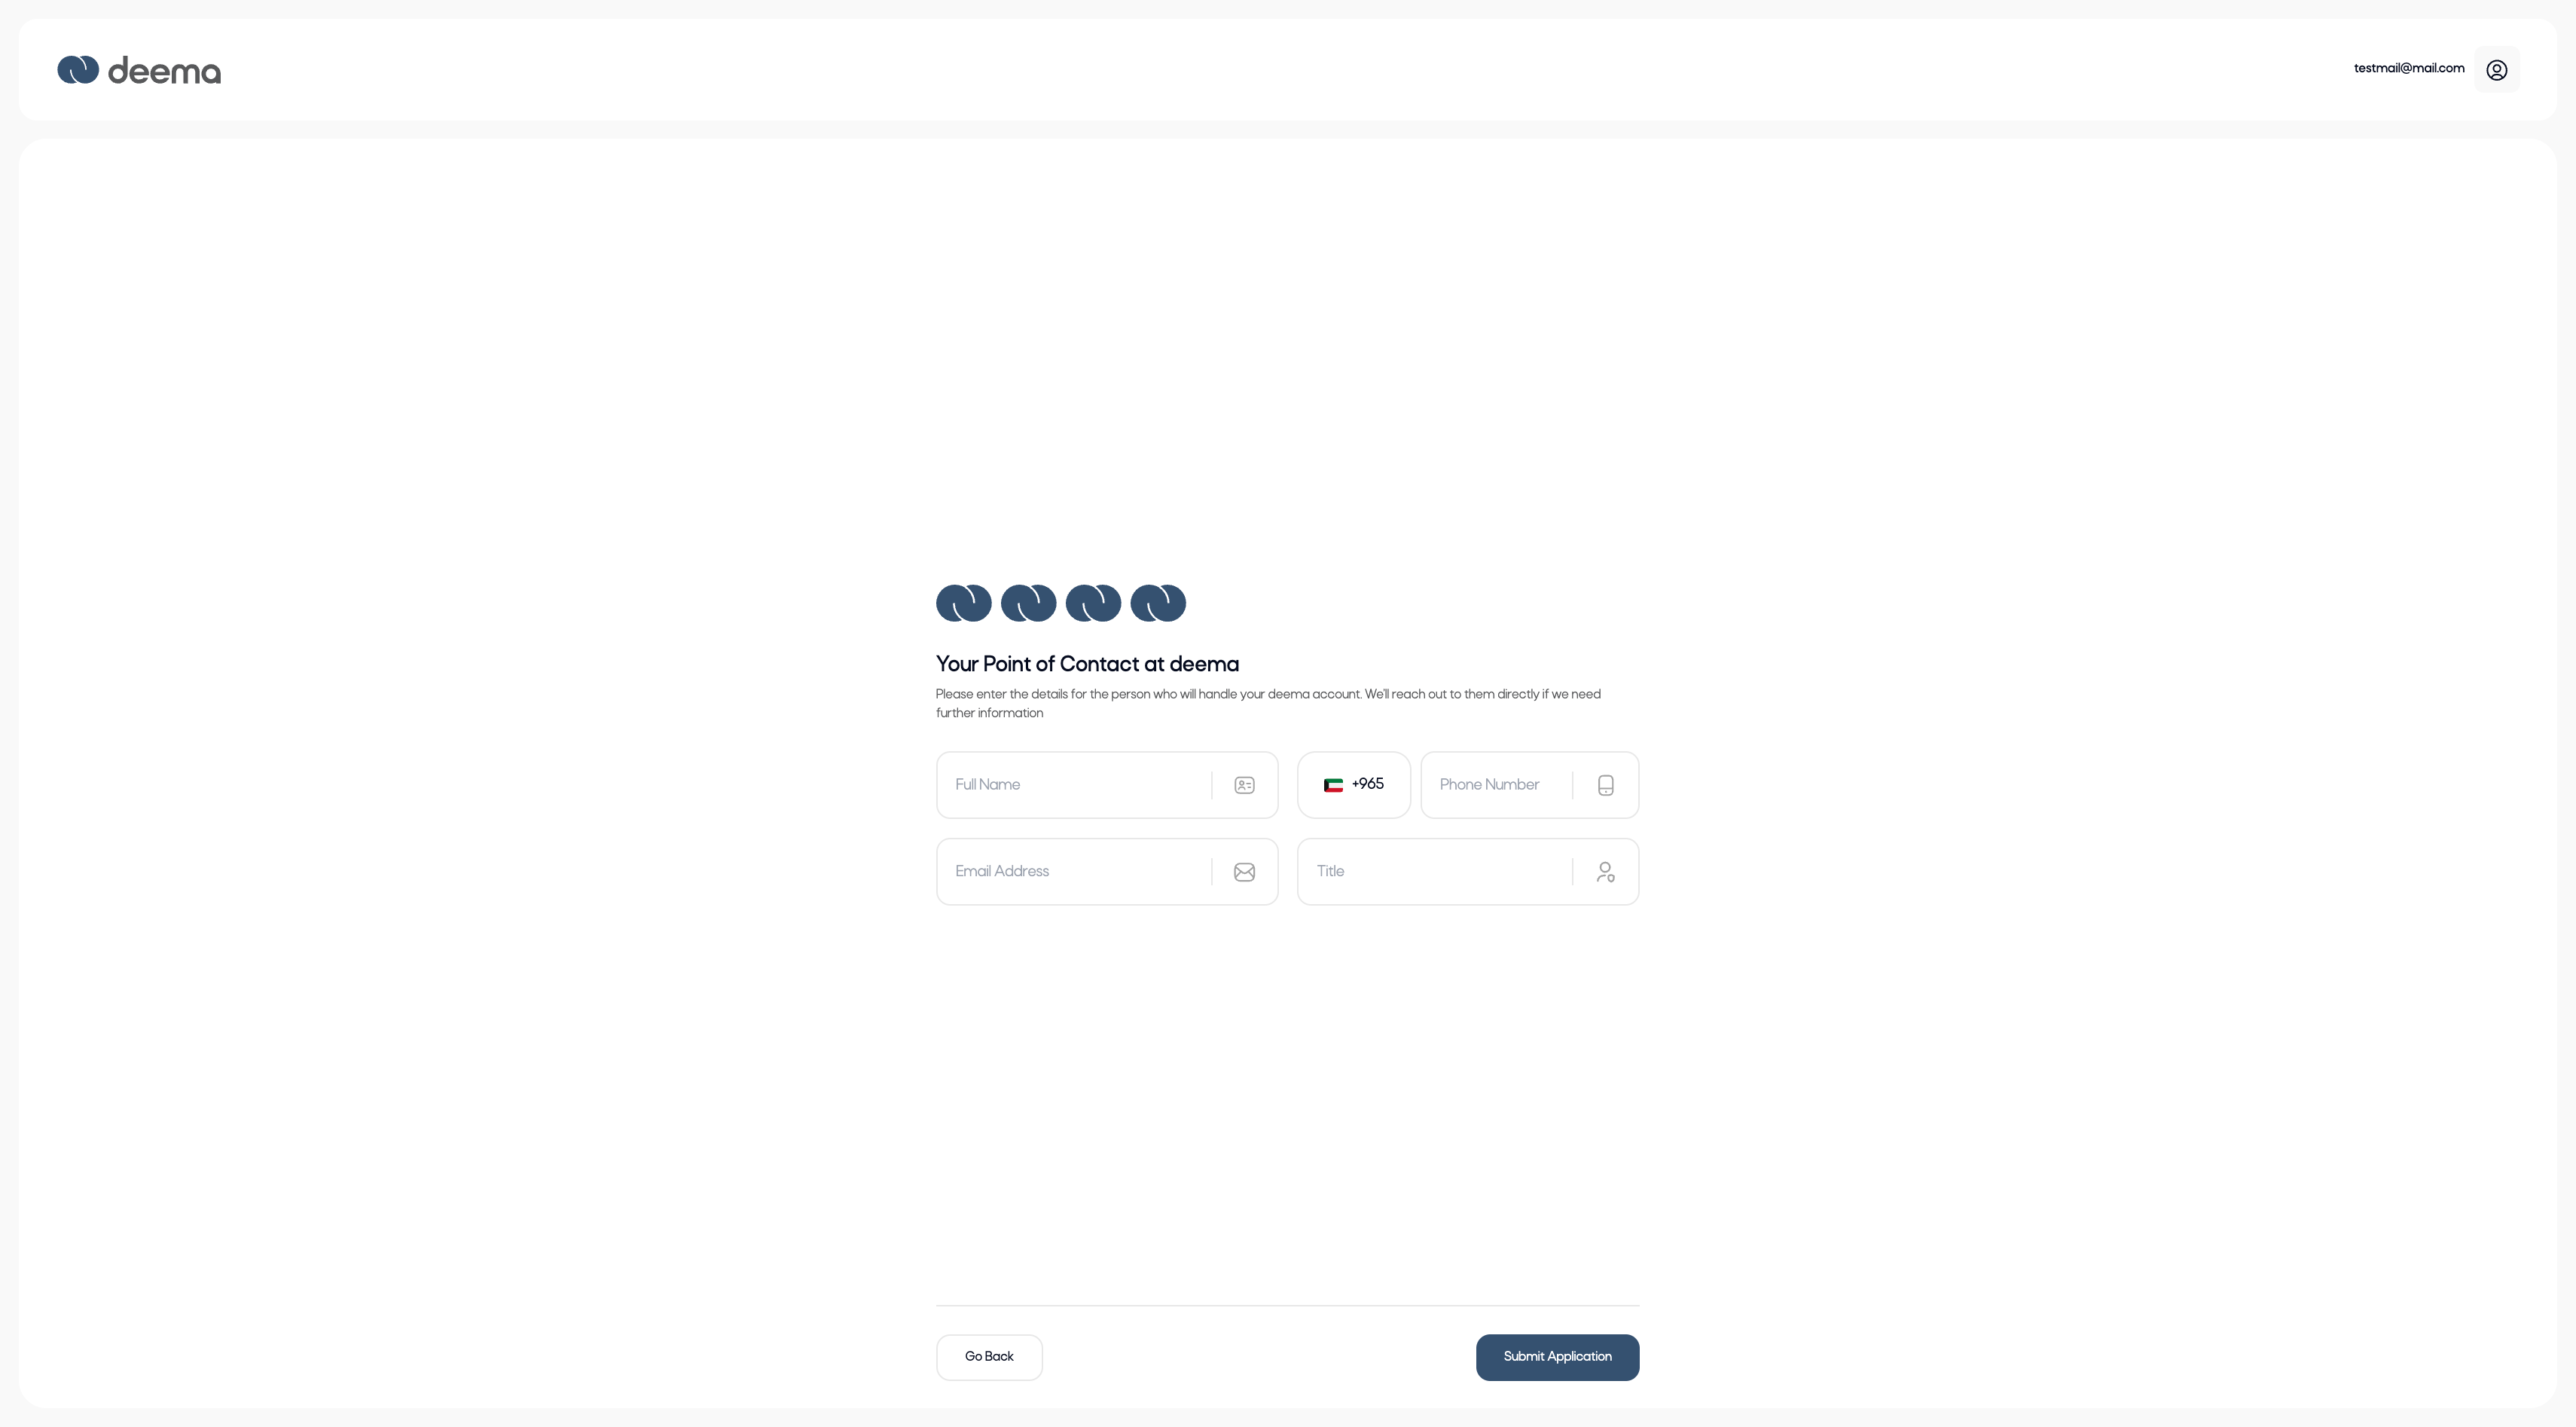
Step 4: Add Your Point of Contact
- Enter the details of your company’s main contact person who will manage the Deema account:
- Full Name
- Phone Number (with country code)
- Email Address
- Title / Position
Click Submit Application to complete your onboarding.
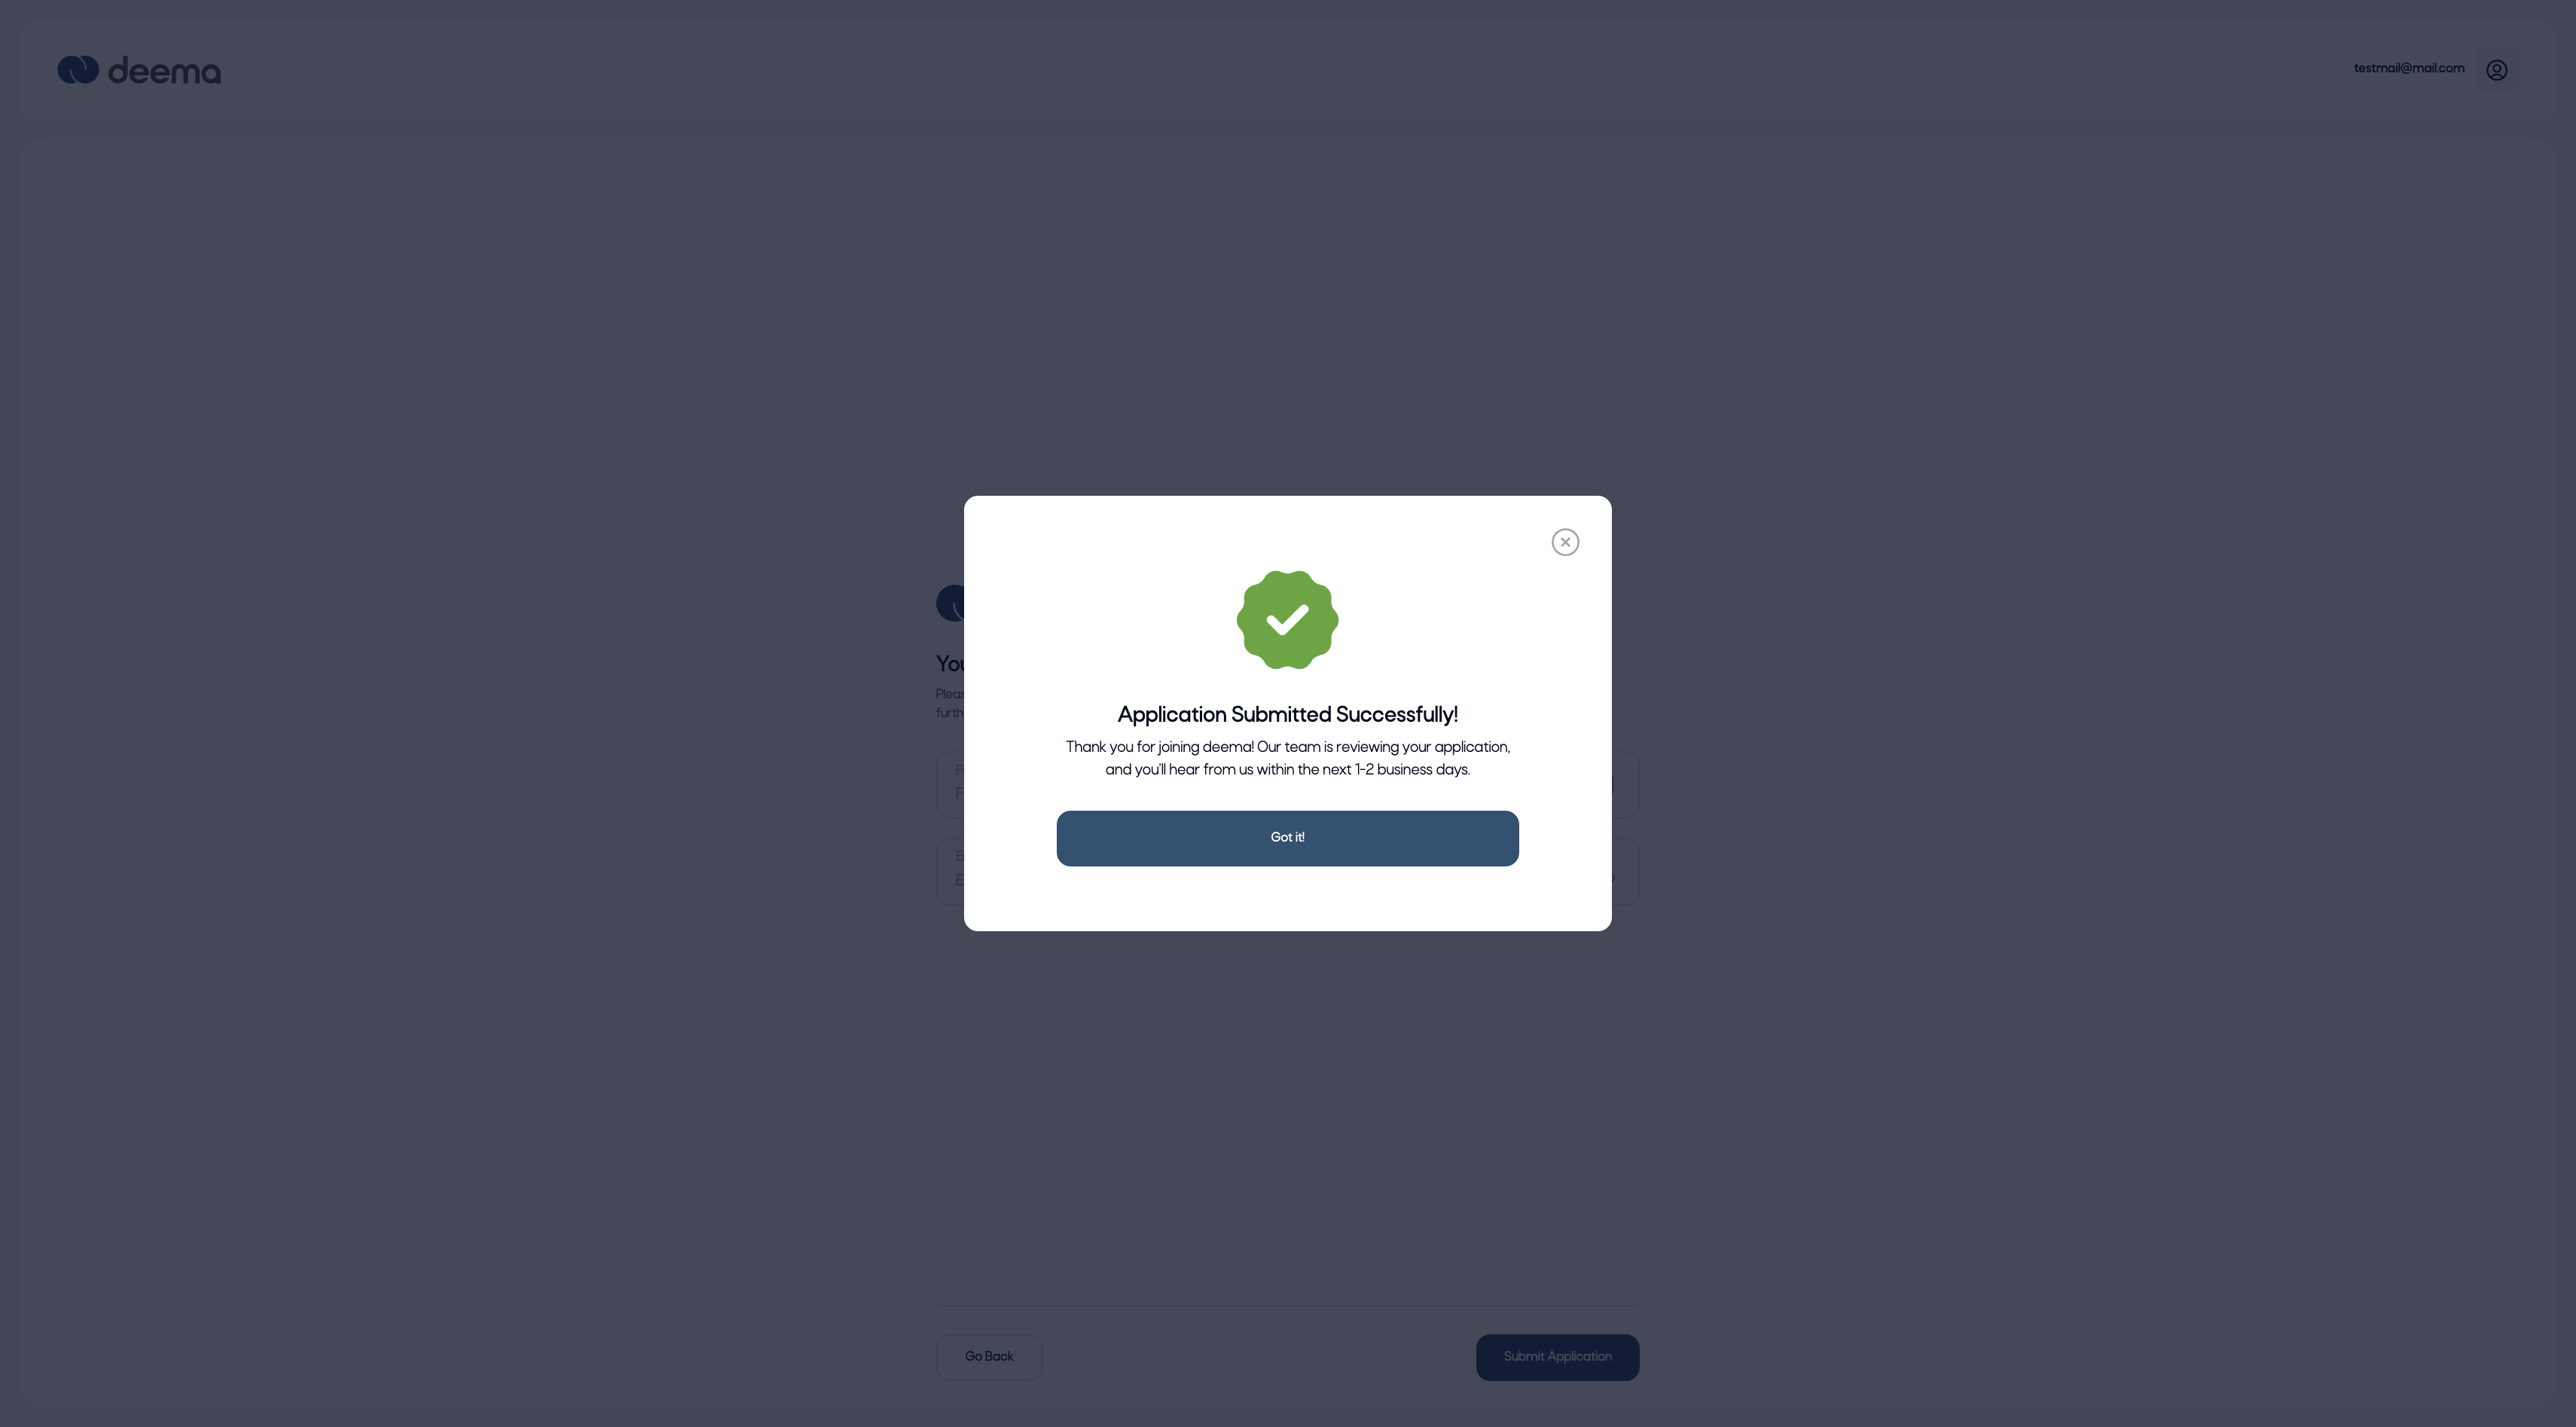
Once submitted, a success message will appear:
Application Submitted Successfully!
Thank you for joining Deema. Our team is reviewing your application, and you’ll hear from us within 1–2 business days.
The Deema compliance team will review your information and either approve your application or request additional details.
Onboarding V2 – Documents and Financial Information
After submitting Onboarding V1, the merchant’s application enters the review phase.
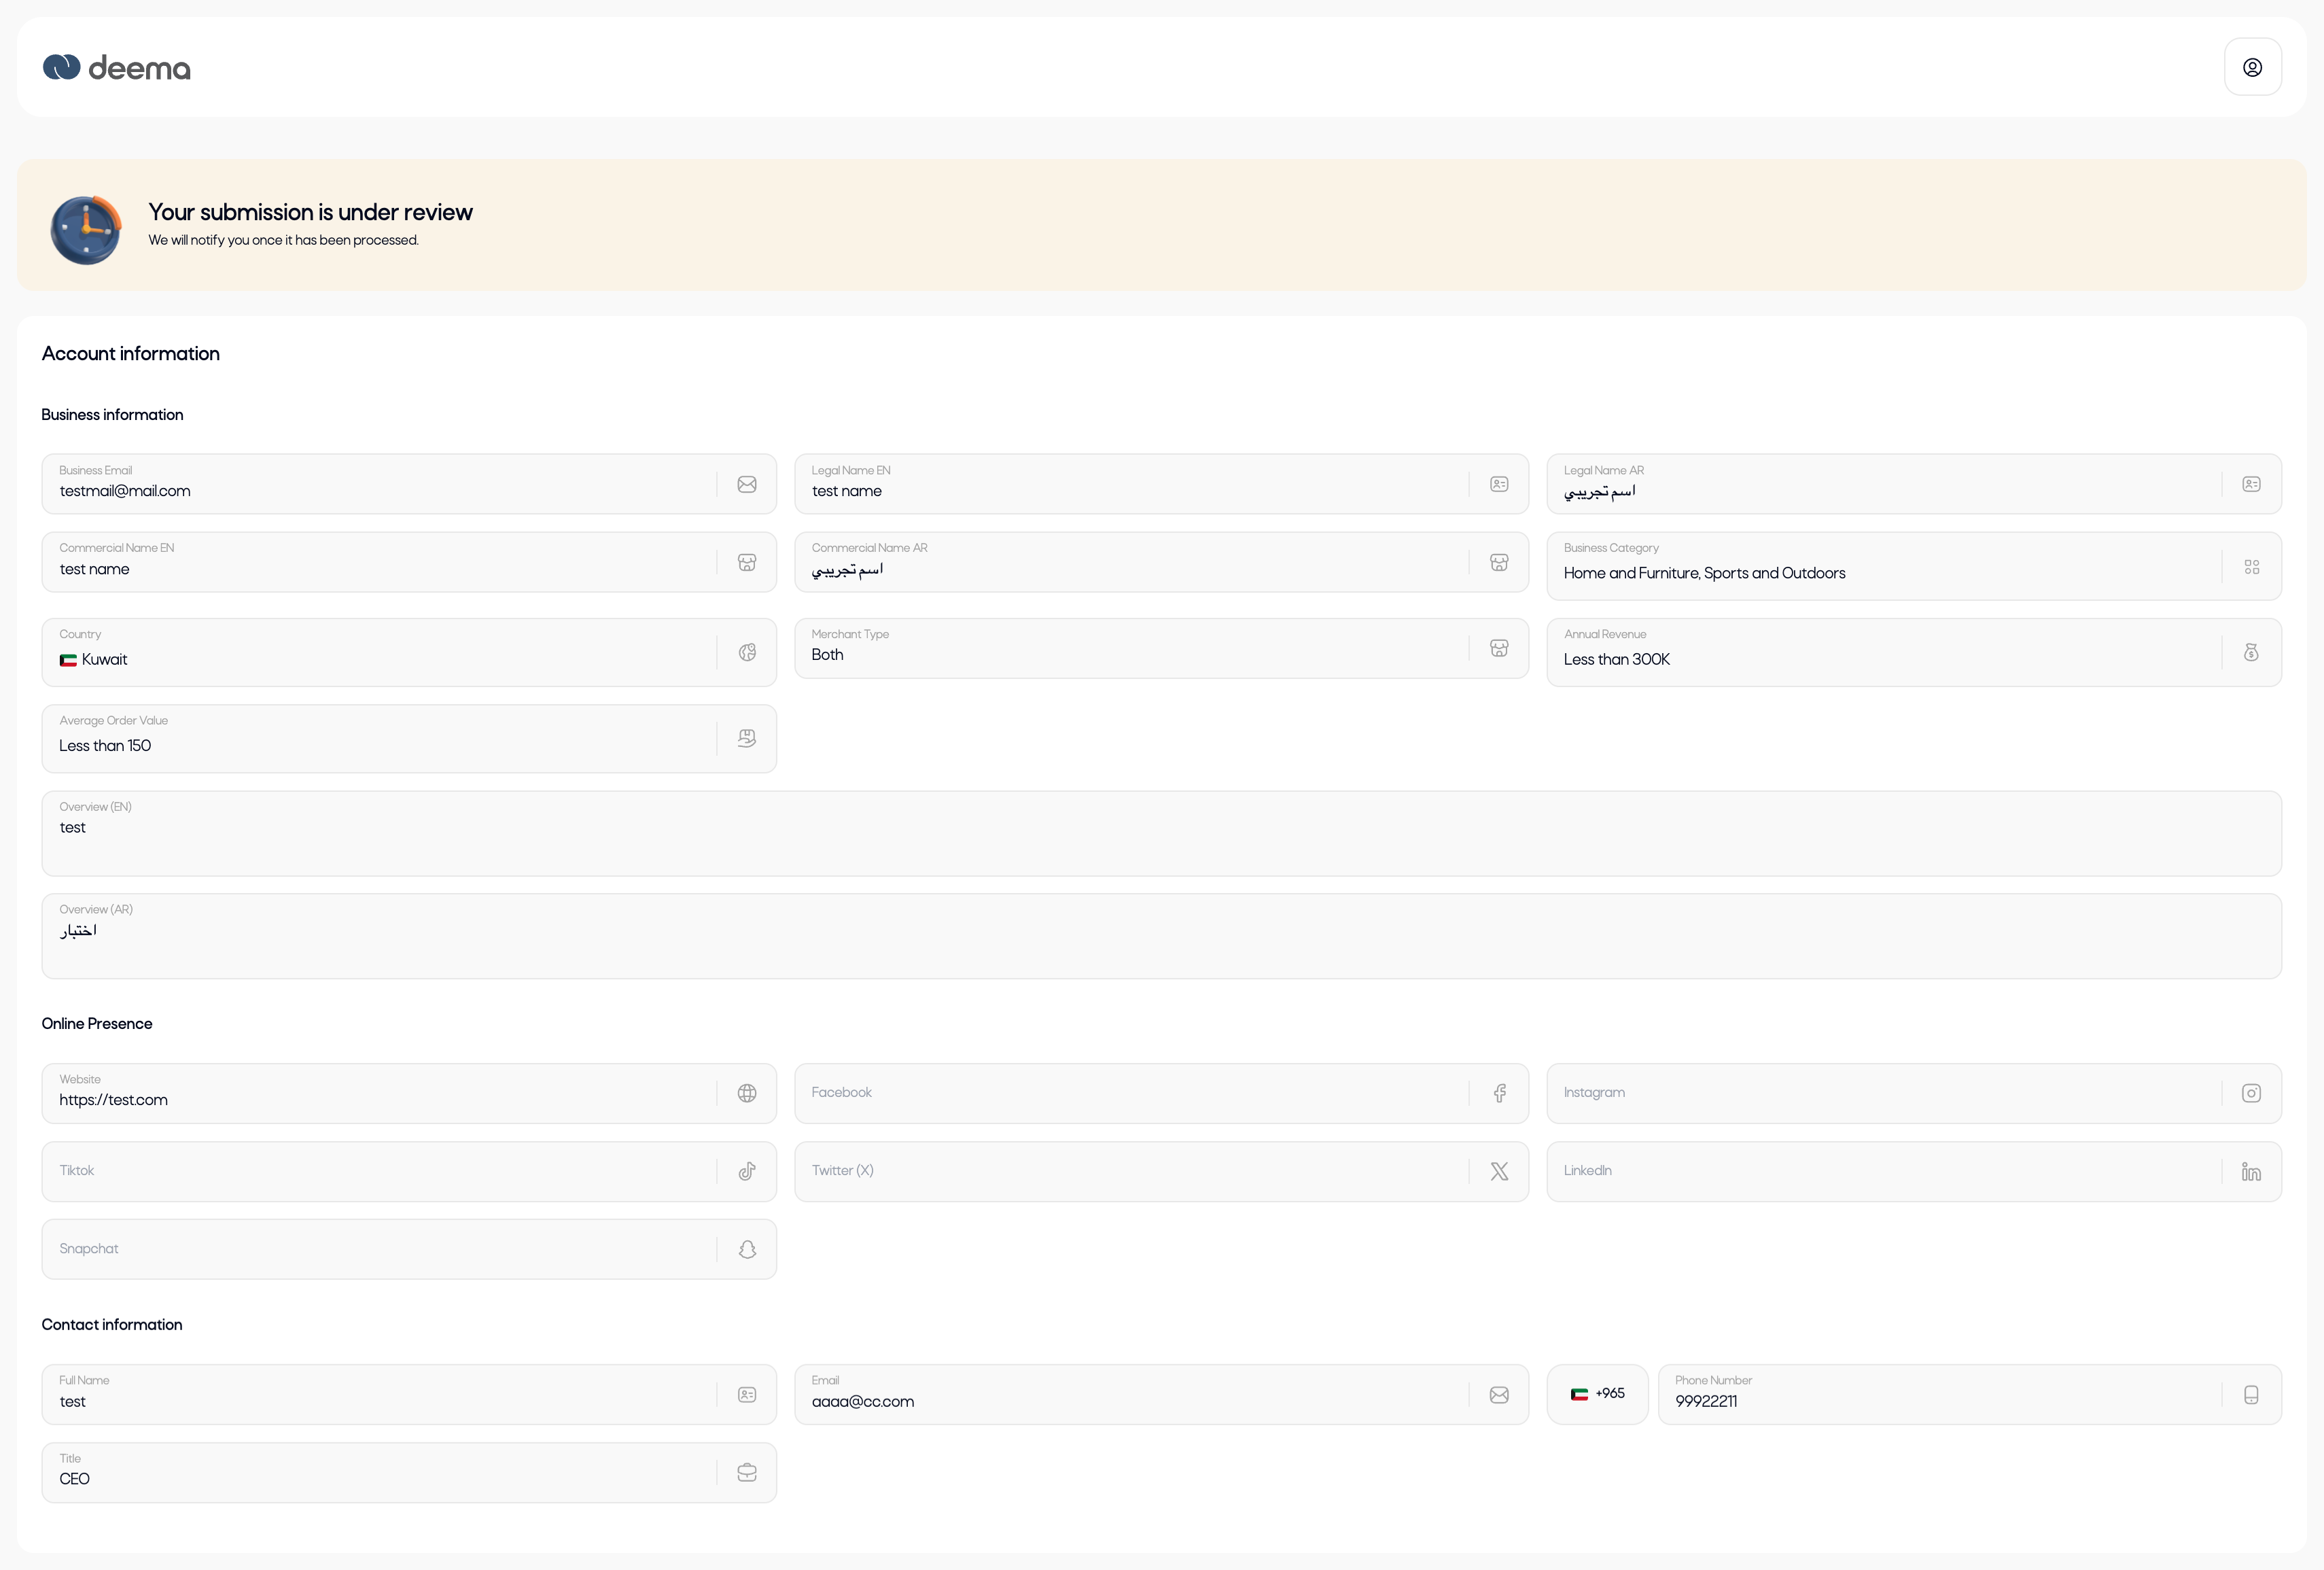
Once reviewed and accepted by the Deema team, the merchant will receive a confirmation message indicating “You’re Accepted!” and will gain access to the second onboarding stage.
This stage ensures that the merchant’s account is fully verified by collecting necessary financial and compliance information.
It consists of three main steps:
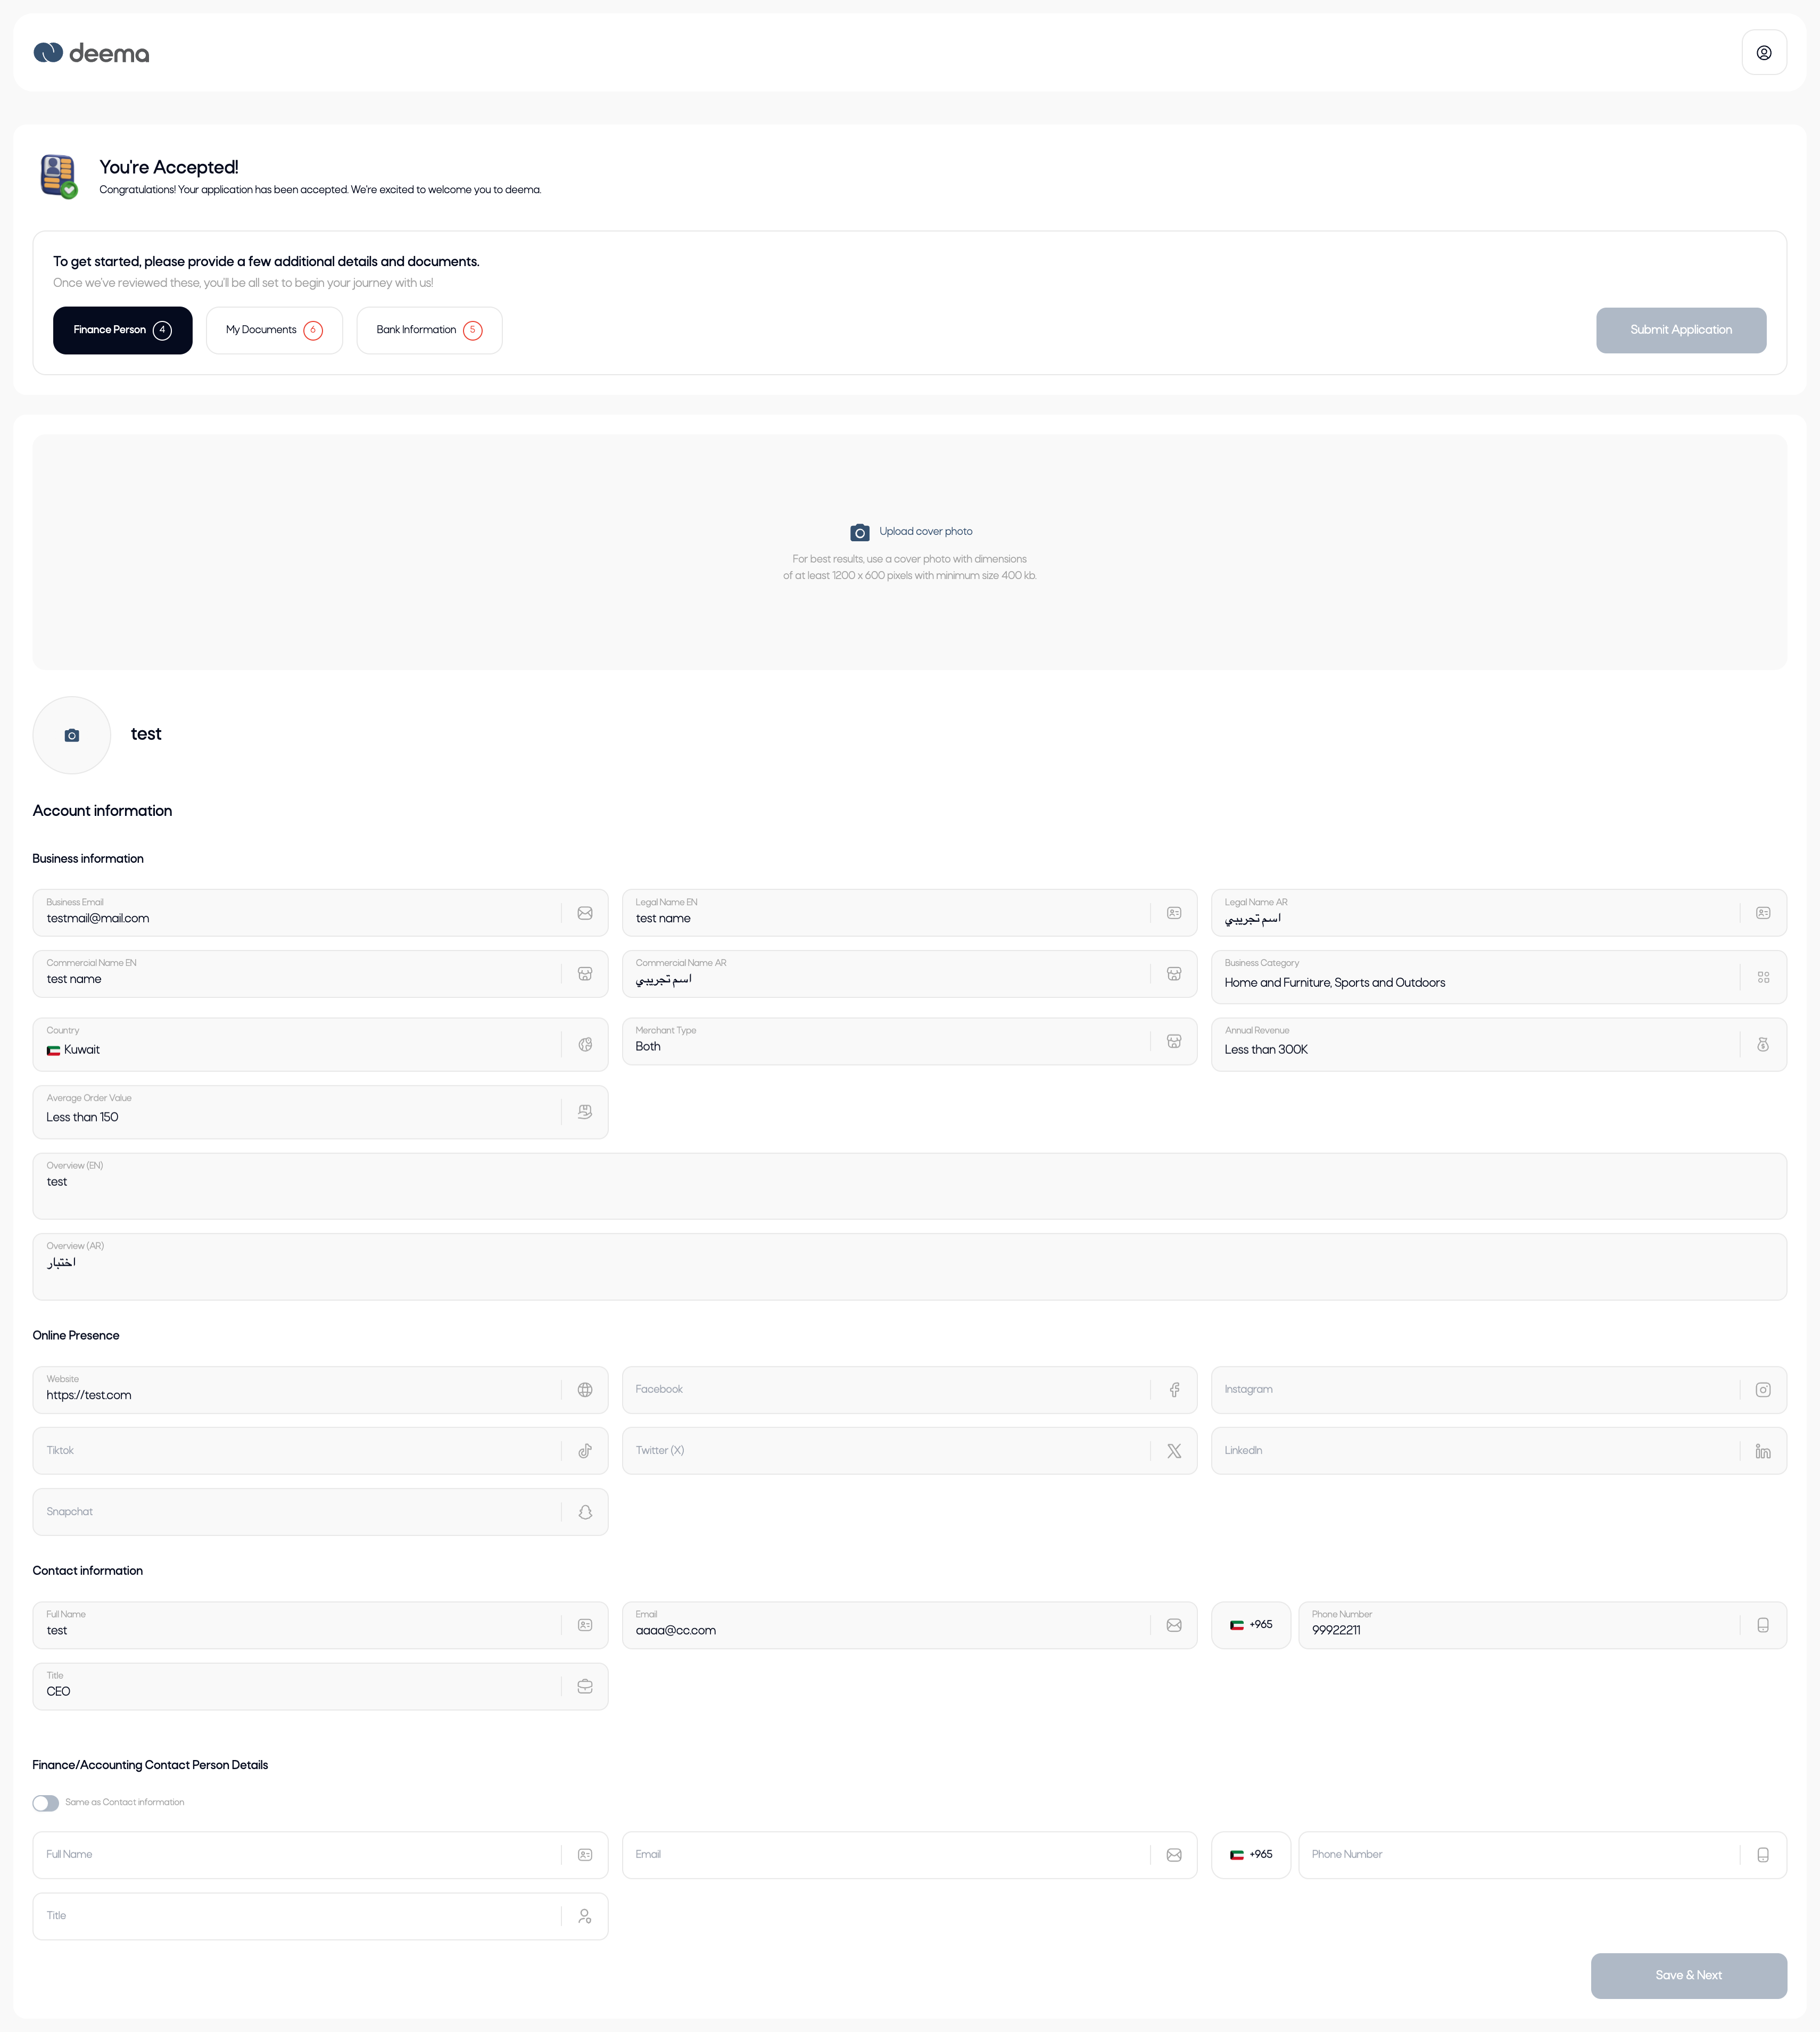
Step 1: Finance Person Information
In this step, merchants are required to:
-
Upload a Logo – This logo will appear on the Deema customer app and help users recognize your brand.
-
Upload a Cover Photo (optional but recommended) – Improves your profile appearance on the customer app.
Recommended size: at least 1200 × 600 pixels (minimum 400 KB).
Then, the merchant must fill in the Finance/Accounting Contact Details, including:
- Full Name
- Email Address
- Phone Number
- Title / Position
If the finance person is the same as the main contact entered earlier, the merchant can simply toggle “Same as Contact Person” to auto-fill the details.
Once all required fields are complete, the Save & Next button becomes active — click it to proceed to the next step.
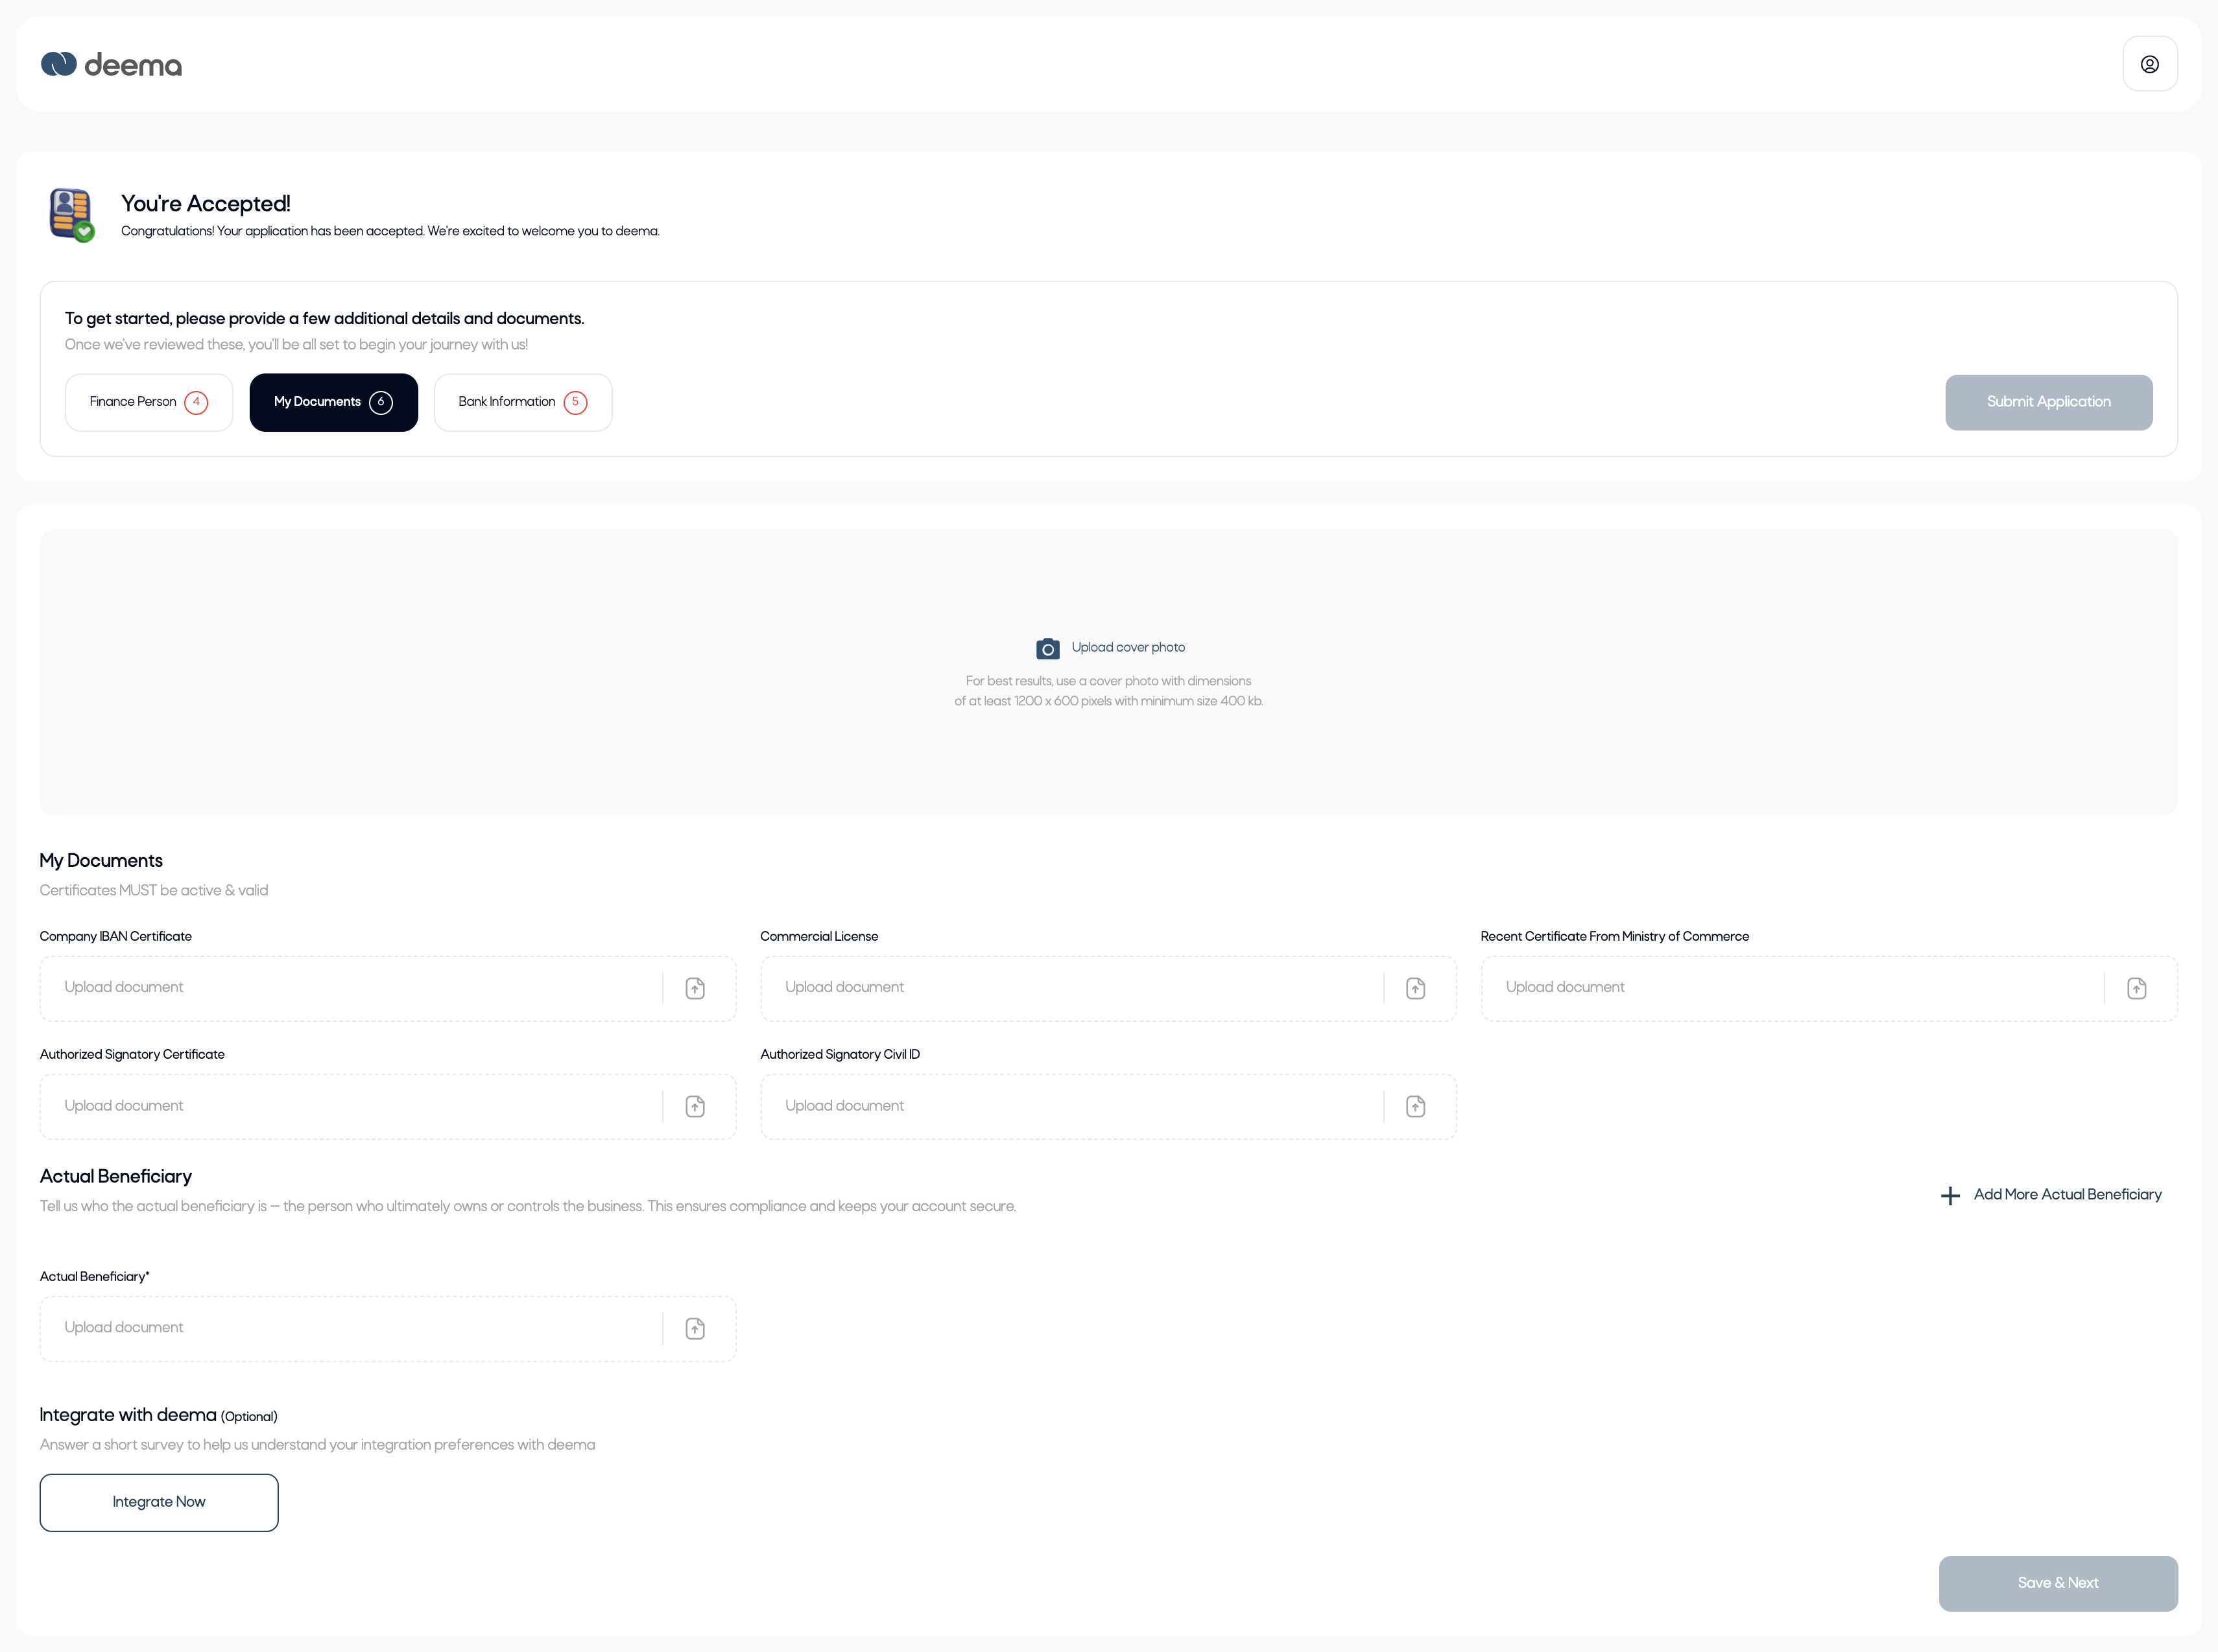
Step 2: Upload Required Documents
In this step, merchants must upload all mandatory business and compliance documents.
All certificates must be active and valid.
Required documents:
- Company IBAN Certificate
- Commercial License
- Recent Certificate from the Ministry of Commerce
- Authorized Signatory Certificate
- Authorized Signatory Civil ID
- Actual Beneficiary Document (at least one is mandatory)
If the merchant has more than one actual beneficiary, they can click “Add More Actual Beneficiary” to upload additional documents.
Optional:
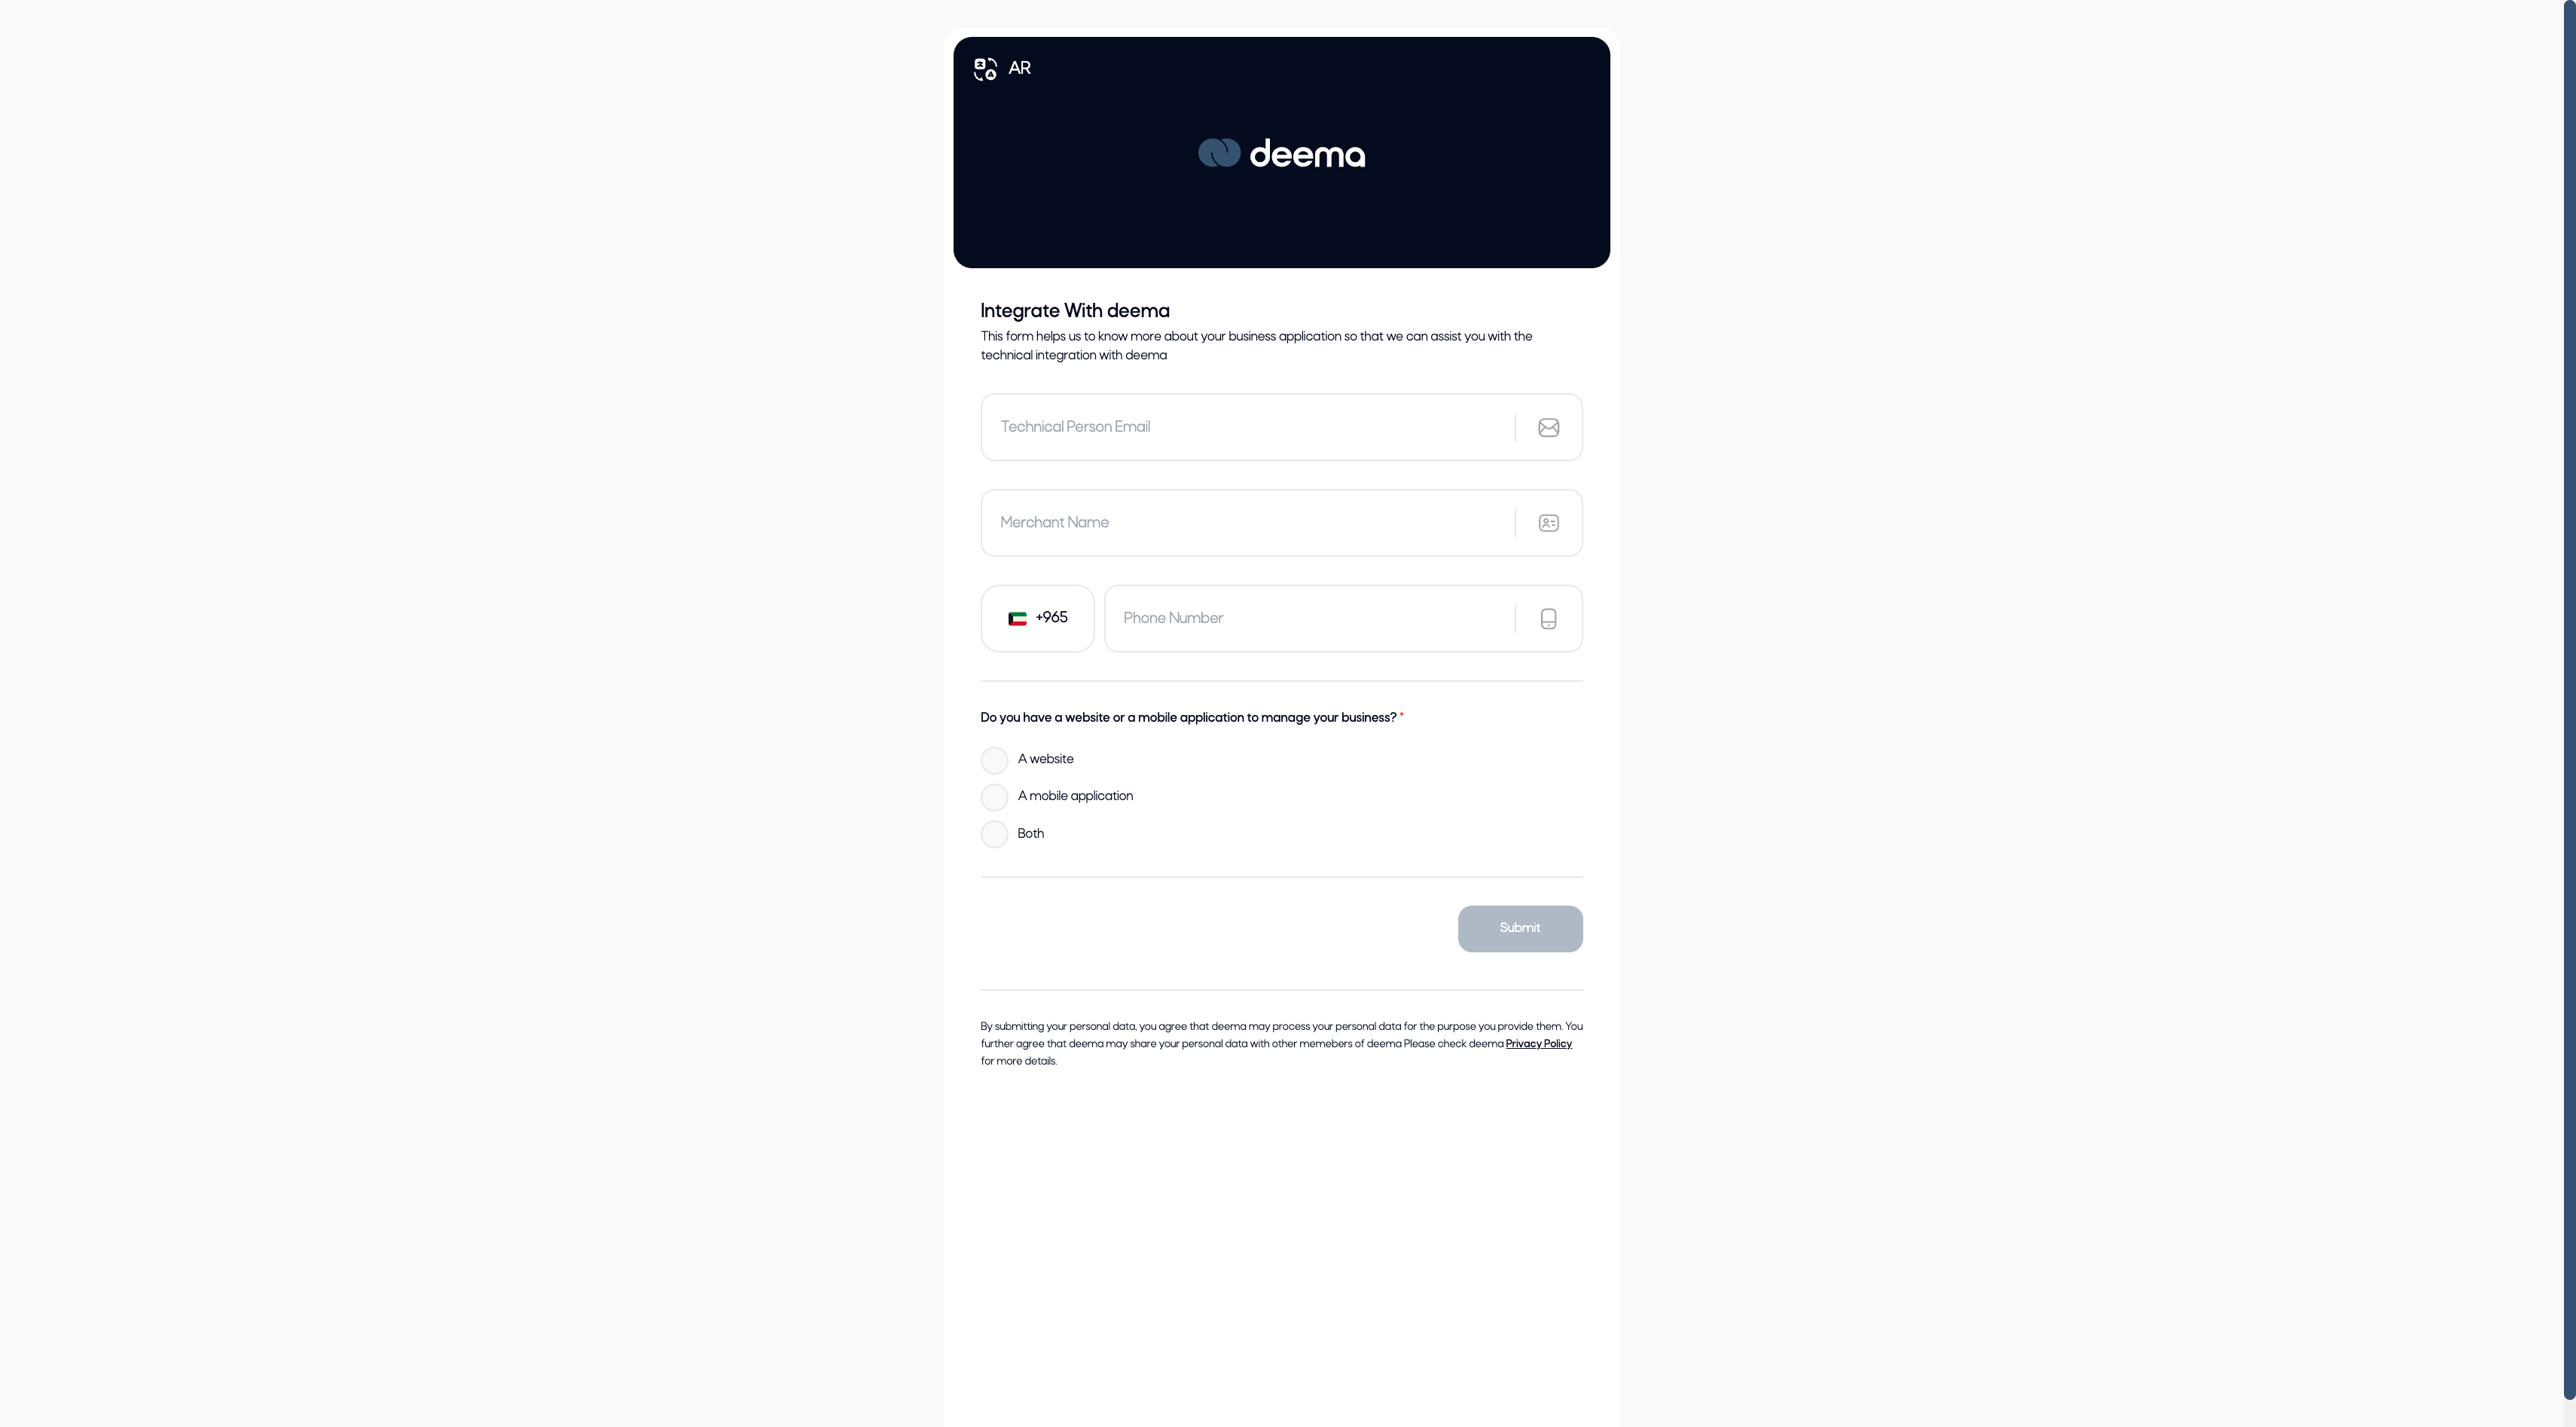
At the bottom of the page, merchants can click “Integrate with Deema” to fill out an integration form if they operate a website or mobile application.
The form requires:
- Technical Person Email
- Merchant Name
- Phone Number
- Type of platform (Website, Mobile Application, or Both)
After uploading all documents, click Save & Next to continue.
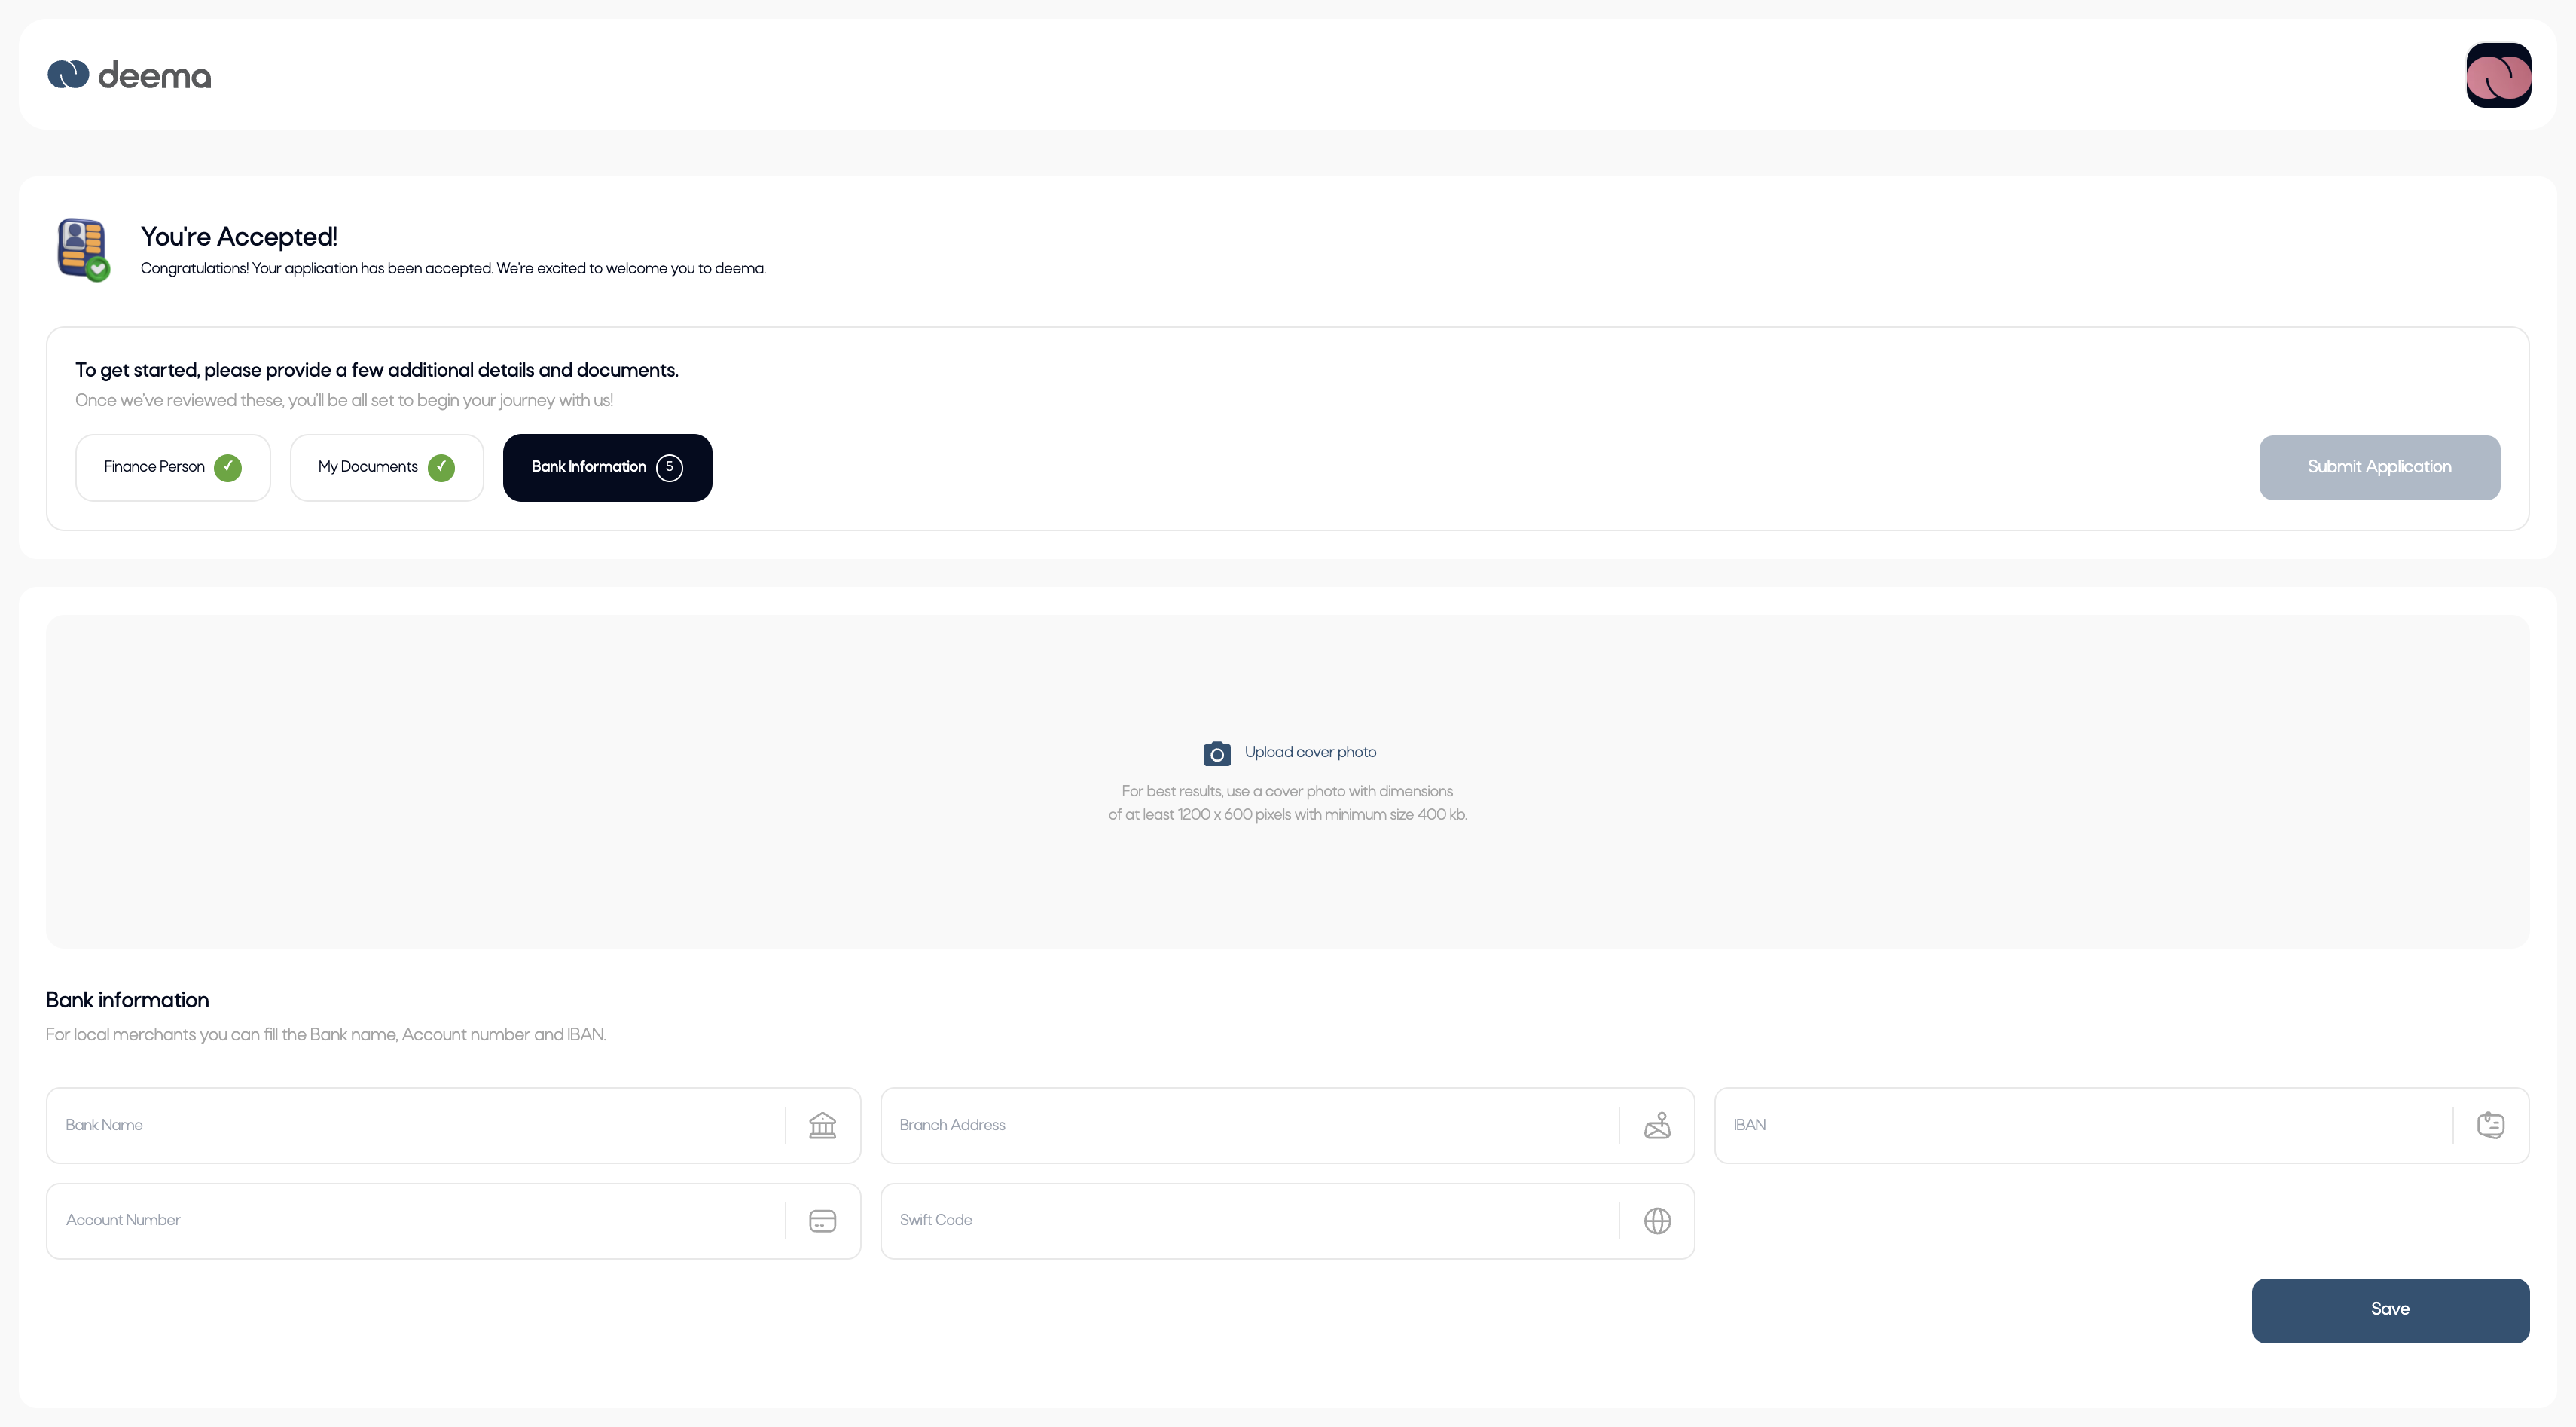
Step 3: Bank Information
This section collects the merchant’s settlement account details.
The fields include:
- Bank Name
- Branch Address
- Account Number
- IBAN
- SWIFT Code
Once all fields are filled, click Save.
After all three steps are completed, the Submit Application button will be activated.
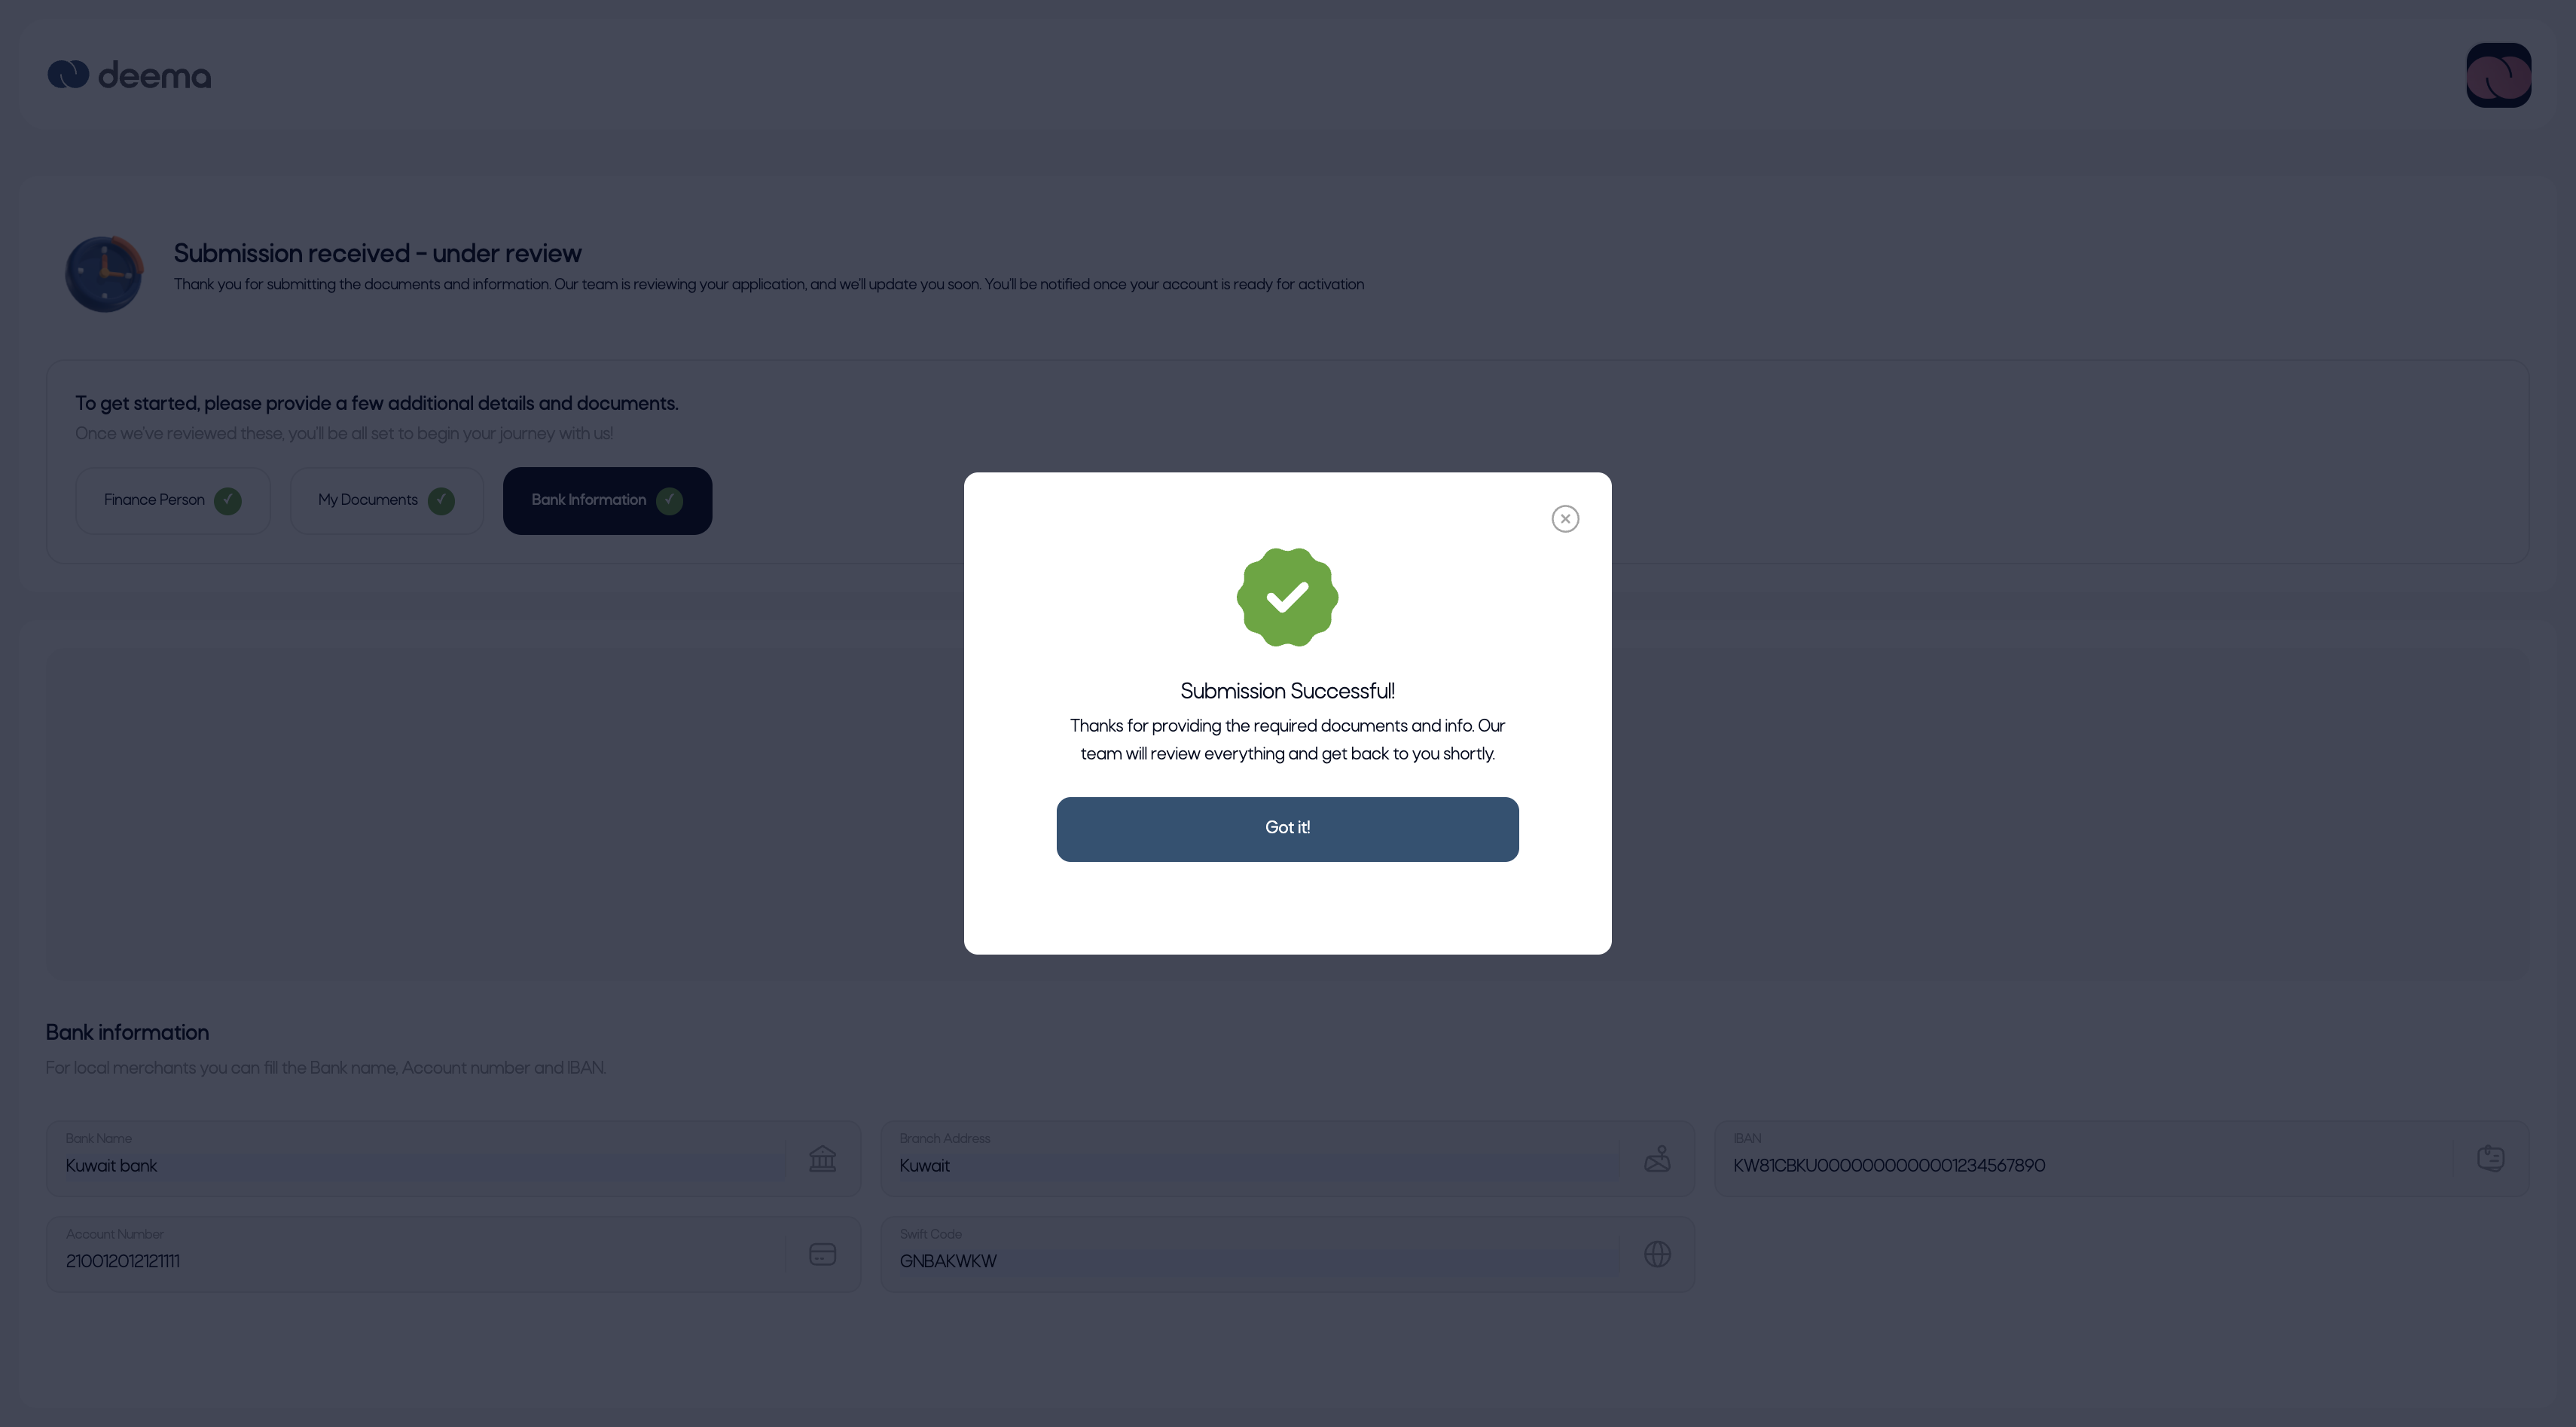
When the merchant clicks Submit Application, a success message will appear confirming submission:
Submission Successful!
Thanks for providing the required documents and info. Our team will review everything and get back to you shortly.
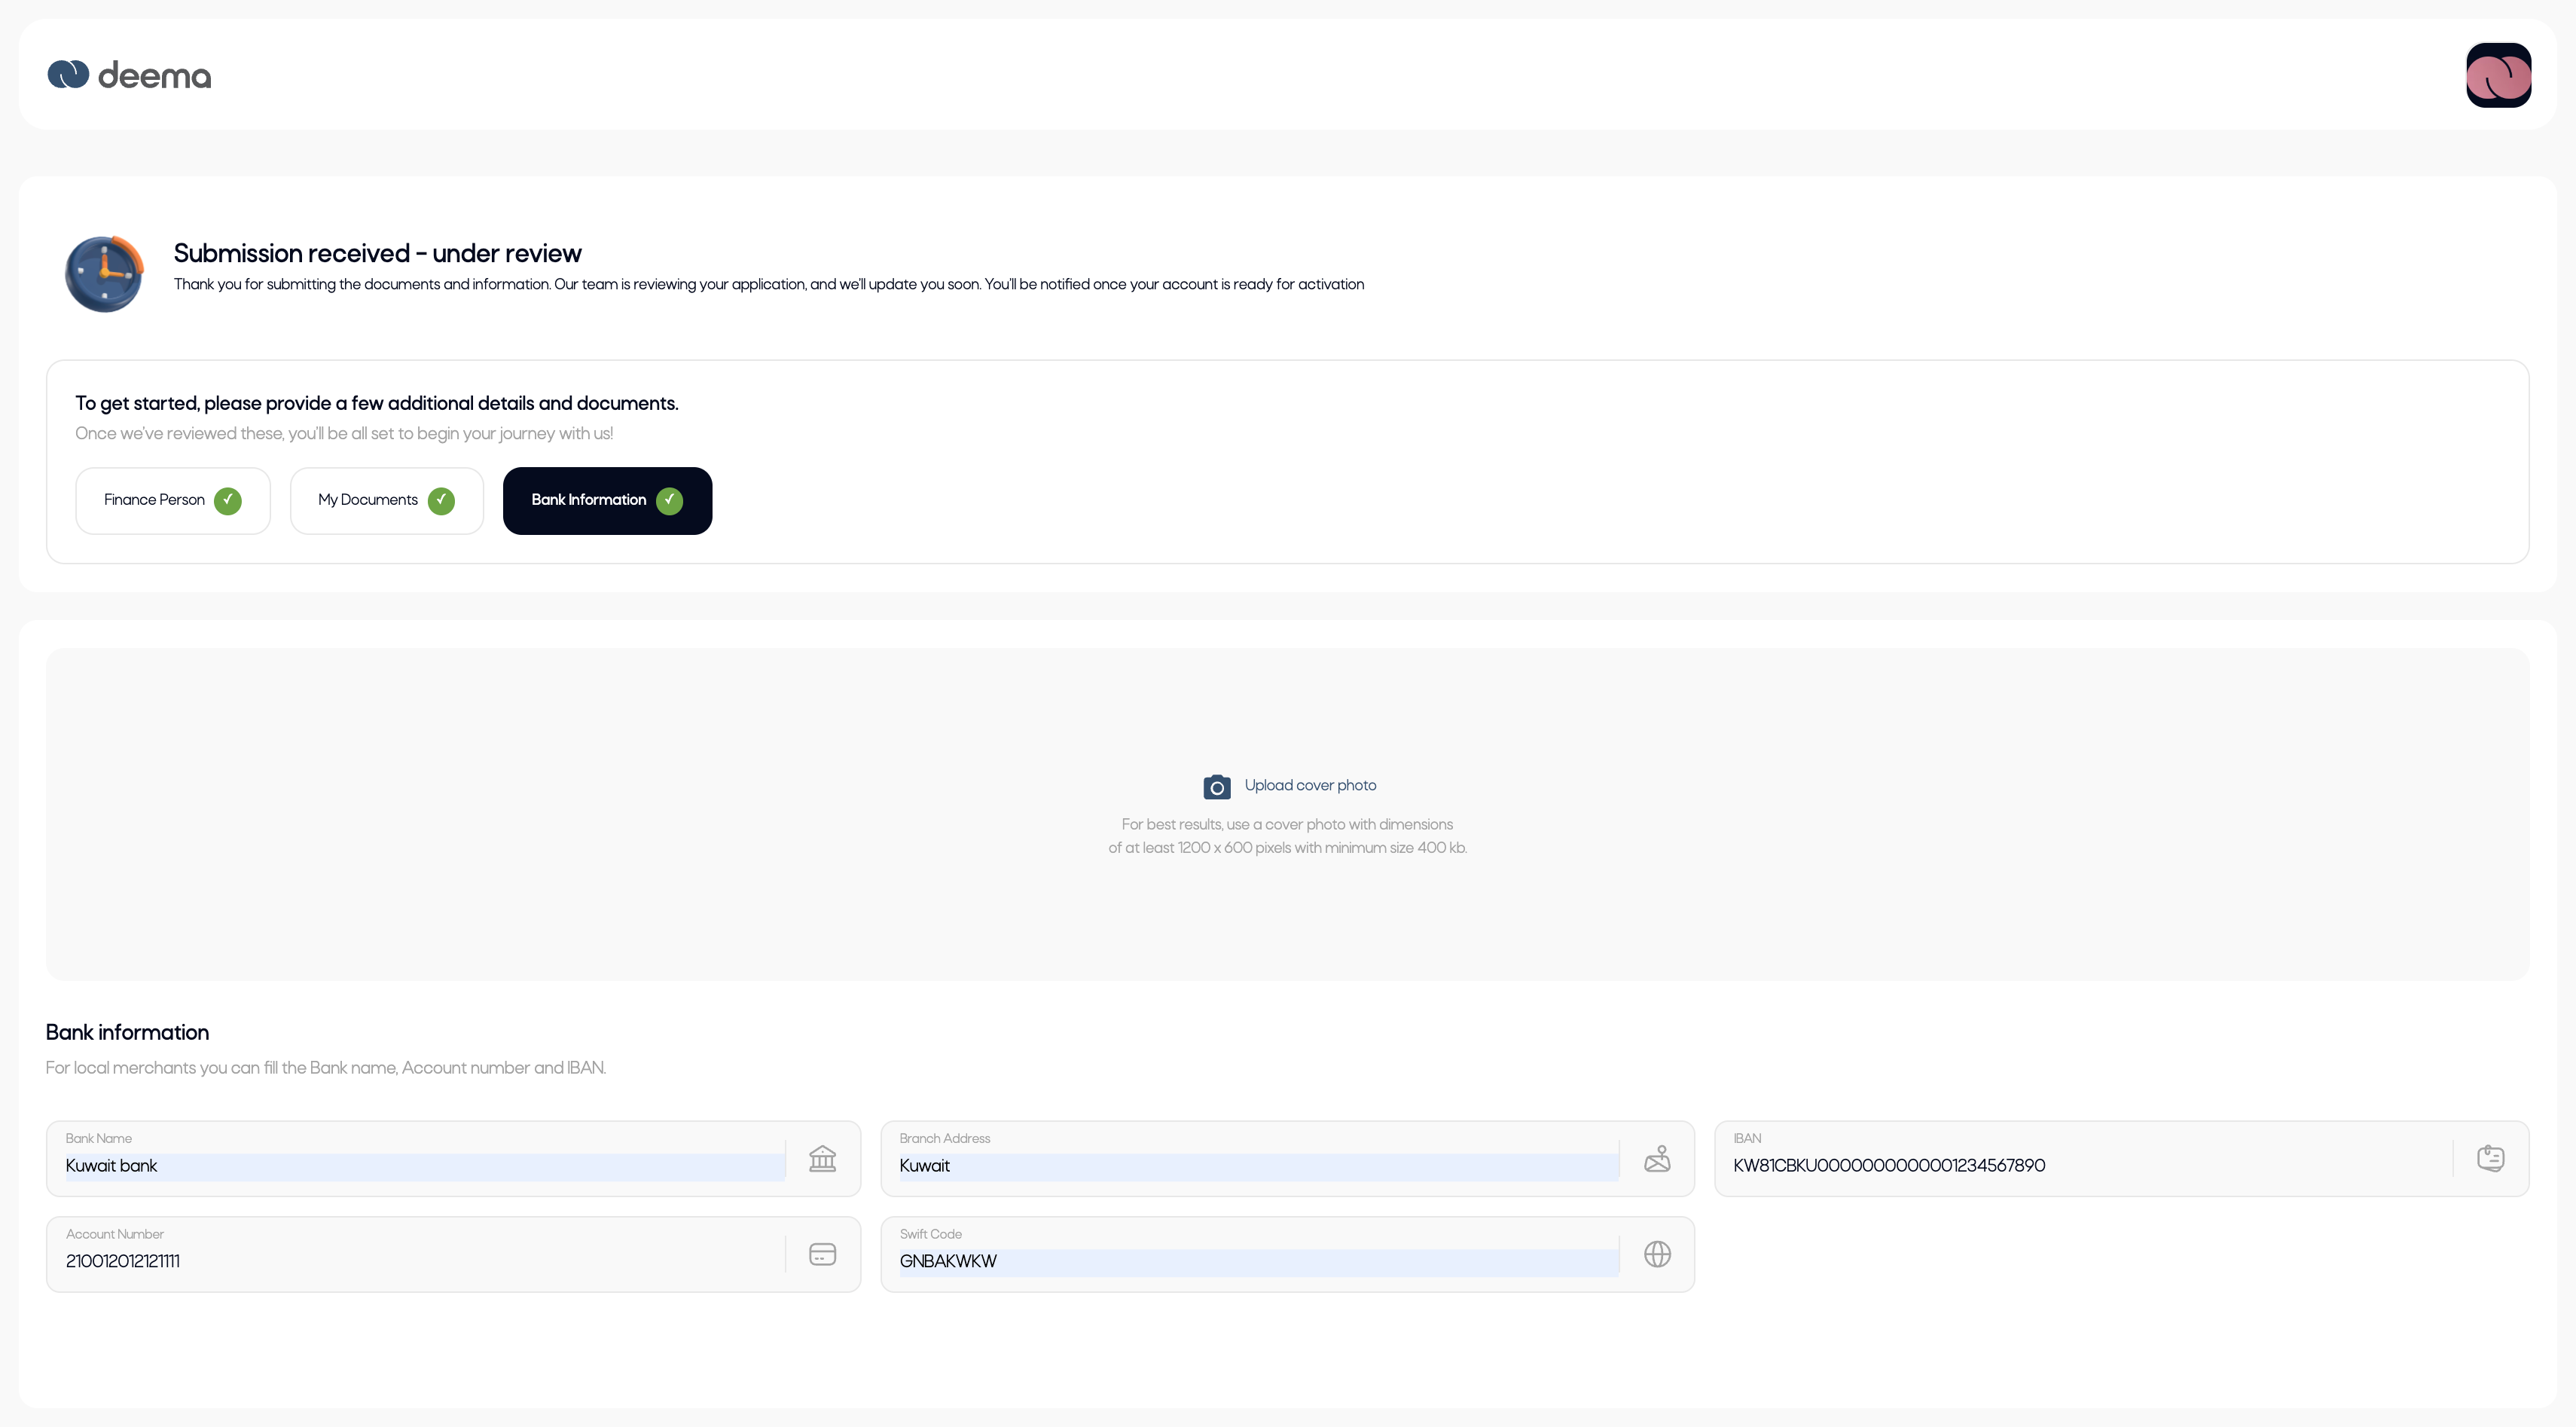
After submission, the page will display the message “Submission received – under review” indicating that the Deema team is verifying the provided information.
Once approved, the merchant’s account becomes fully active and ready to operate.
Dashboard
Once your application has been approved and activated, you will gain full access to the Merchant Portal.
The Dashboard is the first screen you see upon logging in. It provides an overview of your account performance, including sales, orders, and recent activities — all in one place.
Dashboard Sections
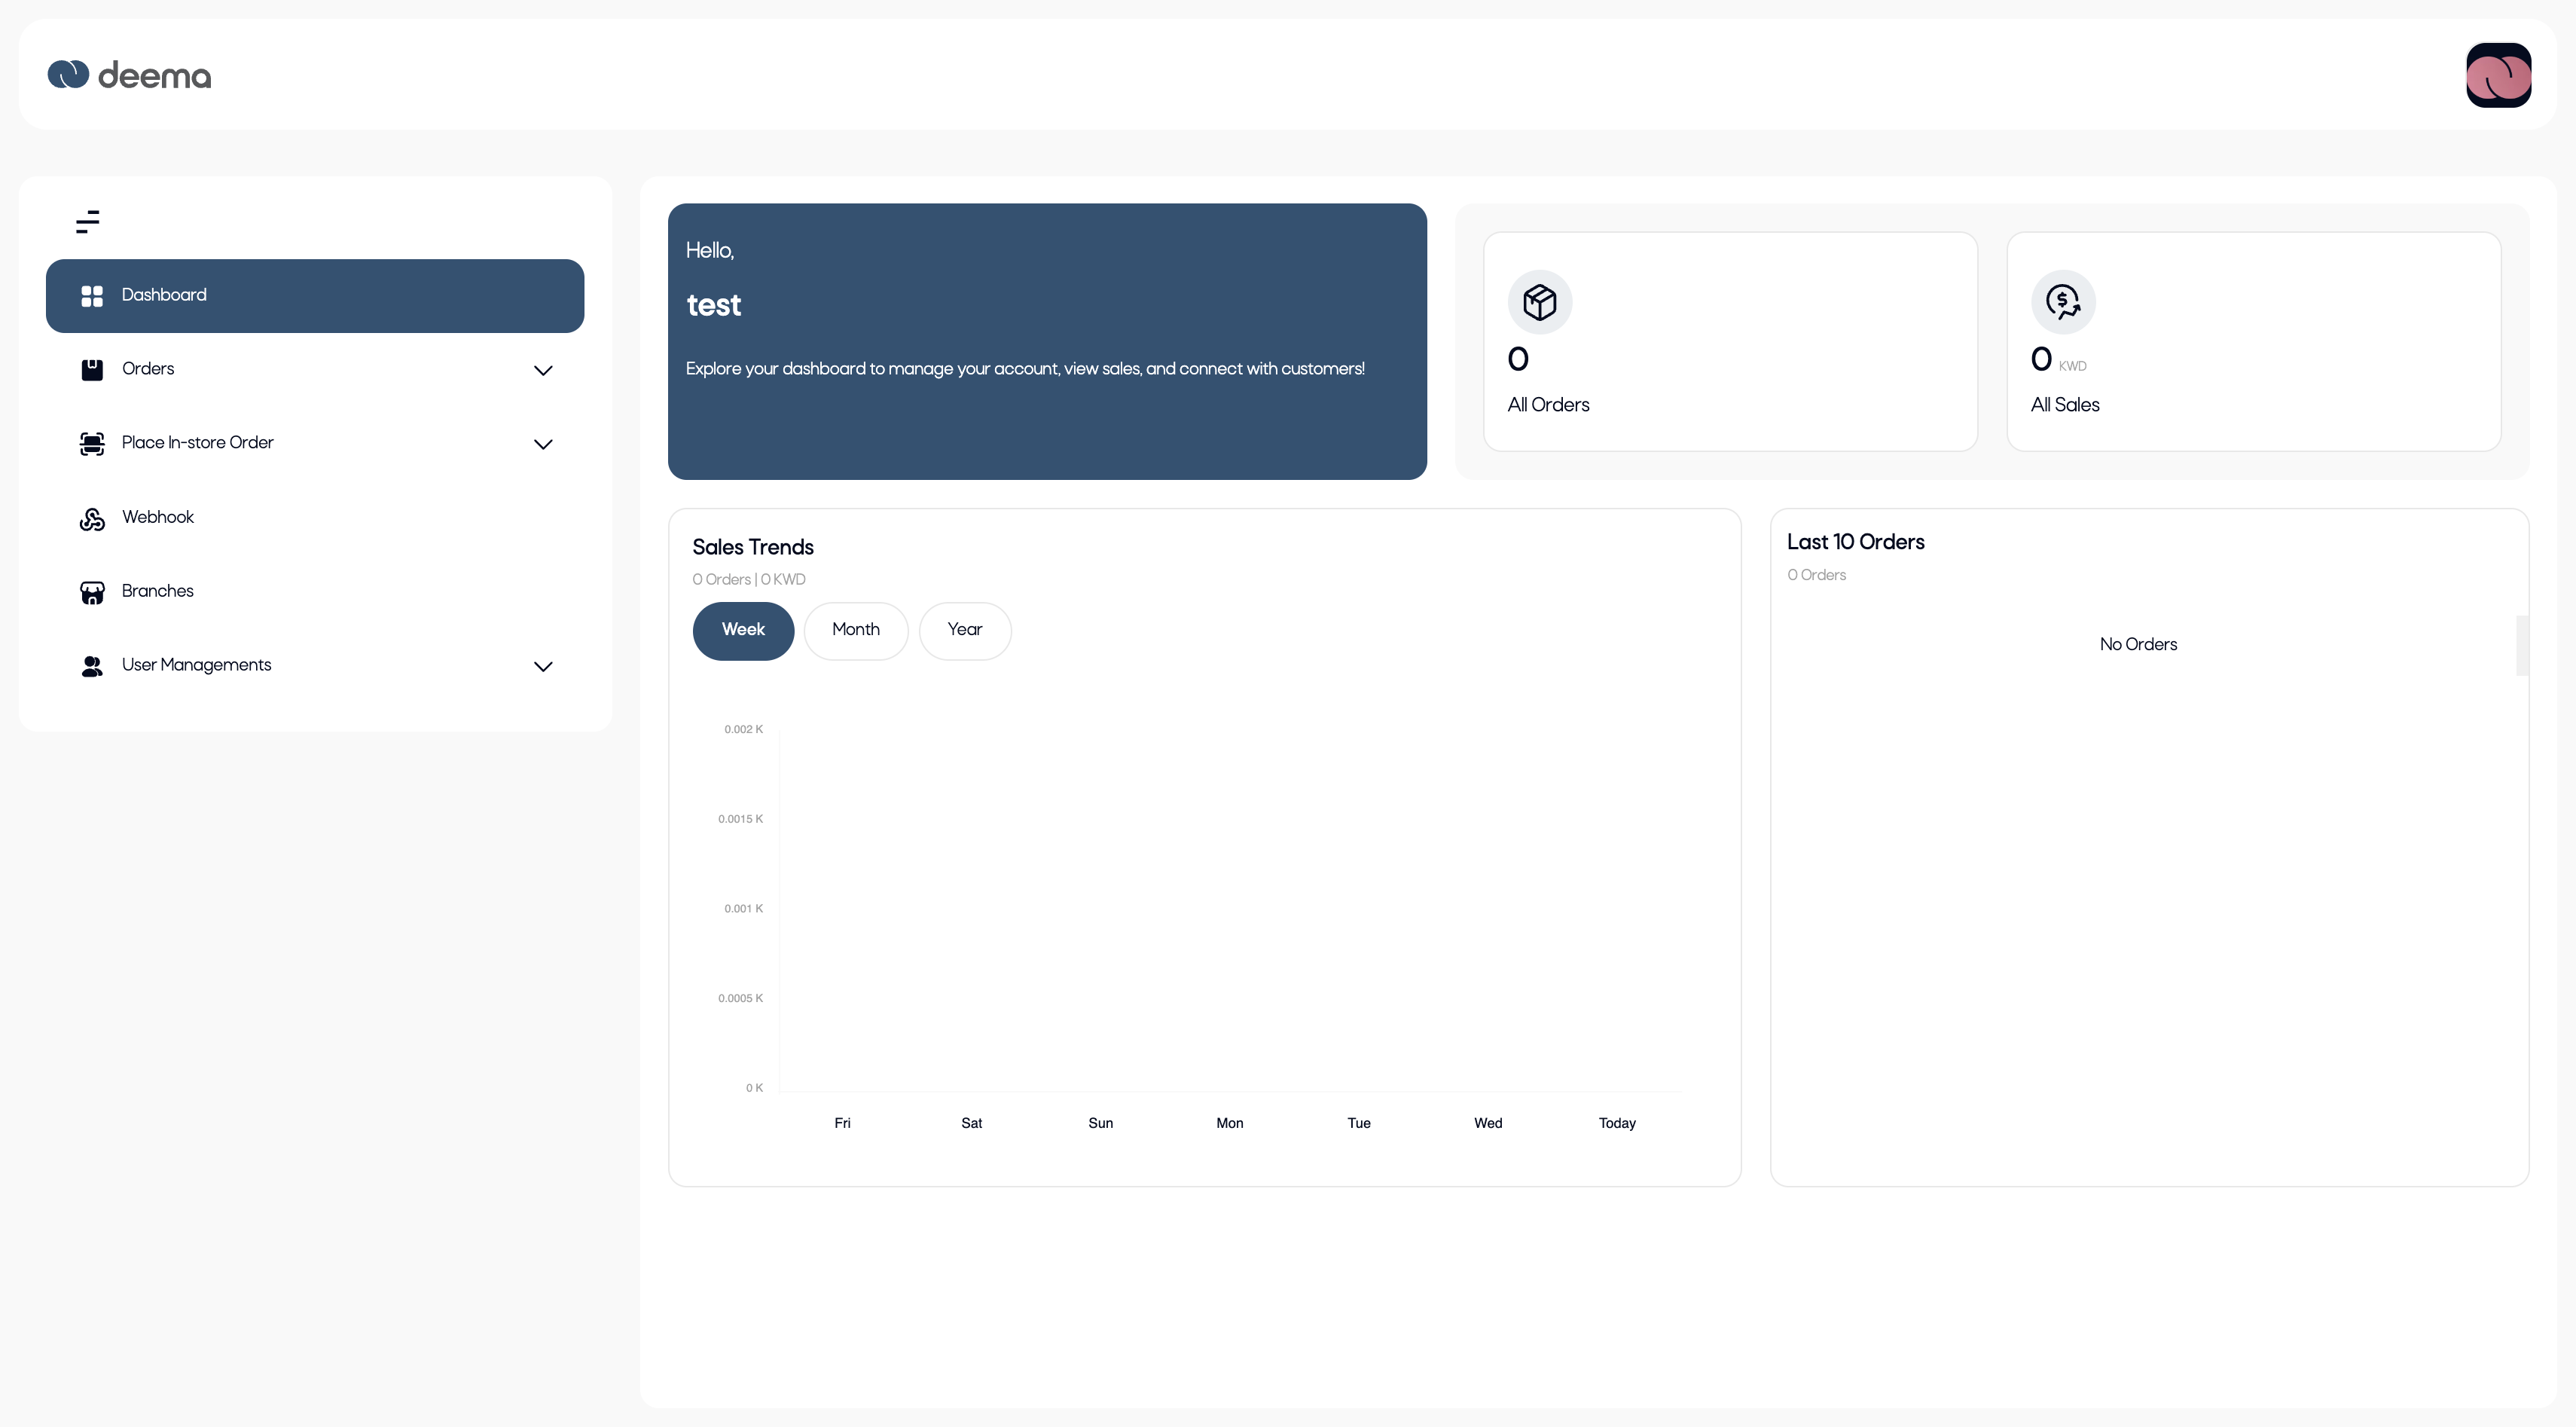
1. Welcome Section
At the top of the dashboard, you’ll find a welcome message displaying your business name.
This section provides a quick greeting and highlights that you can manage your account, view sales insights, and connect with customers from this page.
2. Summary Cards
Two key metrics are displayed at the top-right of the dashboard:
- All Orders – Shows the total number of orders processed through Deema.
- All Sales – Displays the total value of all sales in your local currency (e.g., KWD).
These figures provide a quick snapshot of your store’s overall activity and performance.
3. Sales Trends
This section displays a graphical view of your sales performance over time.
You can filter data by:
- Week
- Month
- Year
The chart updates dynamically to reflect the total number of orders and total sales within the selected period, helping you track growth patterns and performance trends easily.
4. Last 10 Orders
On the right-hand side, you’ll find a summary list of your most recent 10 orders.
If no orders have been placed yet, the message “No Orders” will be displayed.
Purpose
The dashboard helps merchants:
- Monitor total sales and transaction volumes at a glance.
- Identify performance trends over time.
- Quickly access the latest orders and activity.
It serves as the central overview hub for tracking your business progress within the Deema ecosystem.
Orders
The Orders section allows merchants to view, track, and manage all transactions made through Deema.
From here, you can monitor the status of each order, view details, and ensure all payments are processed correctly.
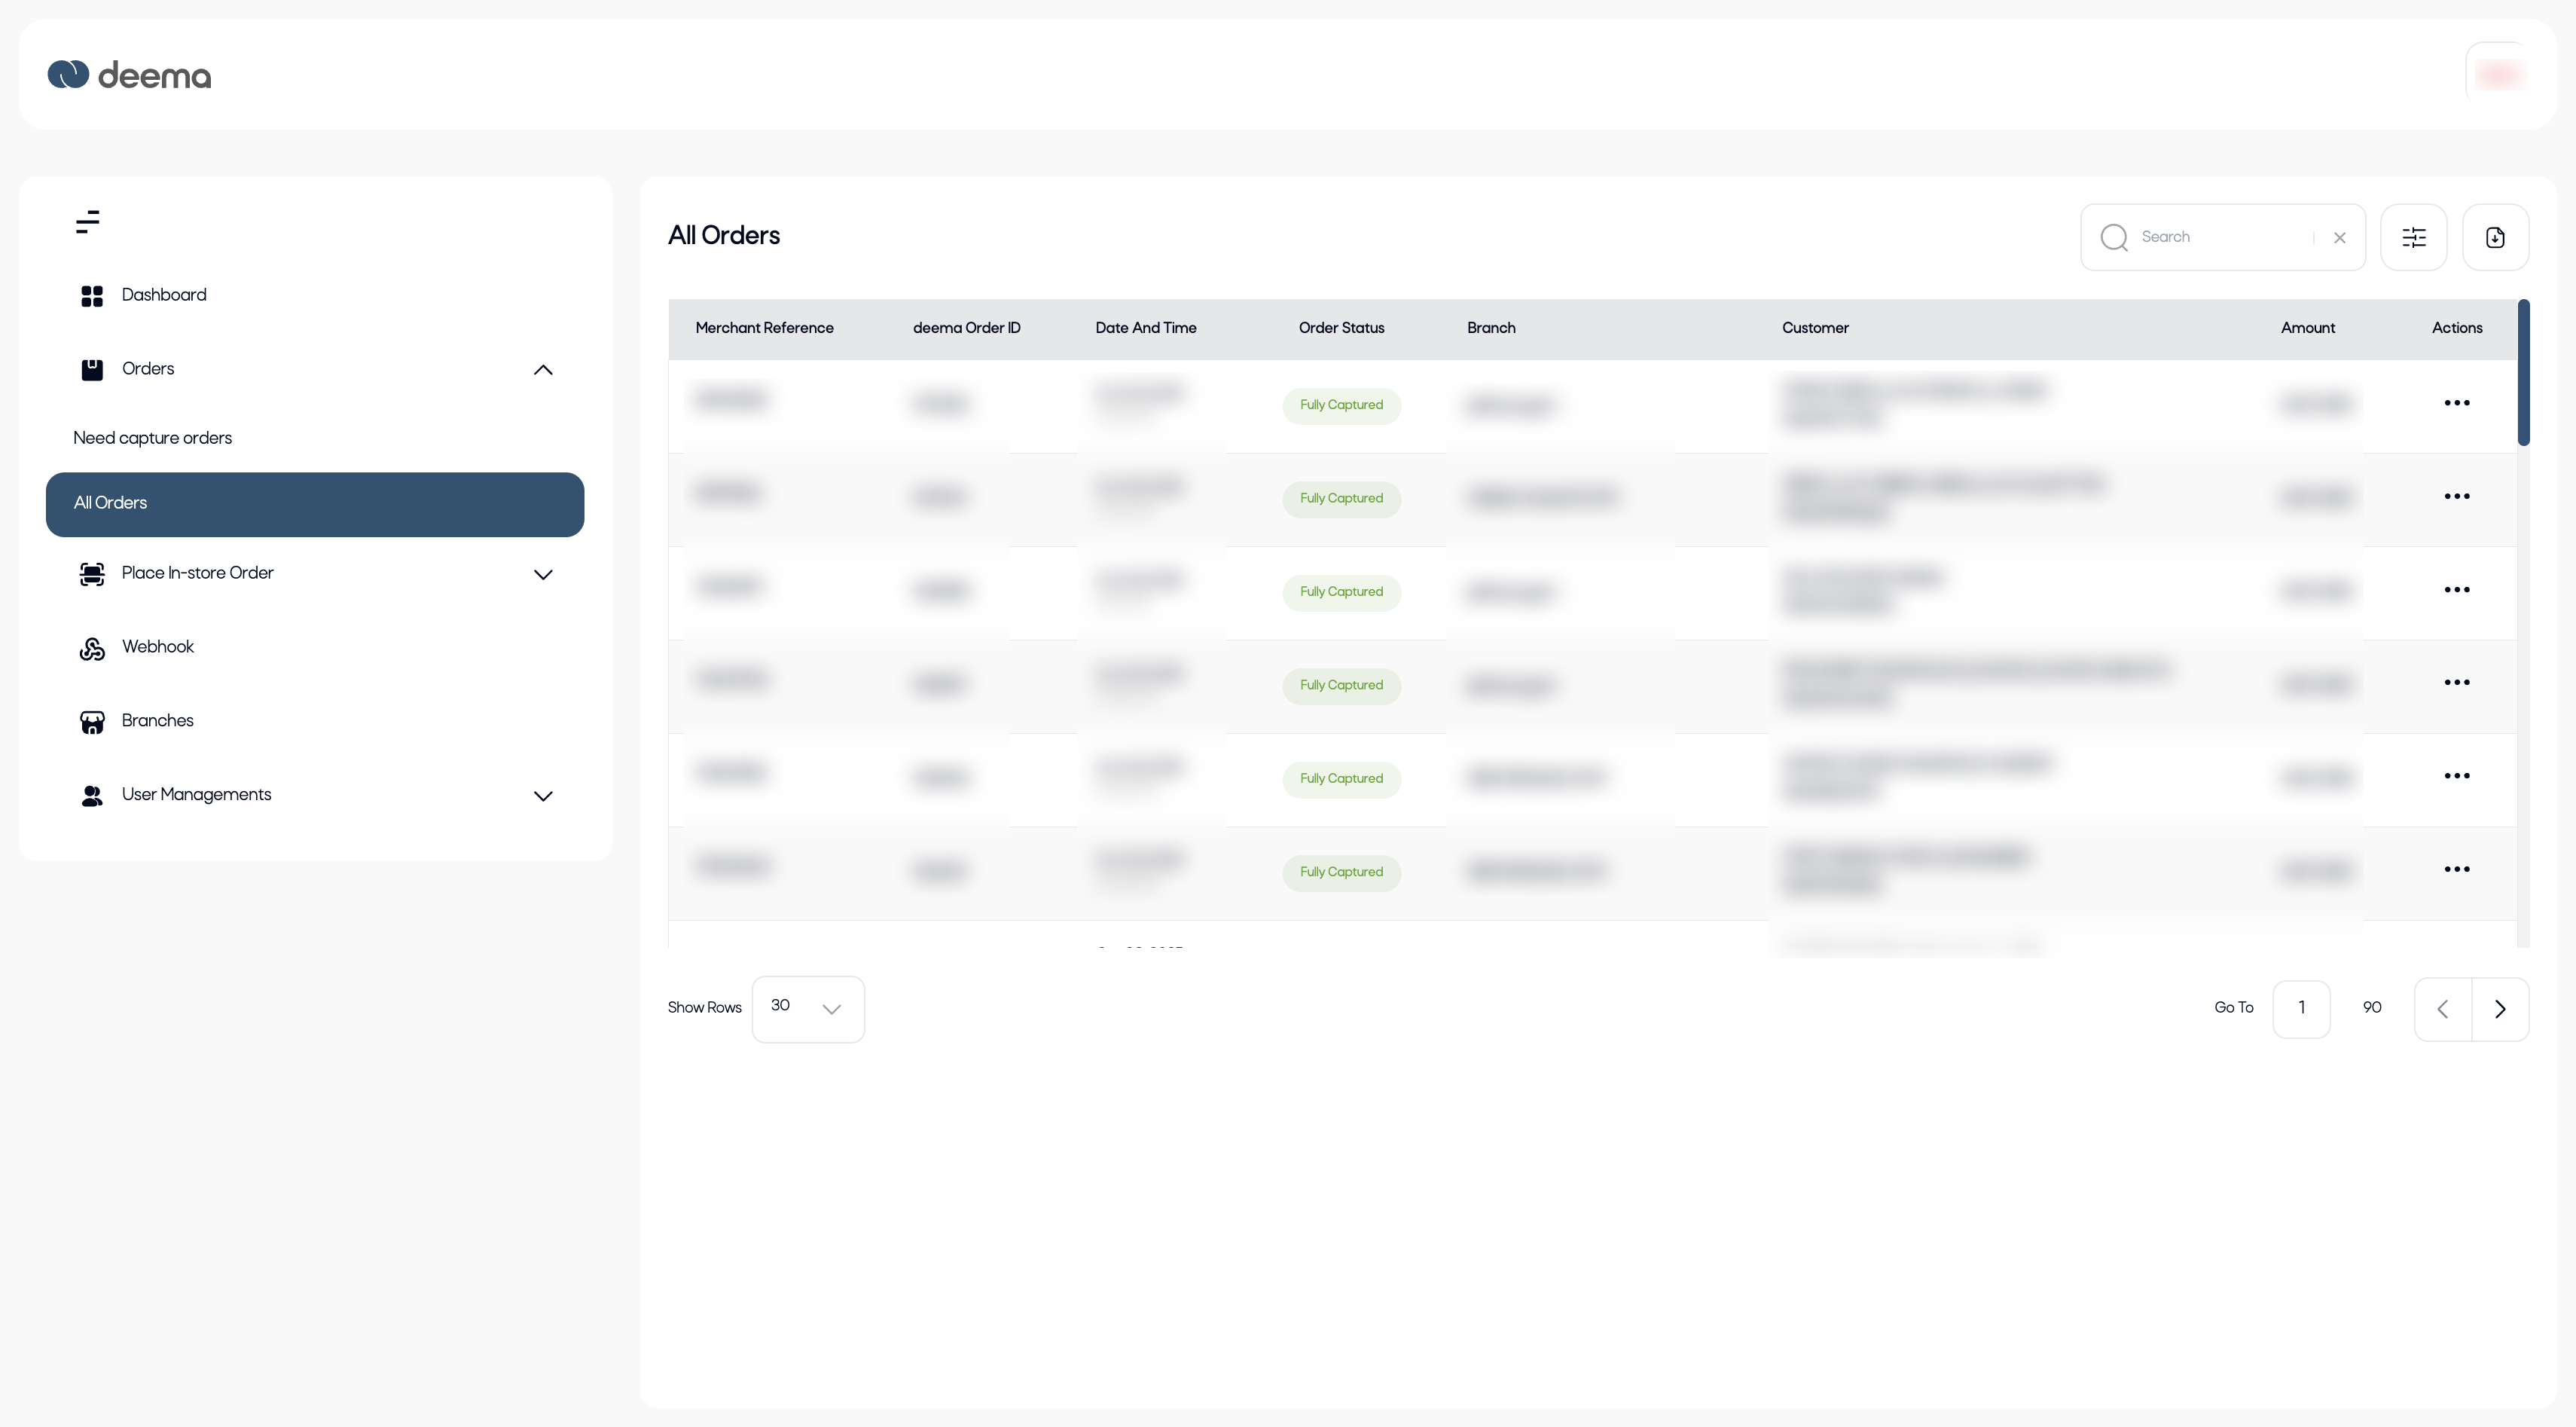
All Orders Page
This page displays a list of all orders made through your store — whether online or in-store — with the following columns:
- Merchant Reference – The internal reference number from your system.
- Deema Order ID – The unique order number generated by Deema.
- Date and Time – The timestamp when the order was created.
- Order Status – Indicates the current payment stage or outcome.
- Branch – The branch associated with the transaction (if applicable).
- Customer – Displays the customer’s name and contact information.
- Amount – The total transaction amount.
- Actions – Provides additional options (e.g., view details, refund, etc.).
You can search orders using the search bar, filter or sort them by date, and navigate between pages using the pagination controls at the bottom.
Order Statuses
Each order in the list includes a status label that reflects its current state in the payment lifecycle:
| Status | Description |
|---|---|
| Pending | The order has been created but payment is not yet completed. |
| Fully Captured | The payment has been fully processed and captured successfully. |
| Fully Refunded | The entire payment amount was refunded to the customer. |
| Partially Refunded | Only a portion of the payment was refunded. |
| Payment Canceled | The customer cancelled the payment or entered wrong payment credentials. |
| Declined by Regulator | The transaction was rejected by the financial regulator. |
| Declined by Deema | The transaction was declined by deema. |
Purpose
This page gives merchants full visibility over all sales and refund operations, enabling them to:
- Track real-time transaction updates.
- Identify failed or pending payments that may require action.
- Monitor refund activity and ensure settlement accuracy.
- Review and reconcile orders across multiple branches.
Order details page
When you click on any order from the All Orders list, you’ll be directed to the Order Details page.
This page provides complete visibility into the transaction, including payment information, refund options, and a full activity history.
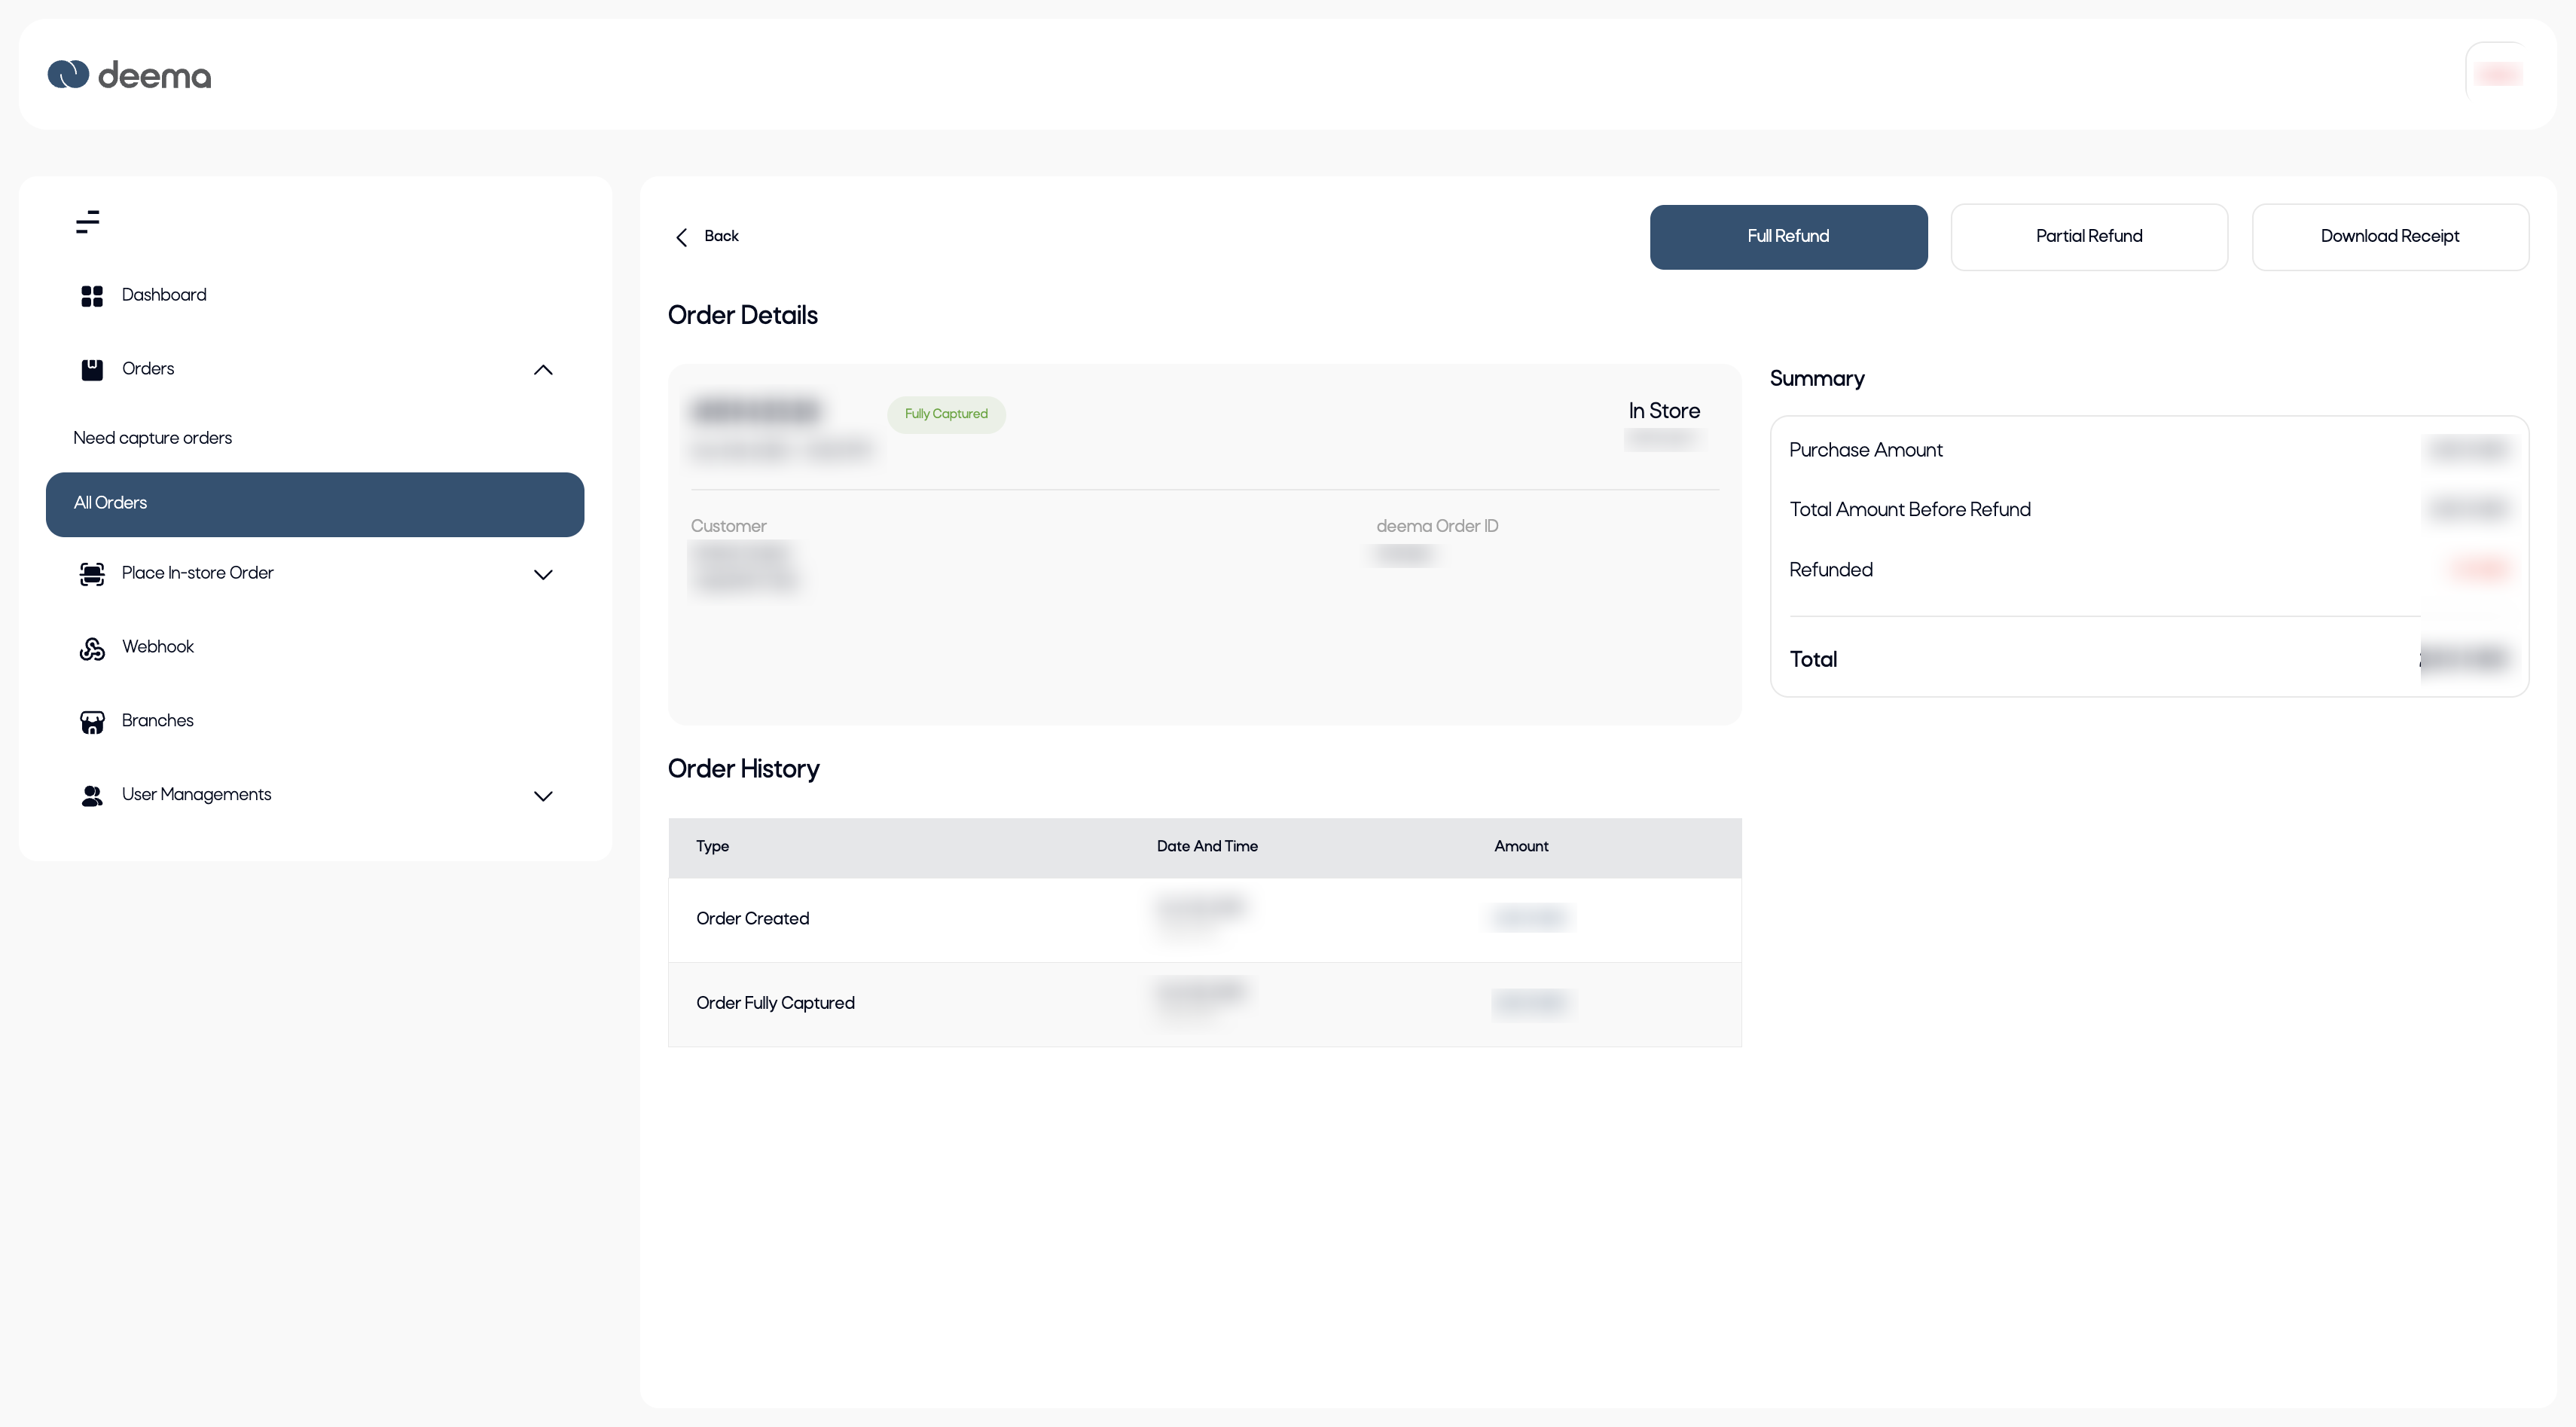
Page Overview
The page is divided into three main sections:
- Order Details
- Summary
- Order History
1. Order Details
This section displays the main order information, including:
- Order Reference – The internal or merchant reference number.
- Order Status – Displays the current order status (e.g., Fully Captured, Partially Refunded, Declined).
- Order Type – Indicates if the order was placed In Store or Online.
- Customer Information – Shows the customer’s name and contact email.
- Deema Order ID – The unique ID assigned by Deema for tracking.
This information helps merchants quickly identify and verify specific transactions.
2. Summary Panel
On the right side of the page, the Summary panel outlines the financial details of the transaction:
- Purchase Amount – The original amount of the purchase.
- Total Amount Before Refund – The total value before any refunds are processed.
- Refunded – Displays the refunded amount (if applicable).
- Total – The final amount after refunds.
Available Actions
At the top of the Summary panel, merchants can perform the following actions:
- Full Refund – Refunds the entire transaction amount to the customer.
- Partial Refund – Allows the merchant to specify a custom amount to refund.
- Download Receipt – Generates and downloads a digital copy of the transaction receipt.
Once a refund is processed, the order status will update automatically to reflect Fully Refunded or Partially Refunded, and the refund details will appear in the order history.
3. Order History
This section lists all events related to the order in chronological order, including:
- Order Created – When the customer initiated the order.
- Order Fully Captured – When the payment was successfully processed.
- Refund Issued – (if applicable) The amount and date of the refund.
Each entry includes:
- Event Type
- Date and Time
- Amount
This transparent record helps merchants track payment flow, status changes, and refund activities.
Purpose
The Order Details Page gives merchants full transaction transparency — enabling them to:
- Verify payment and refund history.
- Take refund actions directly from one interface.
- Maintain an auditable record of order lifecycle events.
Place in-store order
The Place In-Store Order feature allows merchants to create and process orders directly from physical store locations.
There are two ways to initiate an in-store order:
- Generate Payment Link – Sends a secure payment link to the customer’s mobile number.
- Generate QR Code – Displays a QR code that the customer can scan to access the payment link instantly.
Generate Payment Link.
The Generate Payment Link page enables the merchant to send a payment request directly to the customer.
Steps to Create a Payment Link
- Branch Name – Select the branch where the order is created (only store bra).
- Amount – Enter the payment amount in KWD.
- Phone Number – Enter the customer’s mobile number (including country code).
- Merchant Reference – Add a reference number or identifier for internal tracking.
- Click Send to generate and send the payment link.
Once the link is sent, the system will display a status pop-up window confirming the request.
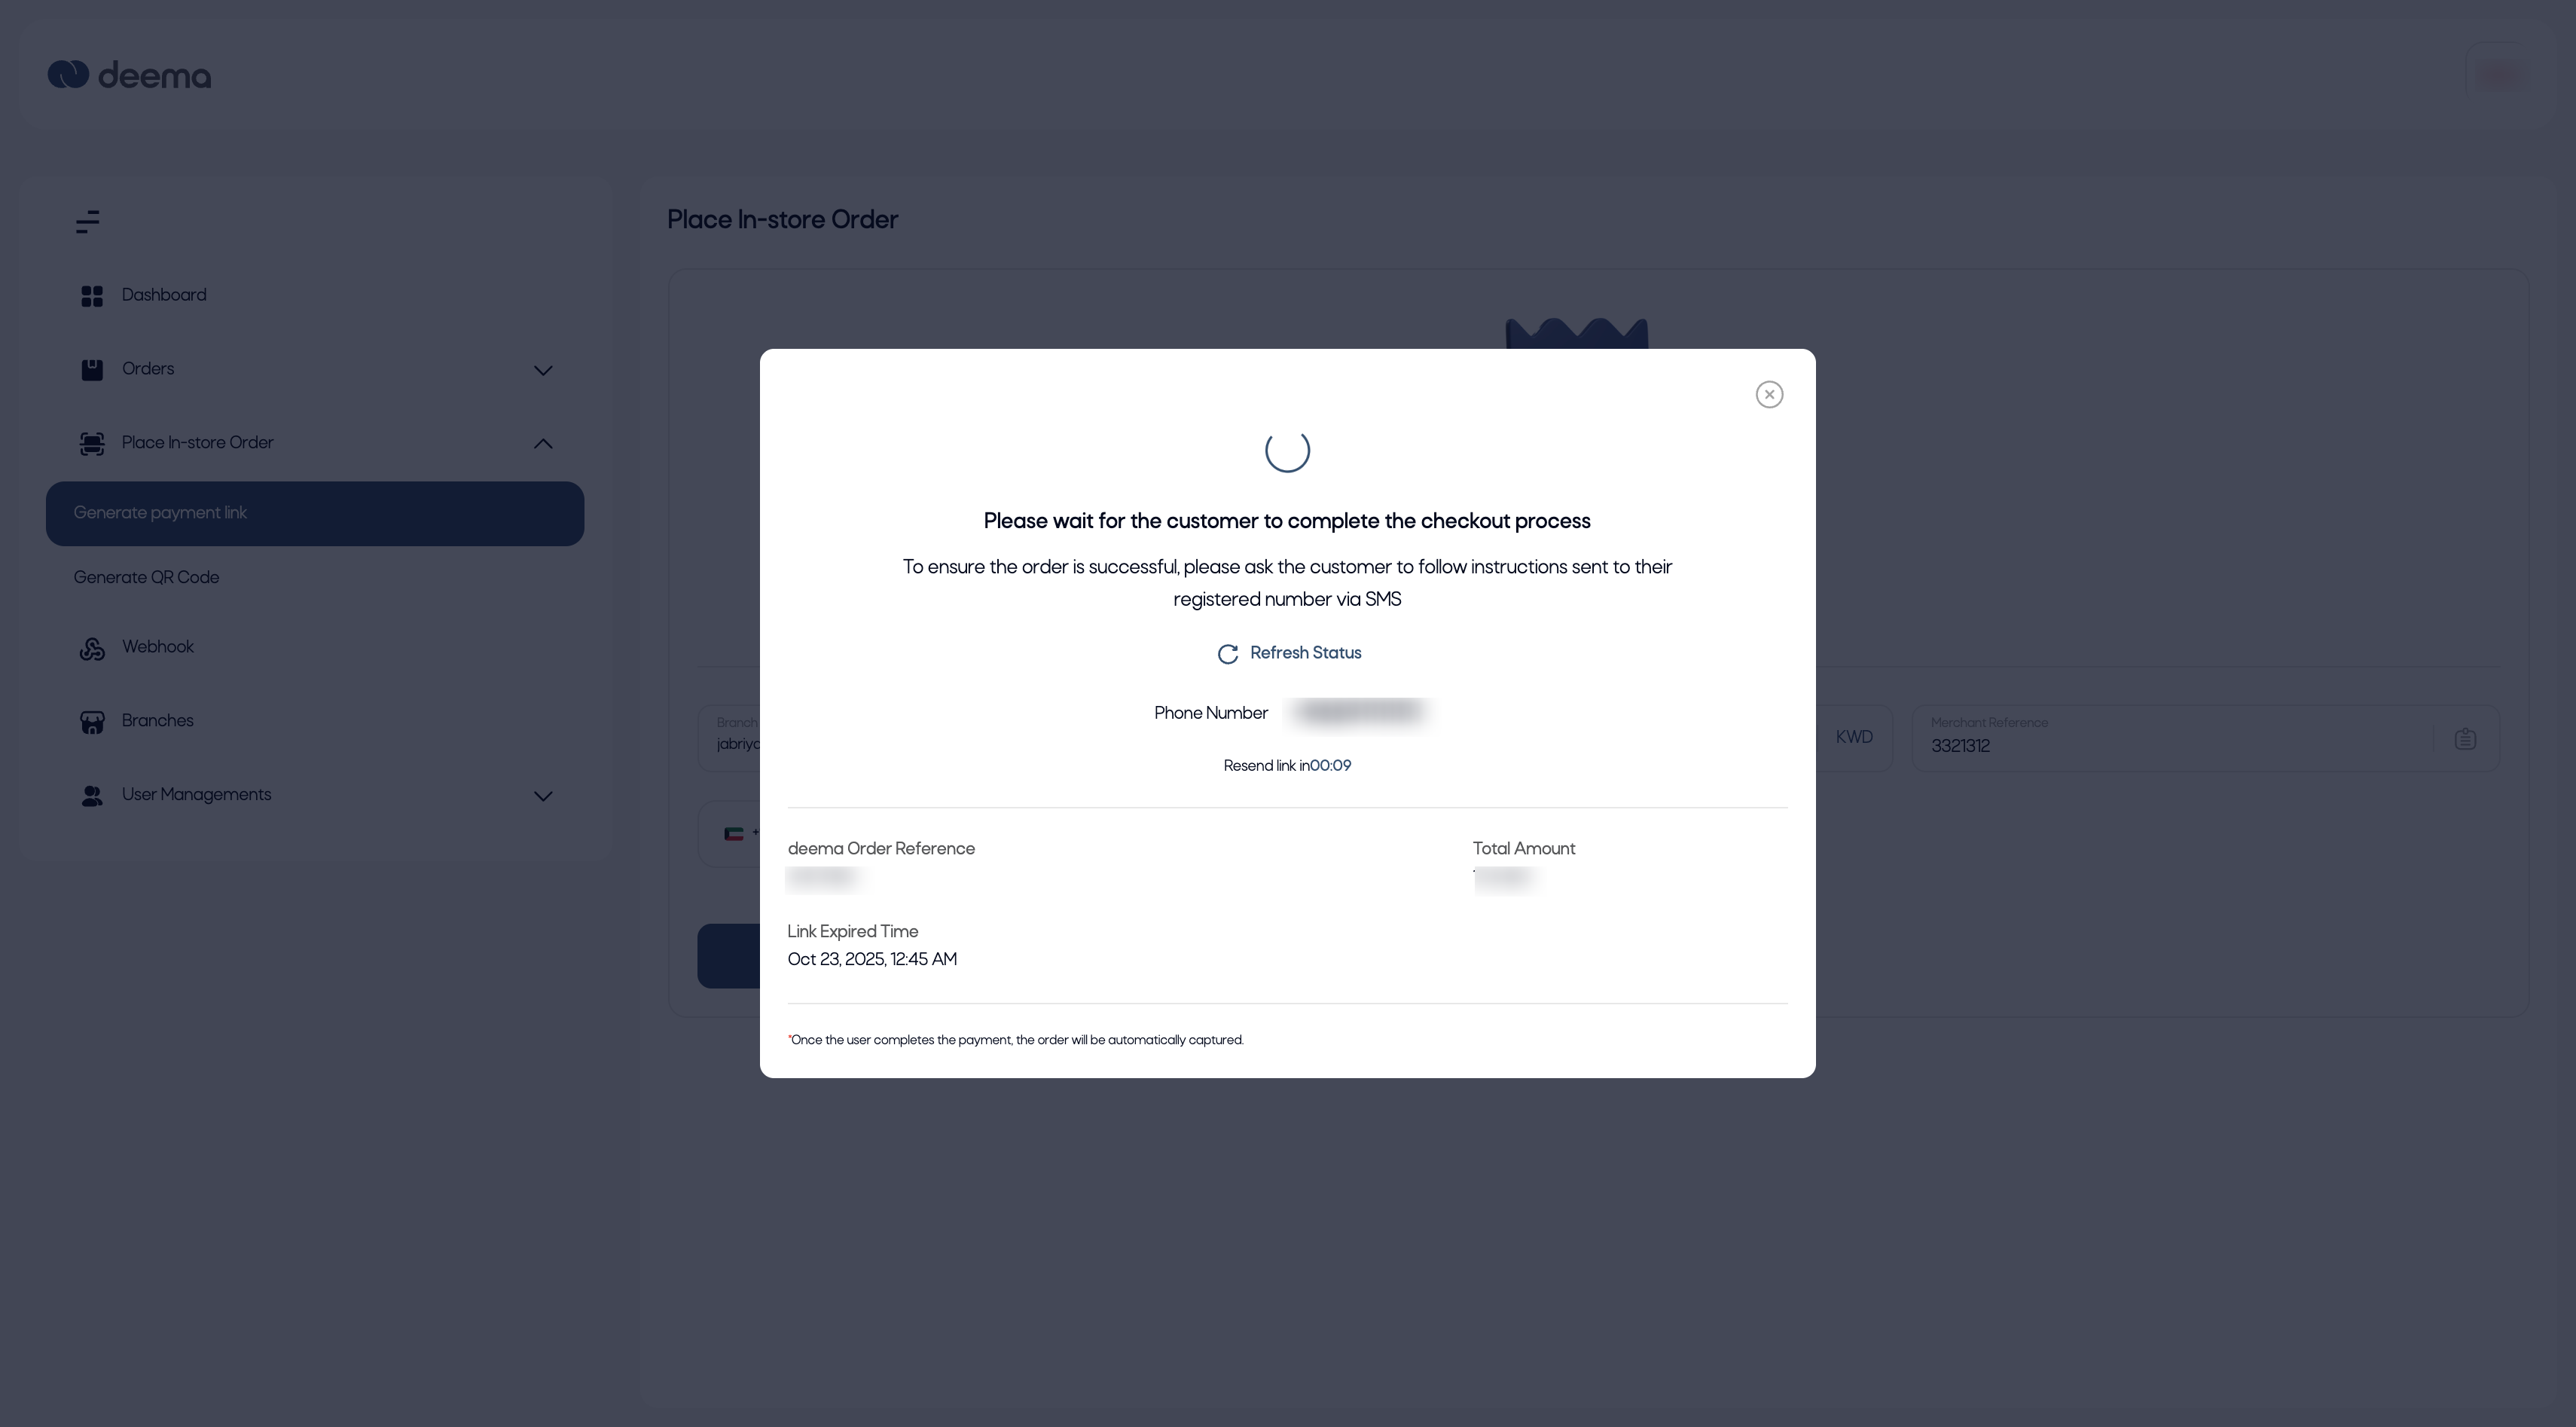
Payment Status Pop-Up
Note: You need to allow notification for the status to update automatically.
After sending the link, a pop-up appears showing the order details and live payment tracking.
The pop-up includes:
- Instruction Message – “Please wait for the customer to complete the checkout process.”
- Phone Number – The customer’s registered number to which the link was sent.
- Deema Order Reference – The system-generated unique order ID.
- Total Amount – The total payable amount.
- Link Expiry Time – The time when the payment link will expire.
- Refresh Status Button – Allows the merchant to manually refresh the order status.
- Resend Timer – Displays a countdown before the link can be resent if needed.
As long as the customer hasn’t completed payment, the pop-up will show a “Pending” state.
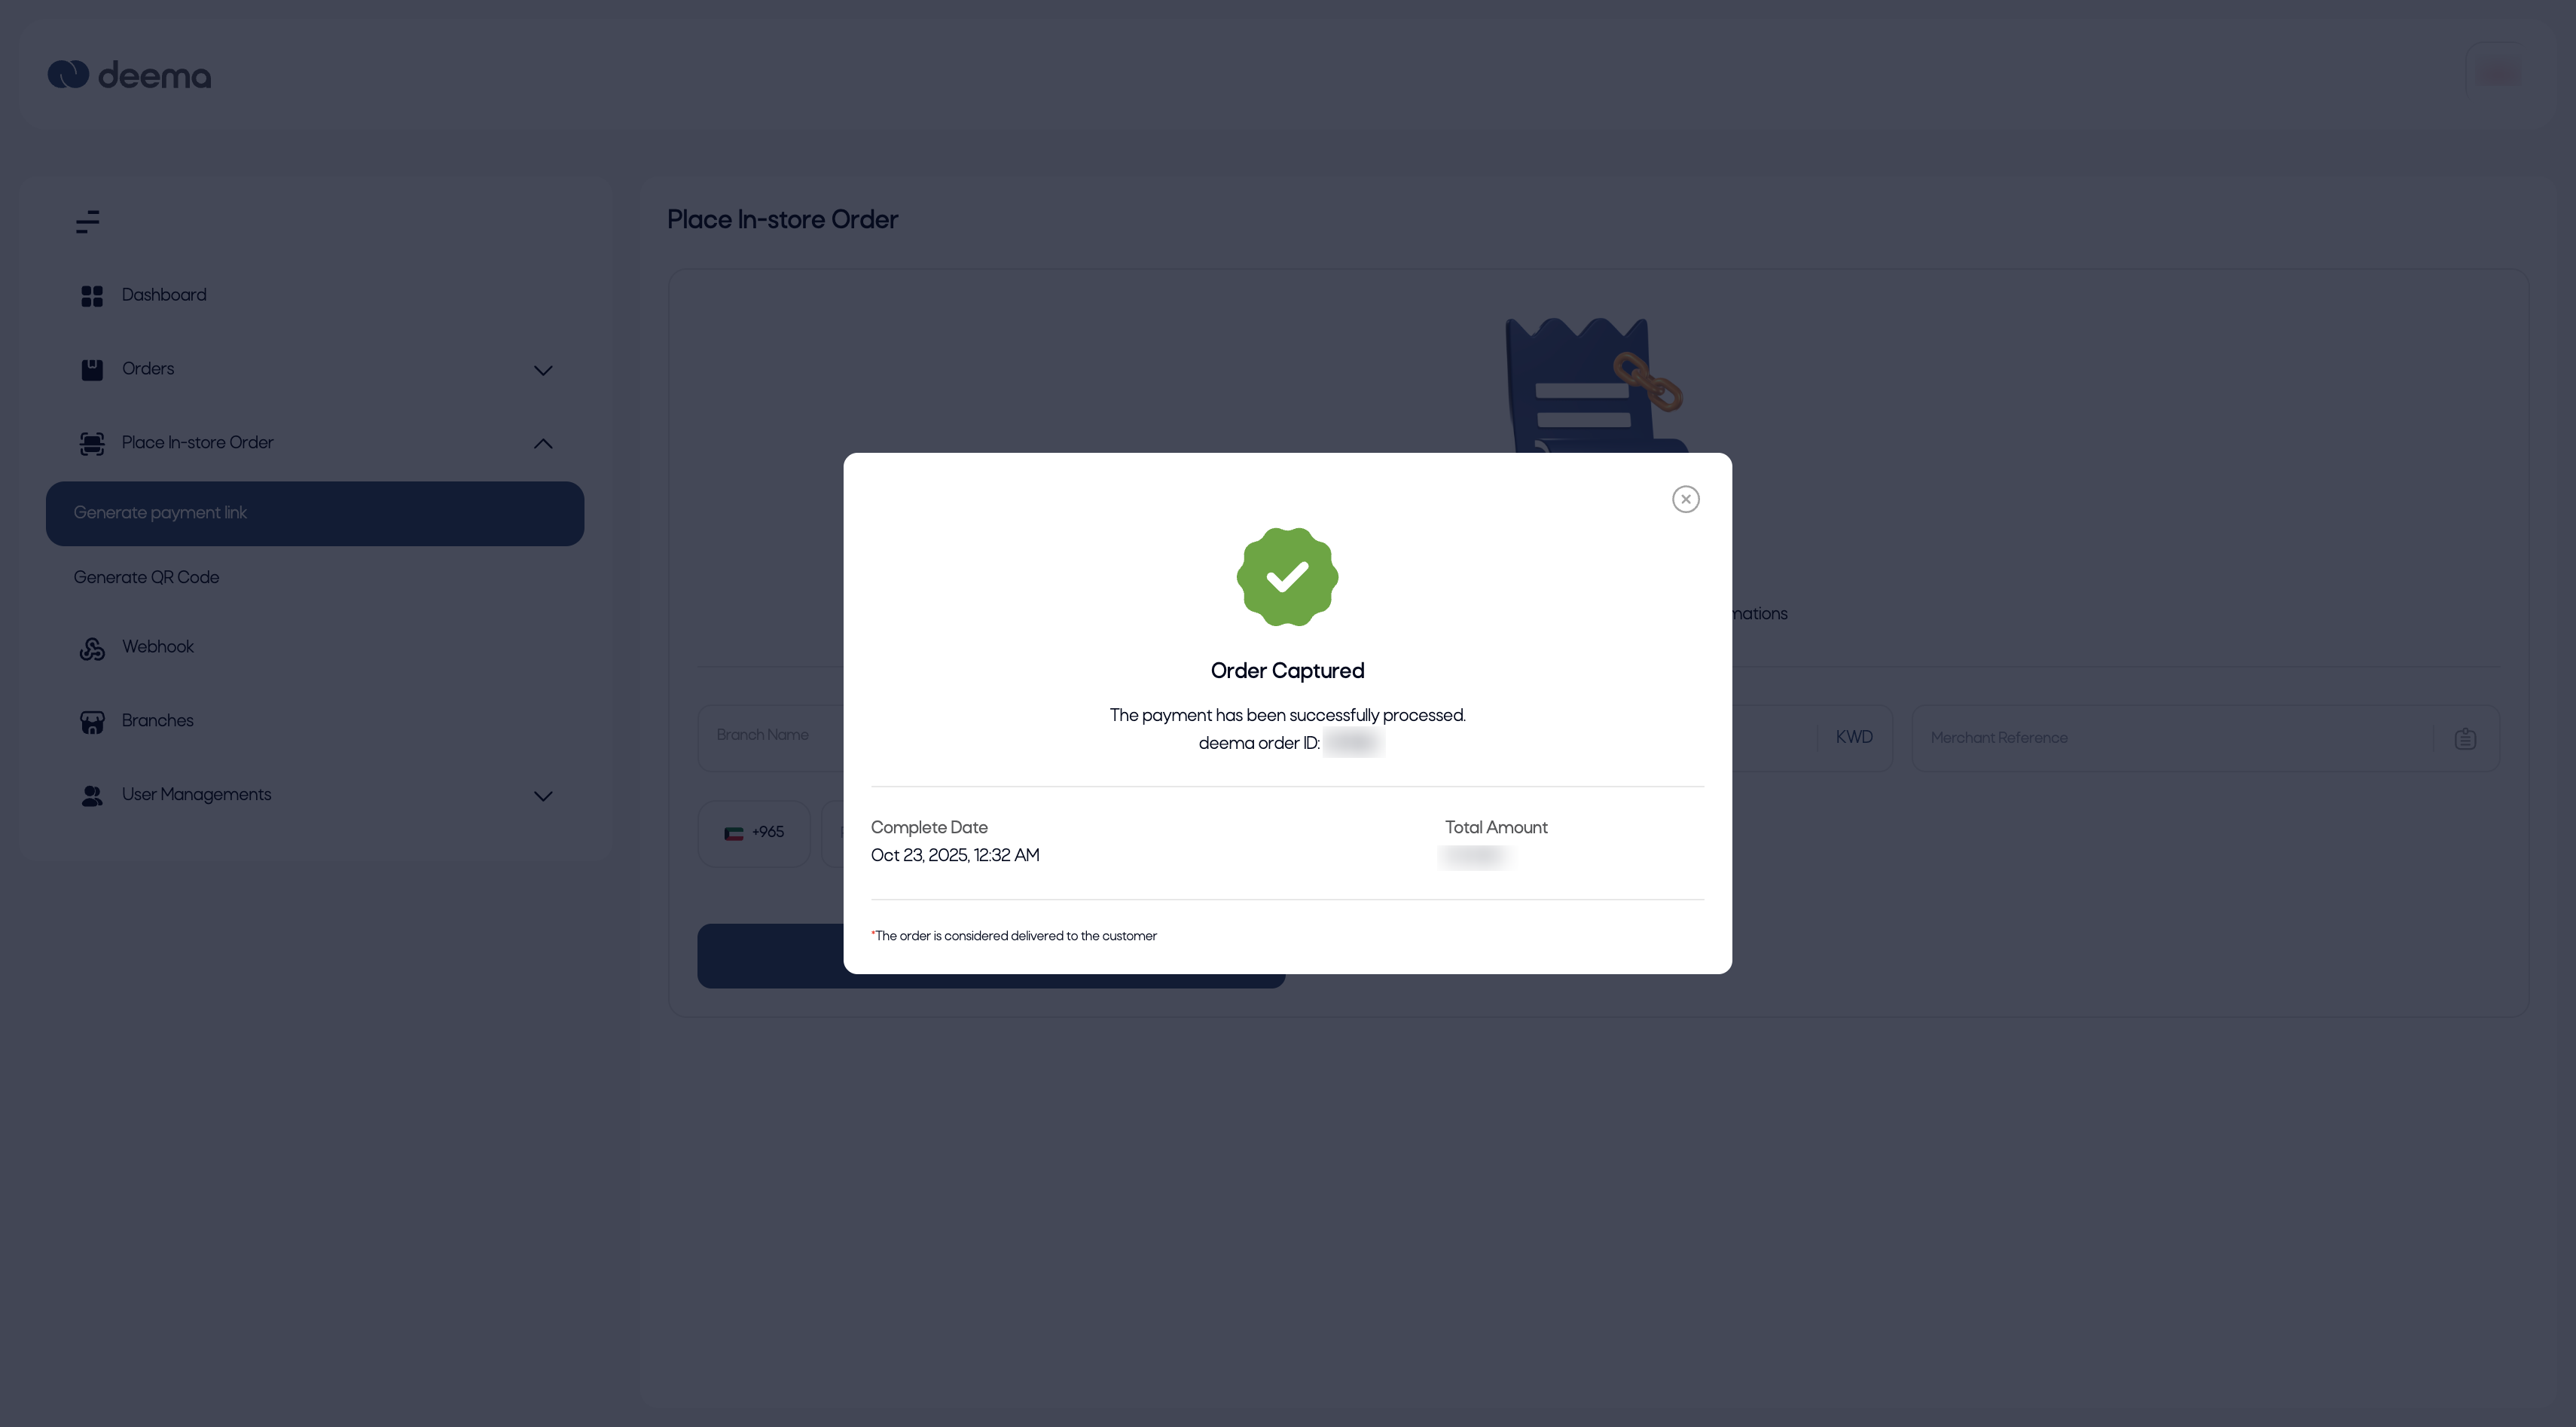
Once the customer successfully completes the payment, the status will automatically update to Captured.
If the update does not appear automatically, click Refresh Status to check for the latest result.
Note: Once the customer completes the payment, the order will be automatically captured and reflected in the Orders page.
Purpose
This feature provides a fast and secure way to collect payments in-store without additional hardware.
Merchants can:
- Send direct payment links via SMS.
- Monitor payment progress in real time.
- Refresh or resend the link if necessary.
- Track completed transactions instantly within the portal.
2. Generate QR Code
The Generate QR Code page allows the merchant to create a dynamic QR code for each in-store payment.
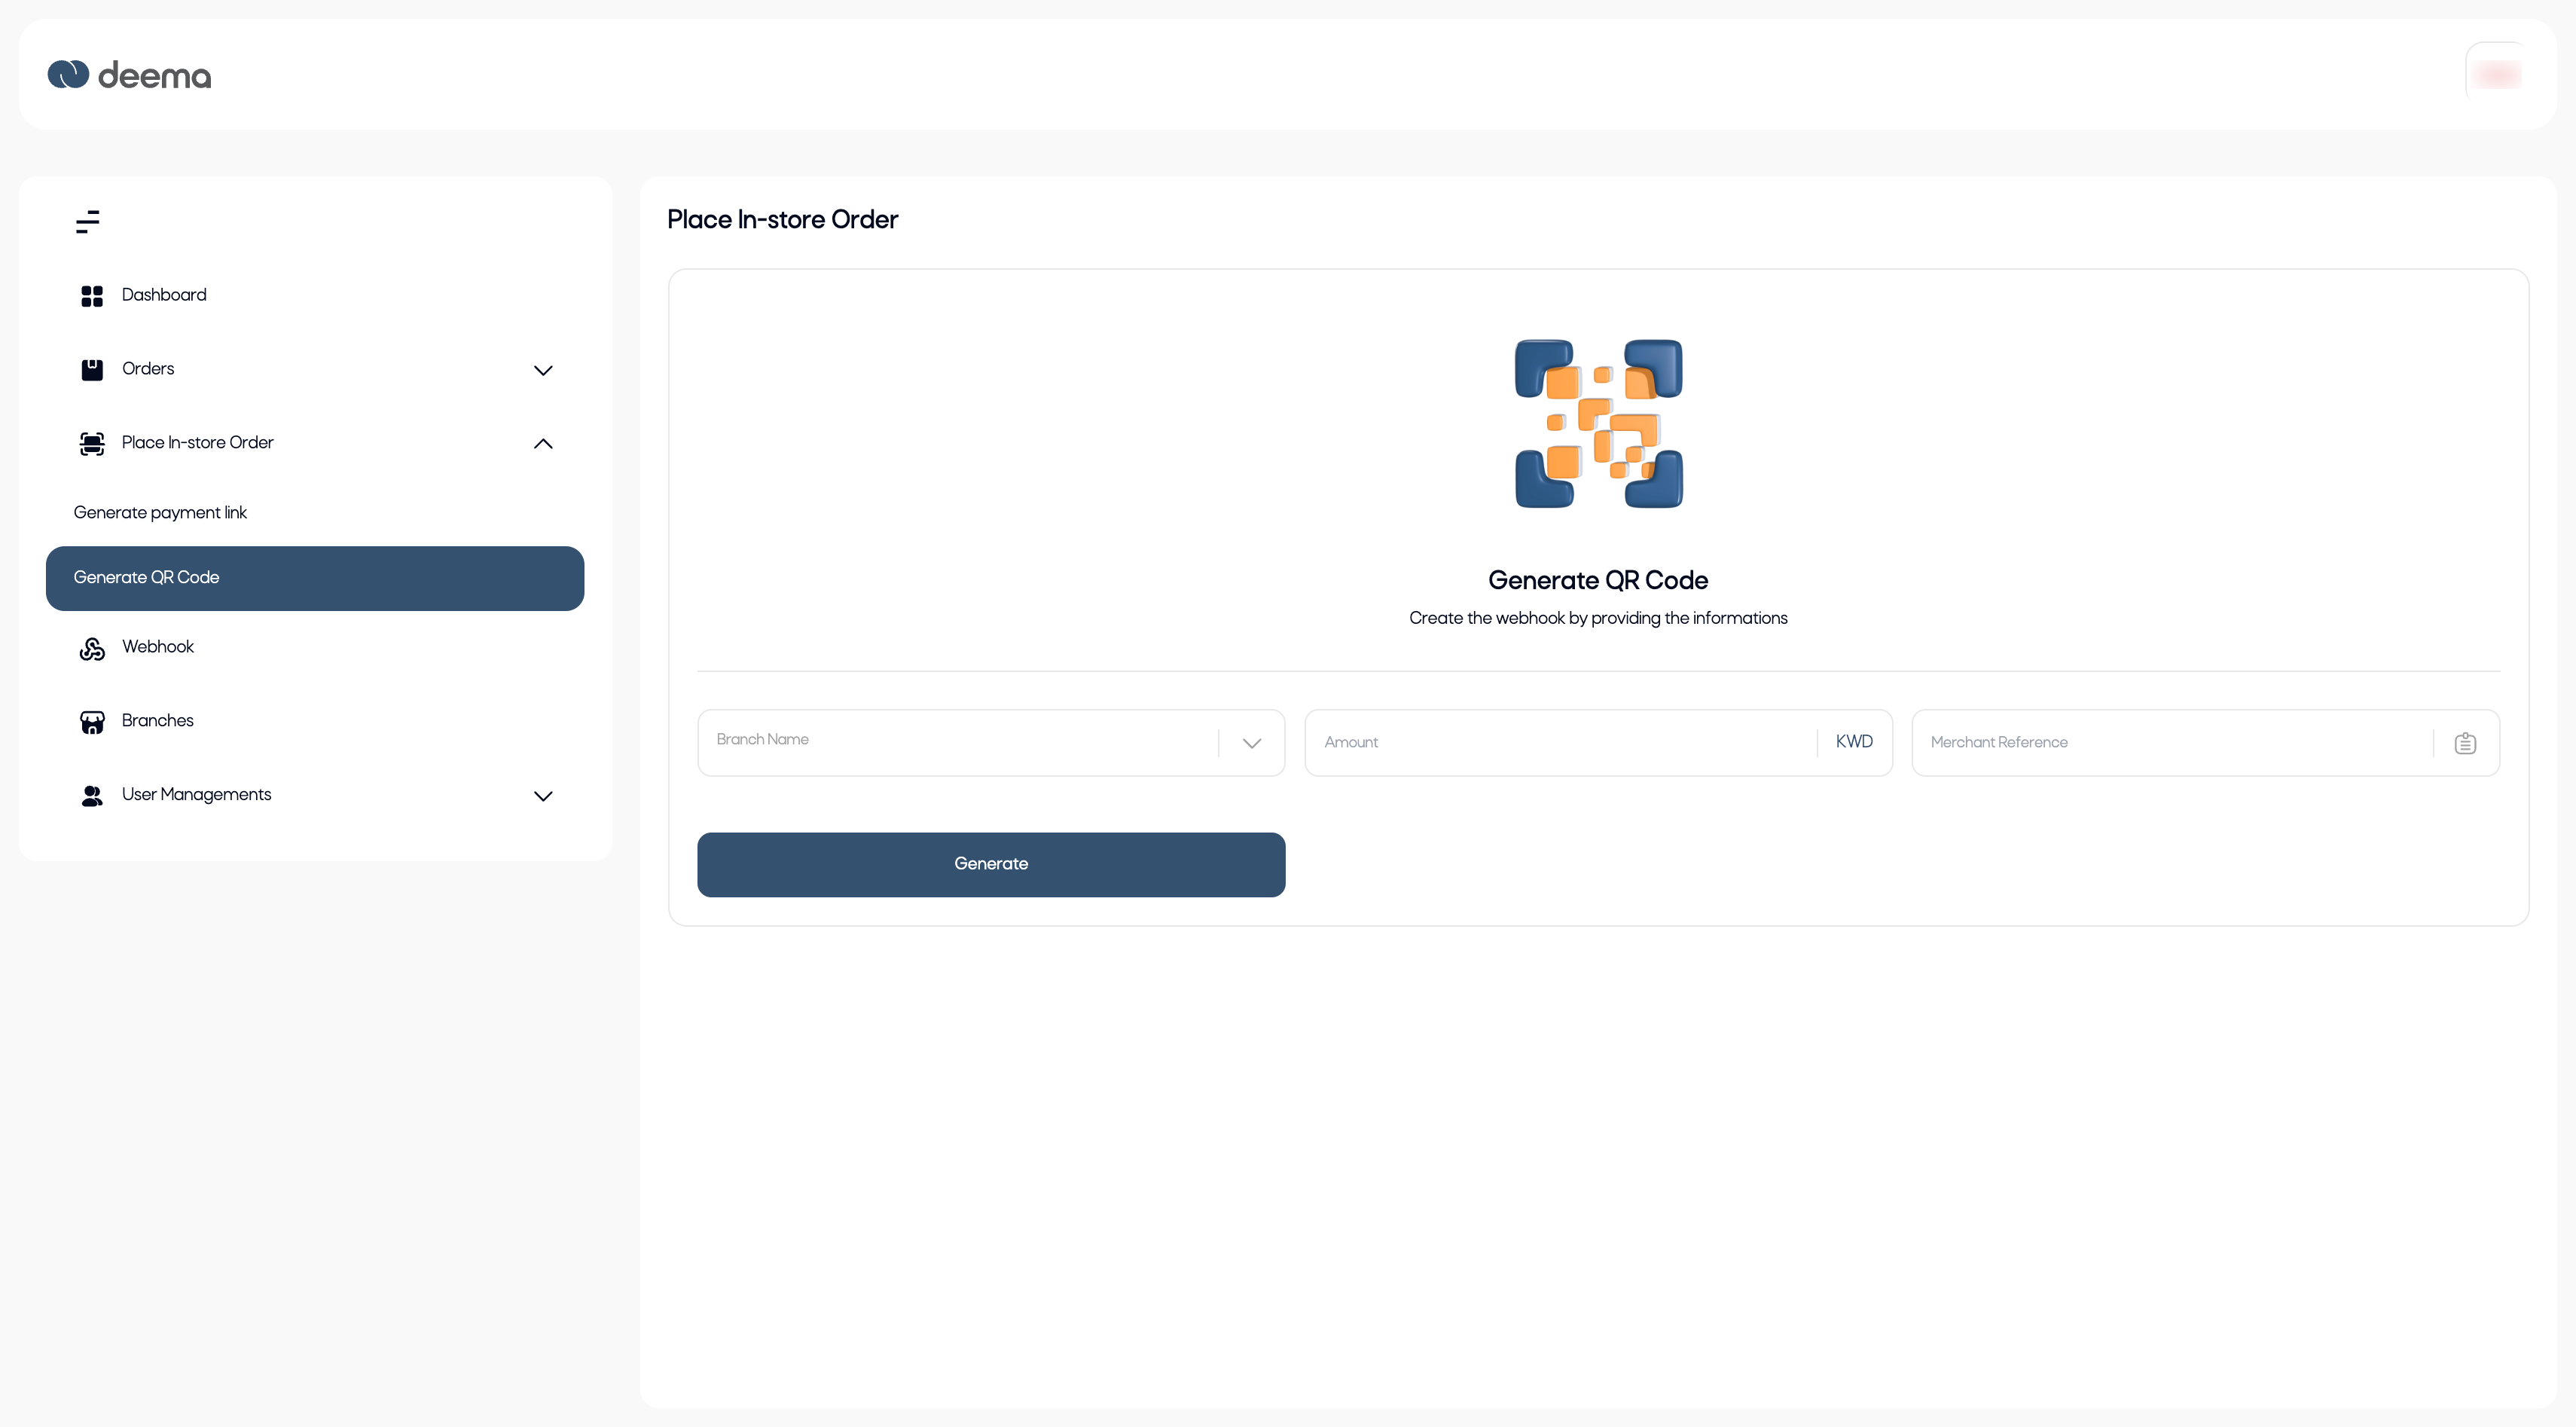
Steps to Generate a QR Code
- Branch Name – Select the branch where the transaction is taking place.
- Amount – Enter the payment amount in Kuwaiti Dinar (KWD).
- Merchant Reference – Add an internal reference number for tracking the order.
- Click Generate to create the QR code.
A pop-up window will appear containing the unique QR code for the transaction.
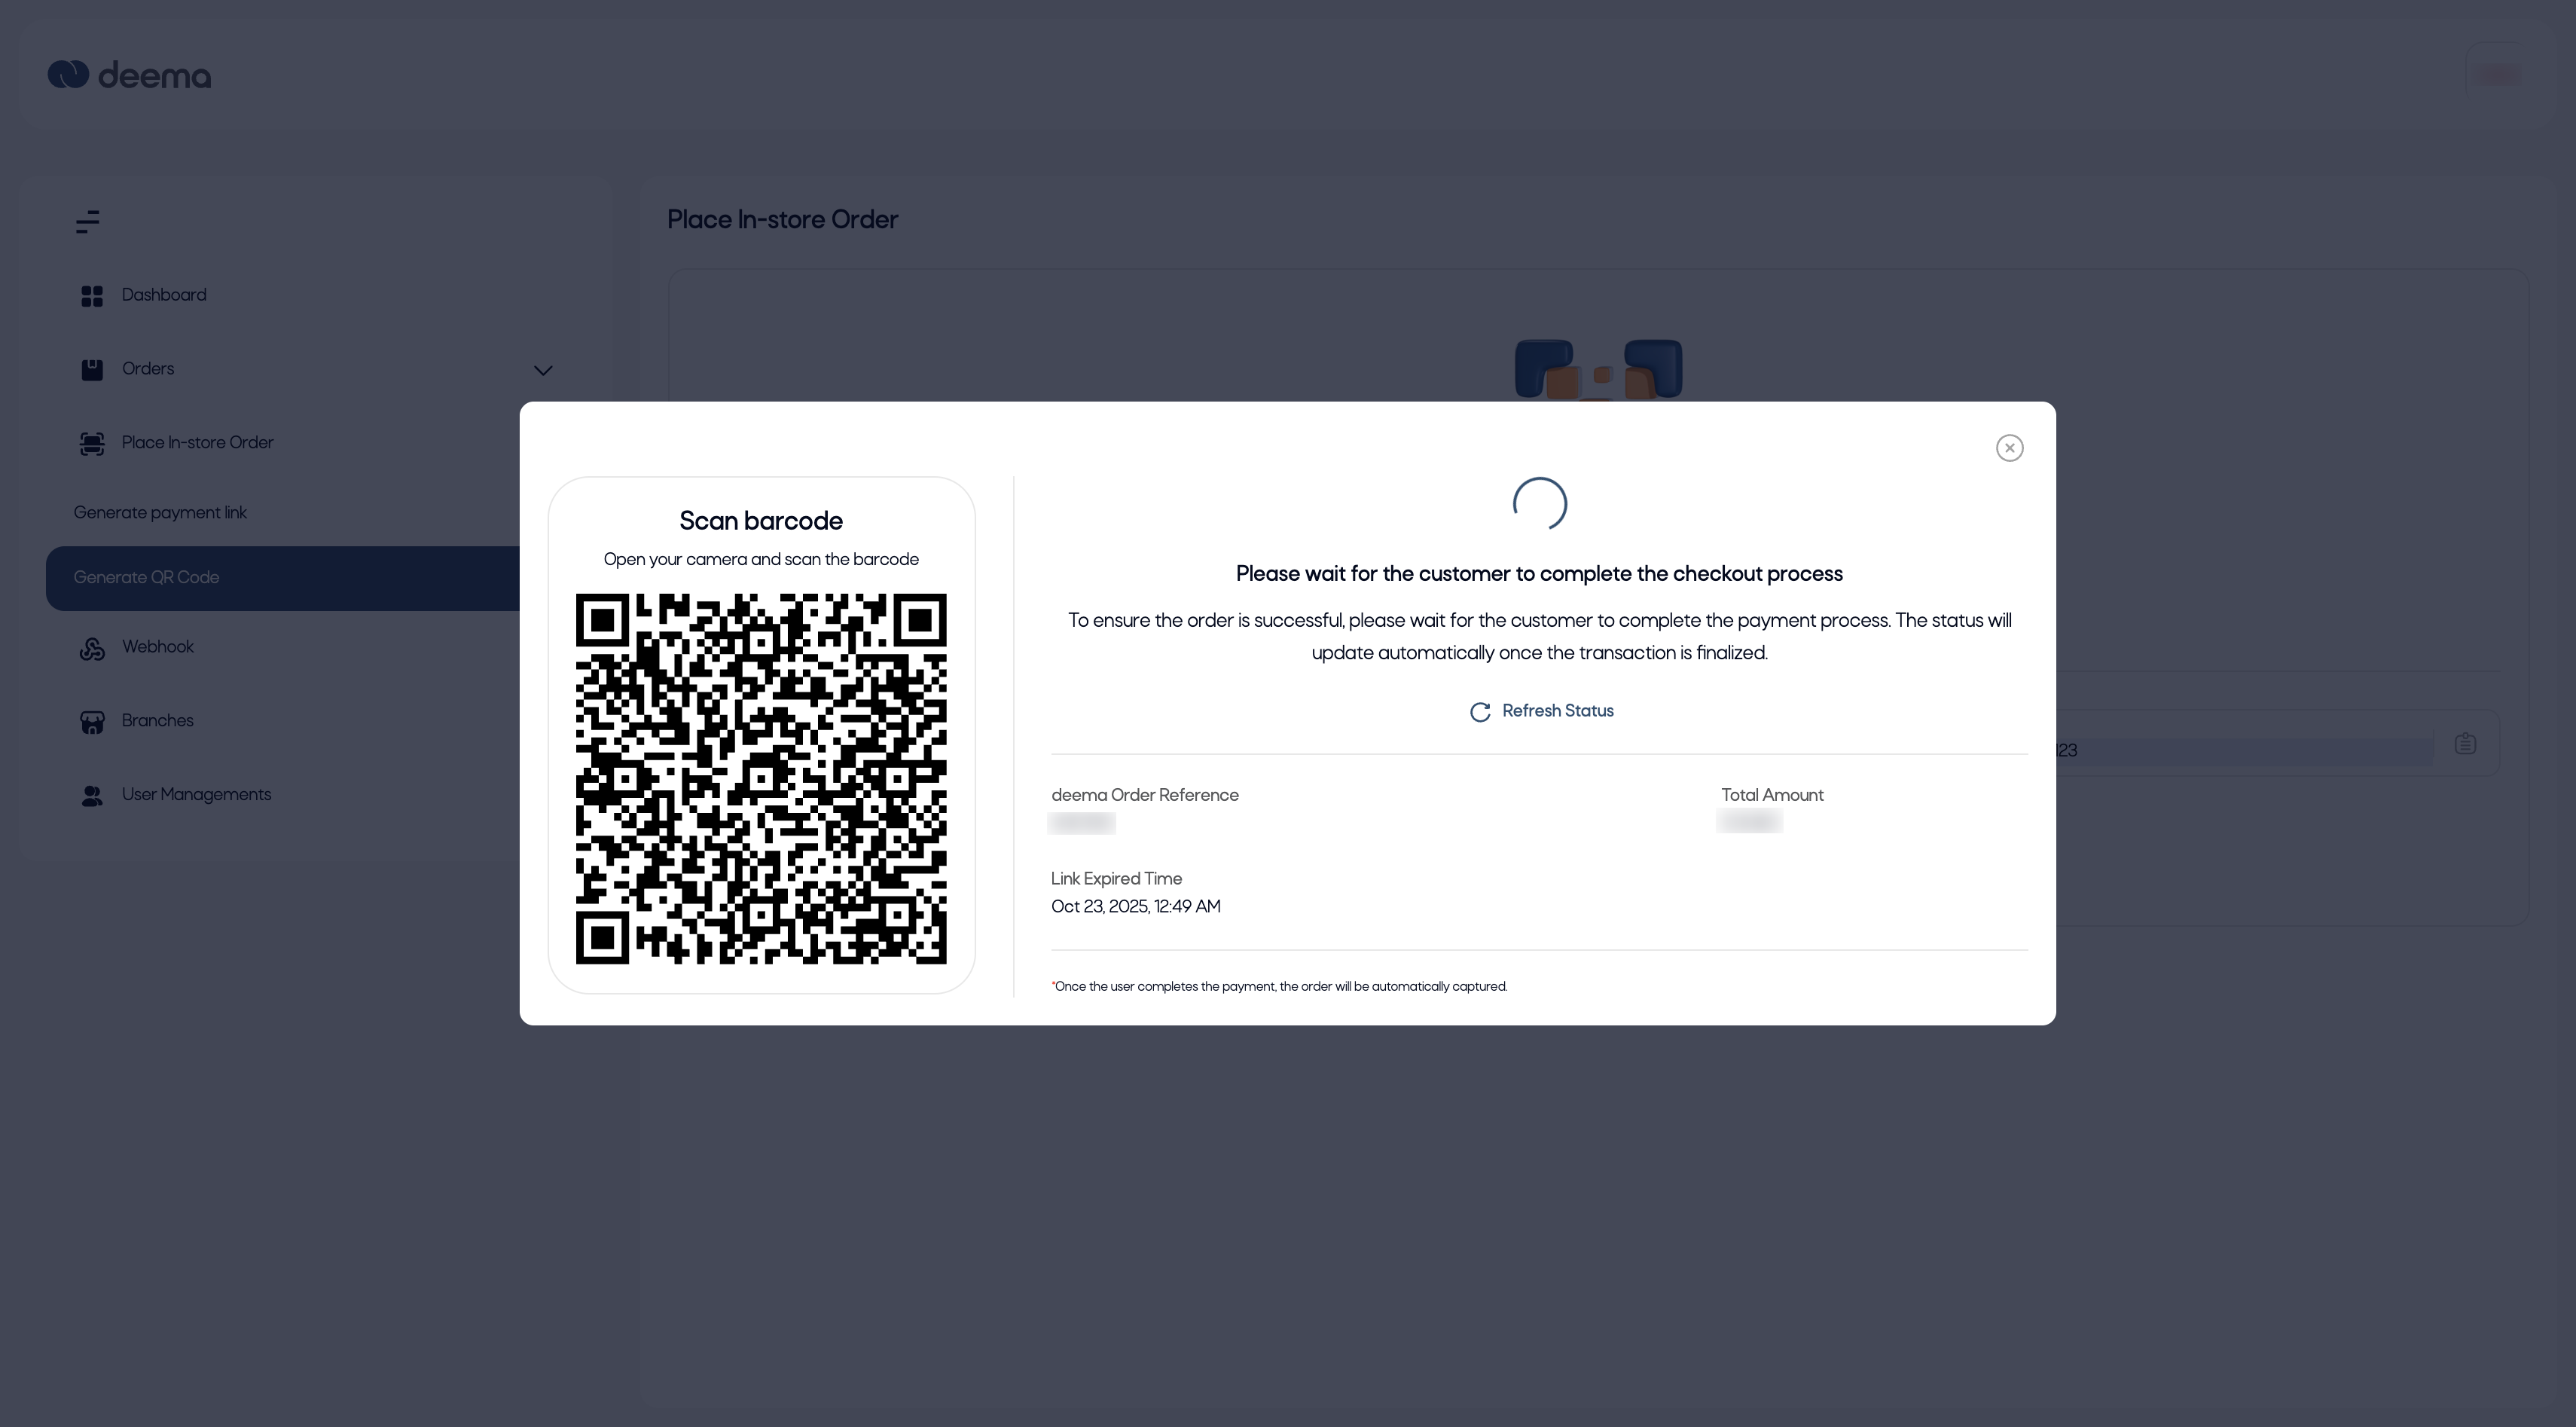
2. Payment Process
Once the QR code appears on screen:
- The customer opens their phone’s camera and scans the QR code.
- The link directs them to the secure payment page where they can complete checkout.
- The merchant can view the live transaction status directly within the pop-up window.
The pop-up also displays:
Note: You need to allow notification for the status to update automatically.
- Order Reference – The system-generated deema order ID.
- Total Amount – The payable amount.
- Link Expiry Time – Indicates when the QR code and its payment link will expire.
- Refresh Status Button – Allows manual refresh to check the payment status.
As long as the payment is not yet completed, the pop-up will show a Pending state.
Once the customer completes payment, the status automatically updates to Captured.
If needed, click Refresh Status to fetch the latest update.
Note: When the payment is completed, the order is automatically recorded under the Orders section of the merchant portal.
Purpose
This feature helps merchants collect in-store payments instantly without entering customer details manually.
It is ideal for walk-in customers who prefer scanning and paying on the spot.
The Generate QR Code option ensures:
- Fast and contactless checkout.
- Secure and traceable transactions.
- Real-time order tracking within the same interface.
Webhook
The Webhook feature allows merchants to receive automatic notifications from deema whenever important events occur — such as order creation, payment completion, refunds, or status updates.
It enables seamless integration between deema and the merchant’s backend system, keeping both platforms synchronized in real time.
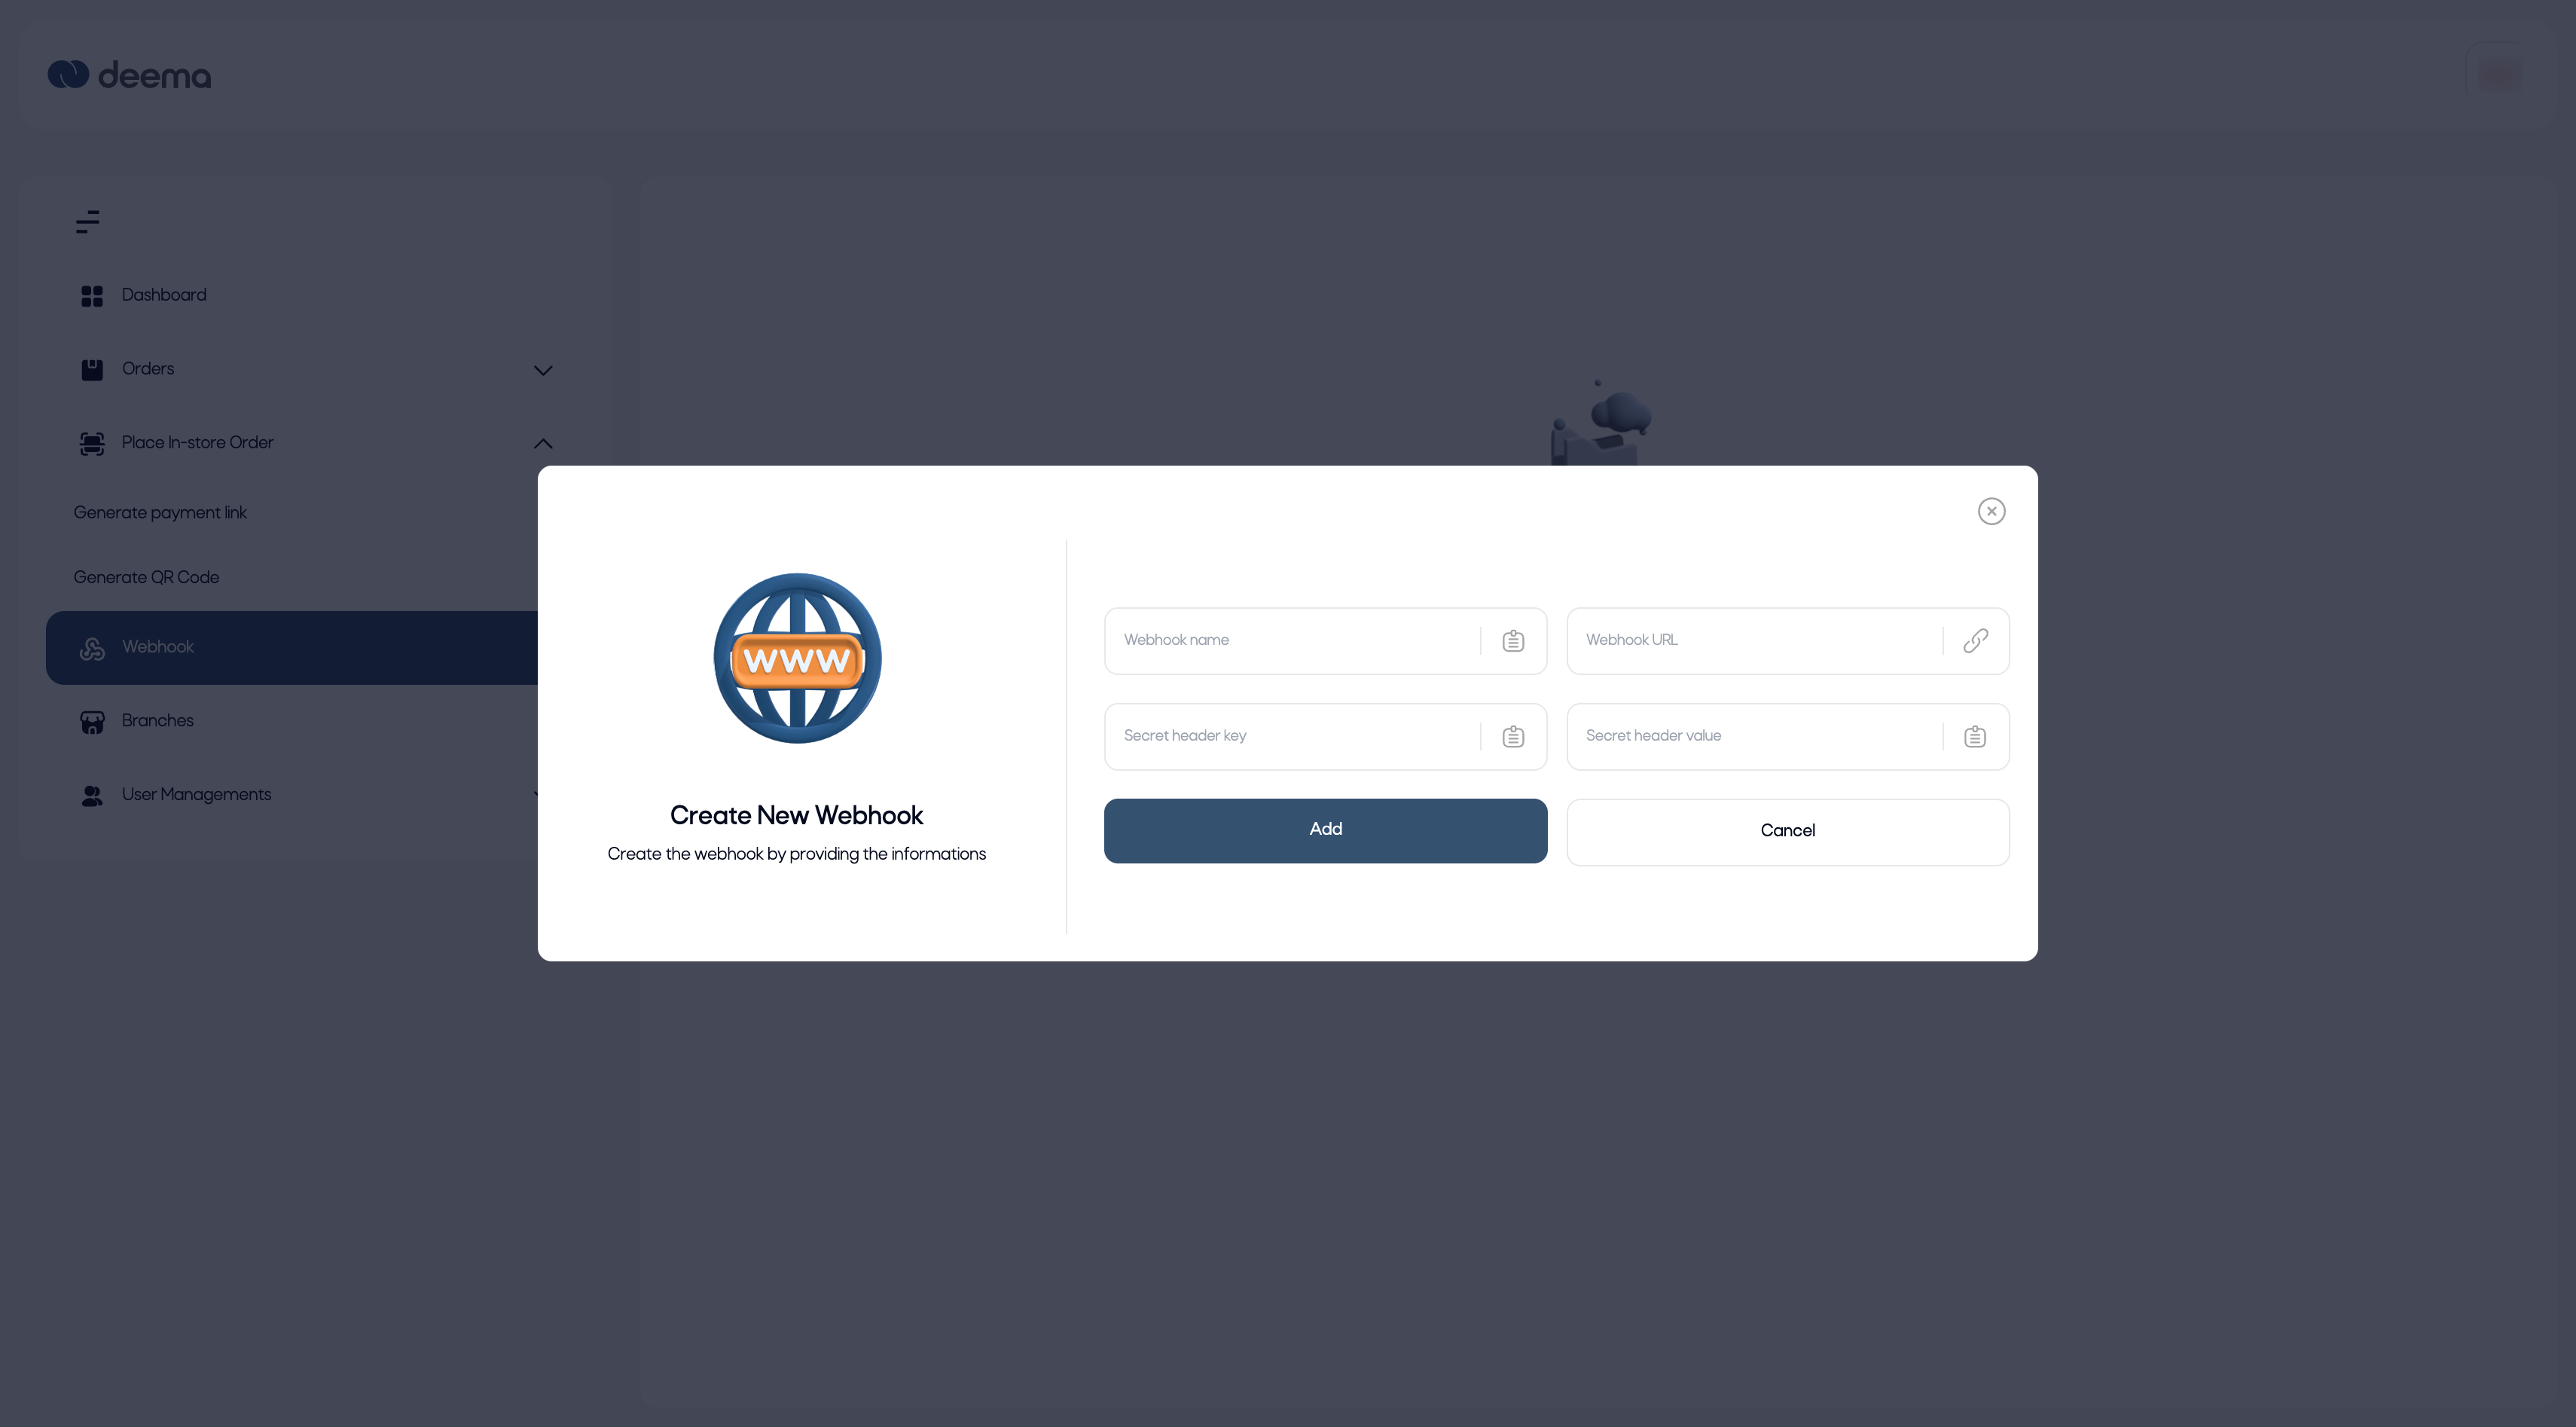
Create a New Webhook
Merchants can easily set up a webhook by filling in the required details and linking their server endpoint.
Steps to Create a Webhook
- Webhook Name – Enter a recognizable name for the webhook (e.g., “Payment Notifications” or “Order Updates”).
- Webhook URL – Provide the endpoint URL on your server where deema should send event data.
- Example:
https://yourdomain.com/webhooks/deema
- Example:
- Secret Header Key – Define a custom security key name (e.g.,
x-deema-signature) that will be used in webhook requests. - Secret Header Value – Enter a secret value associated with the key (e.g., a unique token or hash) to authenticate incoming requests.
- Click Add to save the webhook and activate it, or Cancel to discard changes.
Once created, deema will begin sending real-time event notifications to the provided URL.
This ensures the merchant’s system stays up to date with every order or payment activity.
Purpose
The webhook integration eliminates the need for manual synchronization.
It allows merchants to automate workflows, reduce operational effort, and ensure accurate, real-time data exchange between deema and their internal systems.
Bracnhes
The Branches section allows merchants to manage their store locations within the platform.
Each branch represents a physical or digital sales point under the same merchant account.

Key Features
- View all existing branches and their activation status.
- Add new branches for different locations or stores.
- Edit or delete existing branches as needed.
- Quickly activate or deactivate branches using the toggle switch.
Branch Types
| Branch Type | Description |
|---|---|
| Online Branch | Default branch automatically created for online transactions. It cannot be edited or deleted. |
| Physical Branches | Additional branches created by the merchant for in-store operations. These can be edited or deleted anytime. |
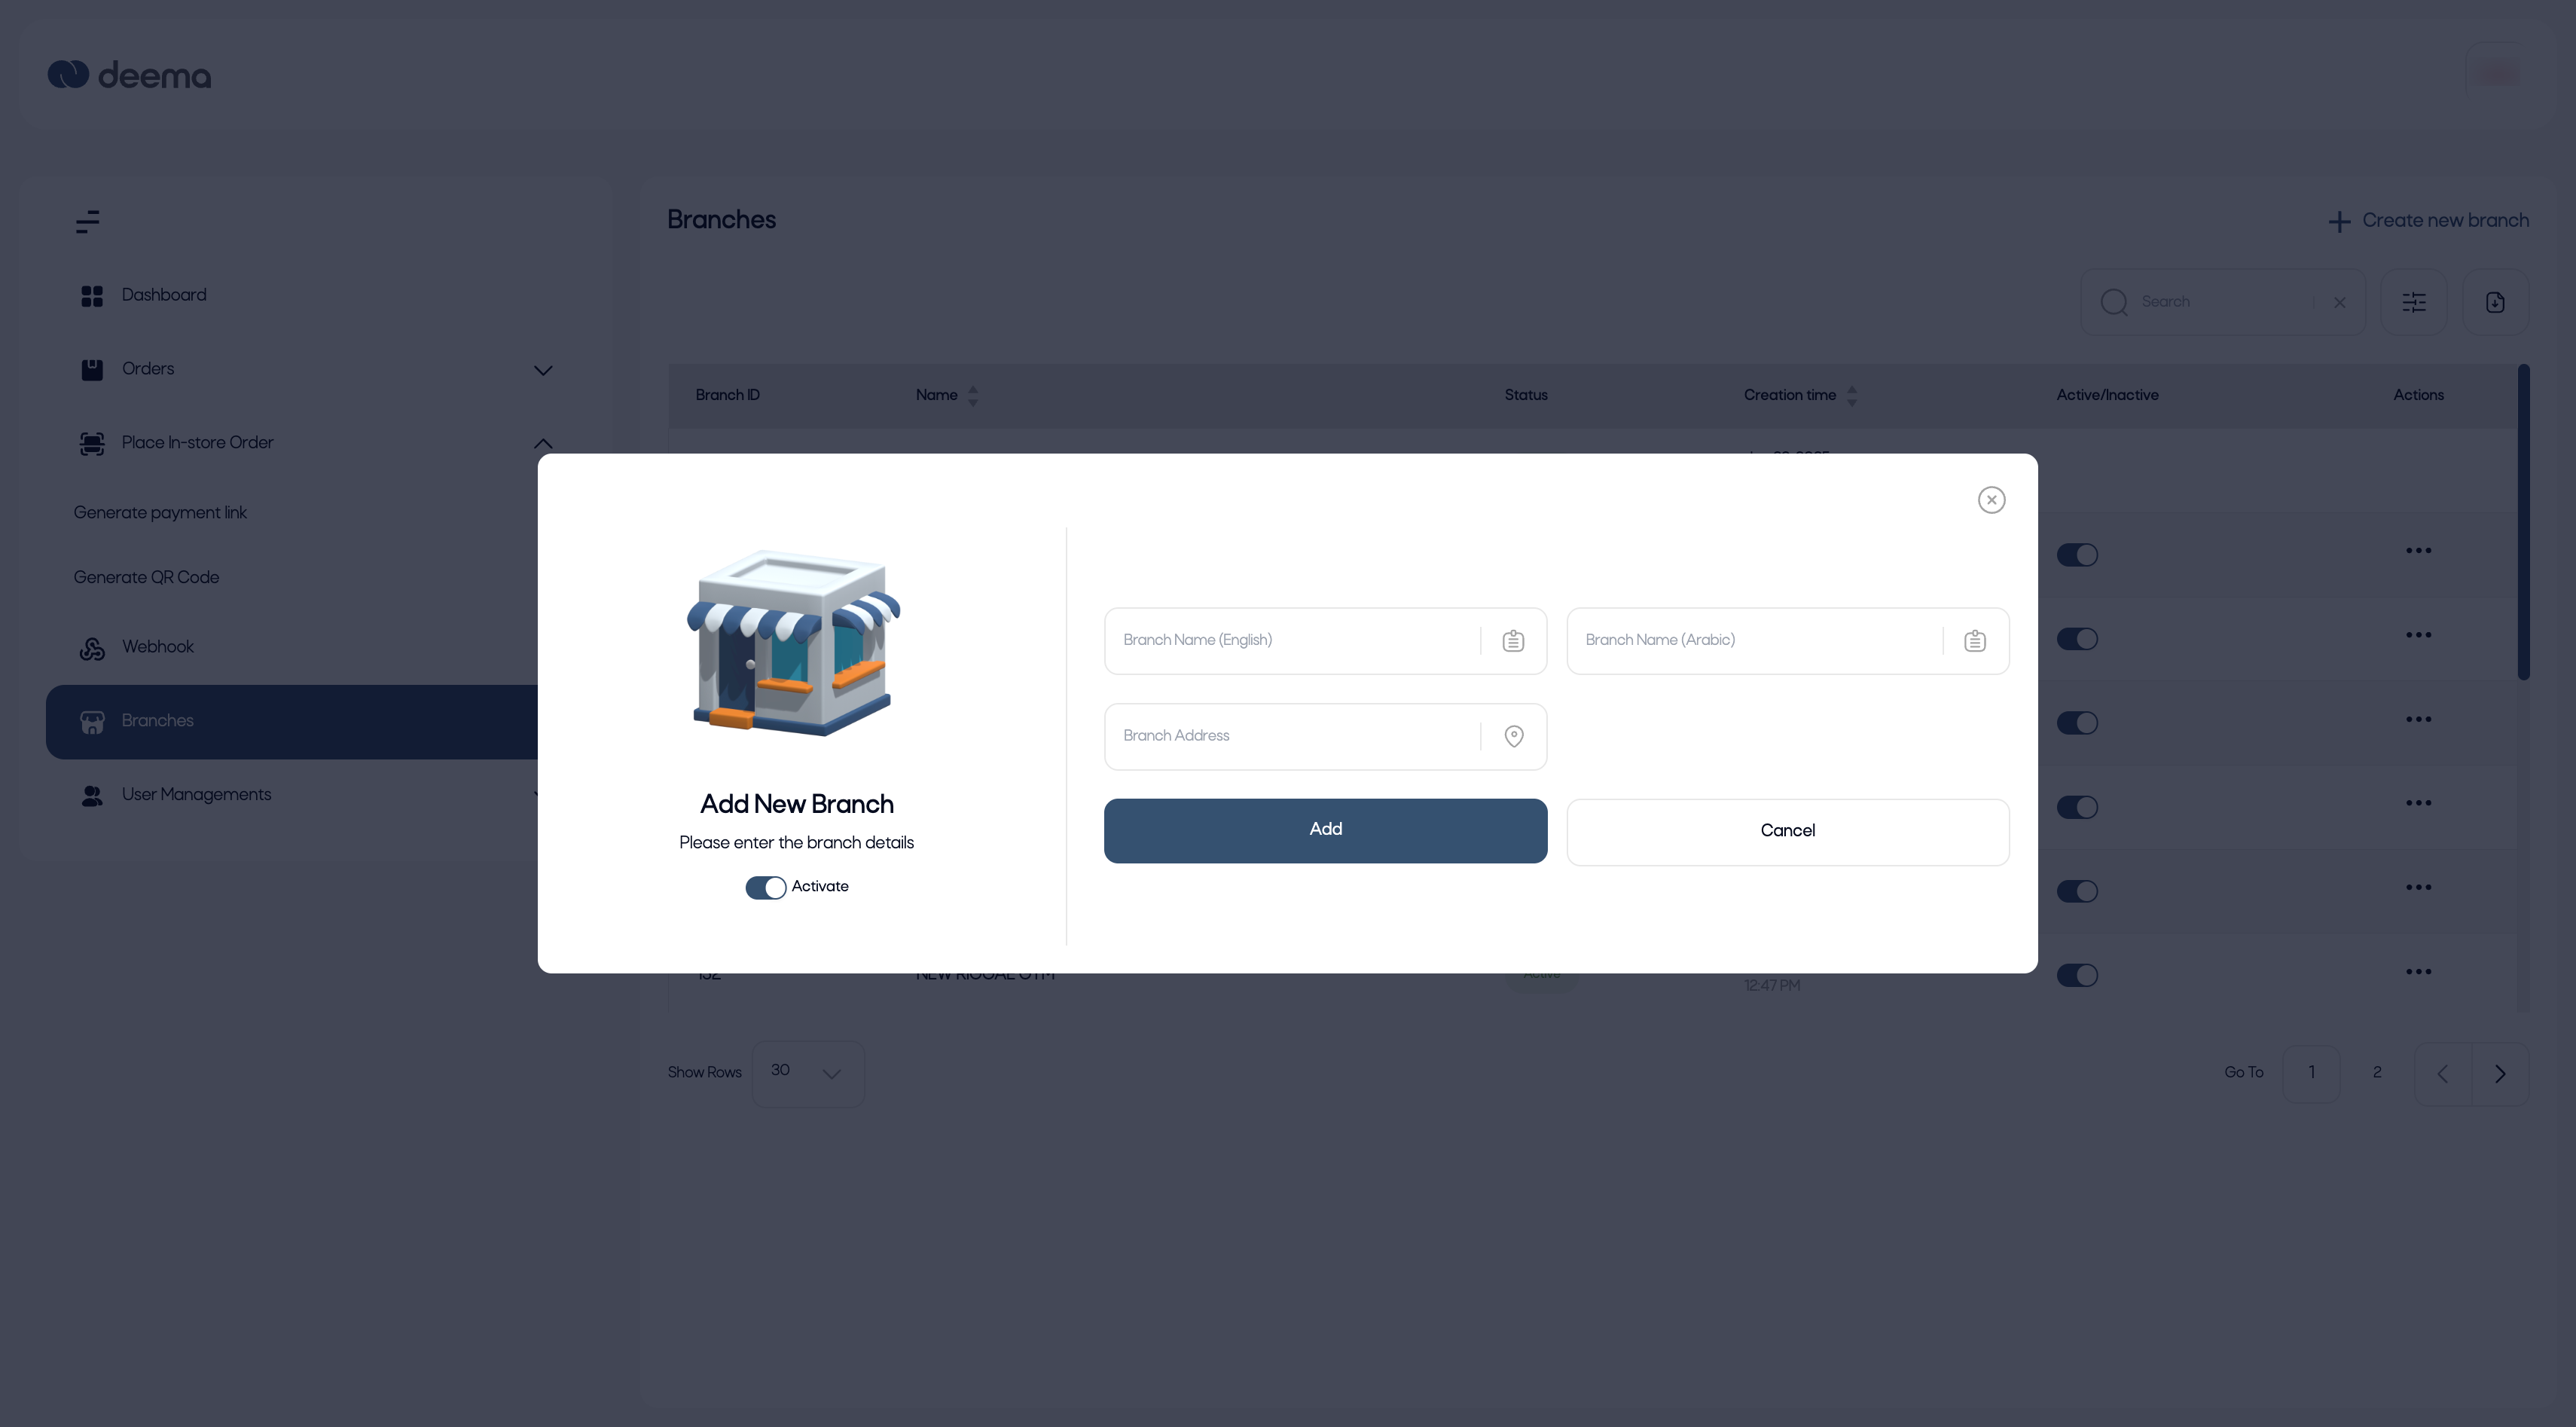
Add New Branch
When selecting + Create New Branch, the merchant can fill out the form to add a new branch.
Form Fields:
| Field | Description |
|---|---|
| Branch Name (English) | The branch name in English. |
| Branch Name (Arabic) | The branch name in Arabic. |
| Branch Address | The physical address of the branch. |
| Activate | Toggle to make the branch active immediately upon creation. |
Action Buttons:
- Add – Saves the branch and activates it if selected.
- Cancel – Discards the form and returns to the main view.
Step-by-Step Guidance
- Go to Branches from the sidebar menu.
- Review your existing branch list.
- Click + Create New Branch to add a new one.
- Enter the branch details in English and Arabic.
- Toggle Activate if you want the branch to go live immediately.
- Click Add to save.
- Use the Actions (⋯) button next to any branch to edit or delete it (except the online branch).
Notes
- The Online Branch is system-generated and cannot be modified or deleted.
- Only active branches appear in store selection lists during order creation.
- Deactivated branches retain their data but are hidden from transactions.
Roles
The Roles Management section allows the merchant to control access and permissions for users within their account.
Each role defines what actions a user can perform — ensuring that sensitive operations are restricted to authorized personnel only.
Key Features
- View all existing roles and their permissions.
- Create new roles with specific access levels.
- Edit or delete existing roles.
- Assign roles to users in the User Management section.
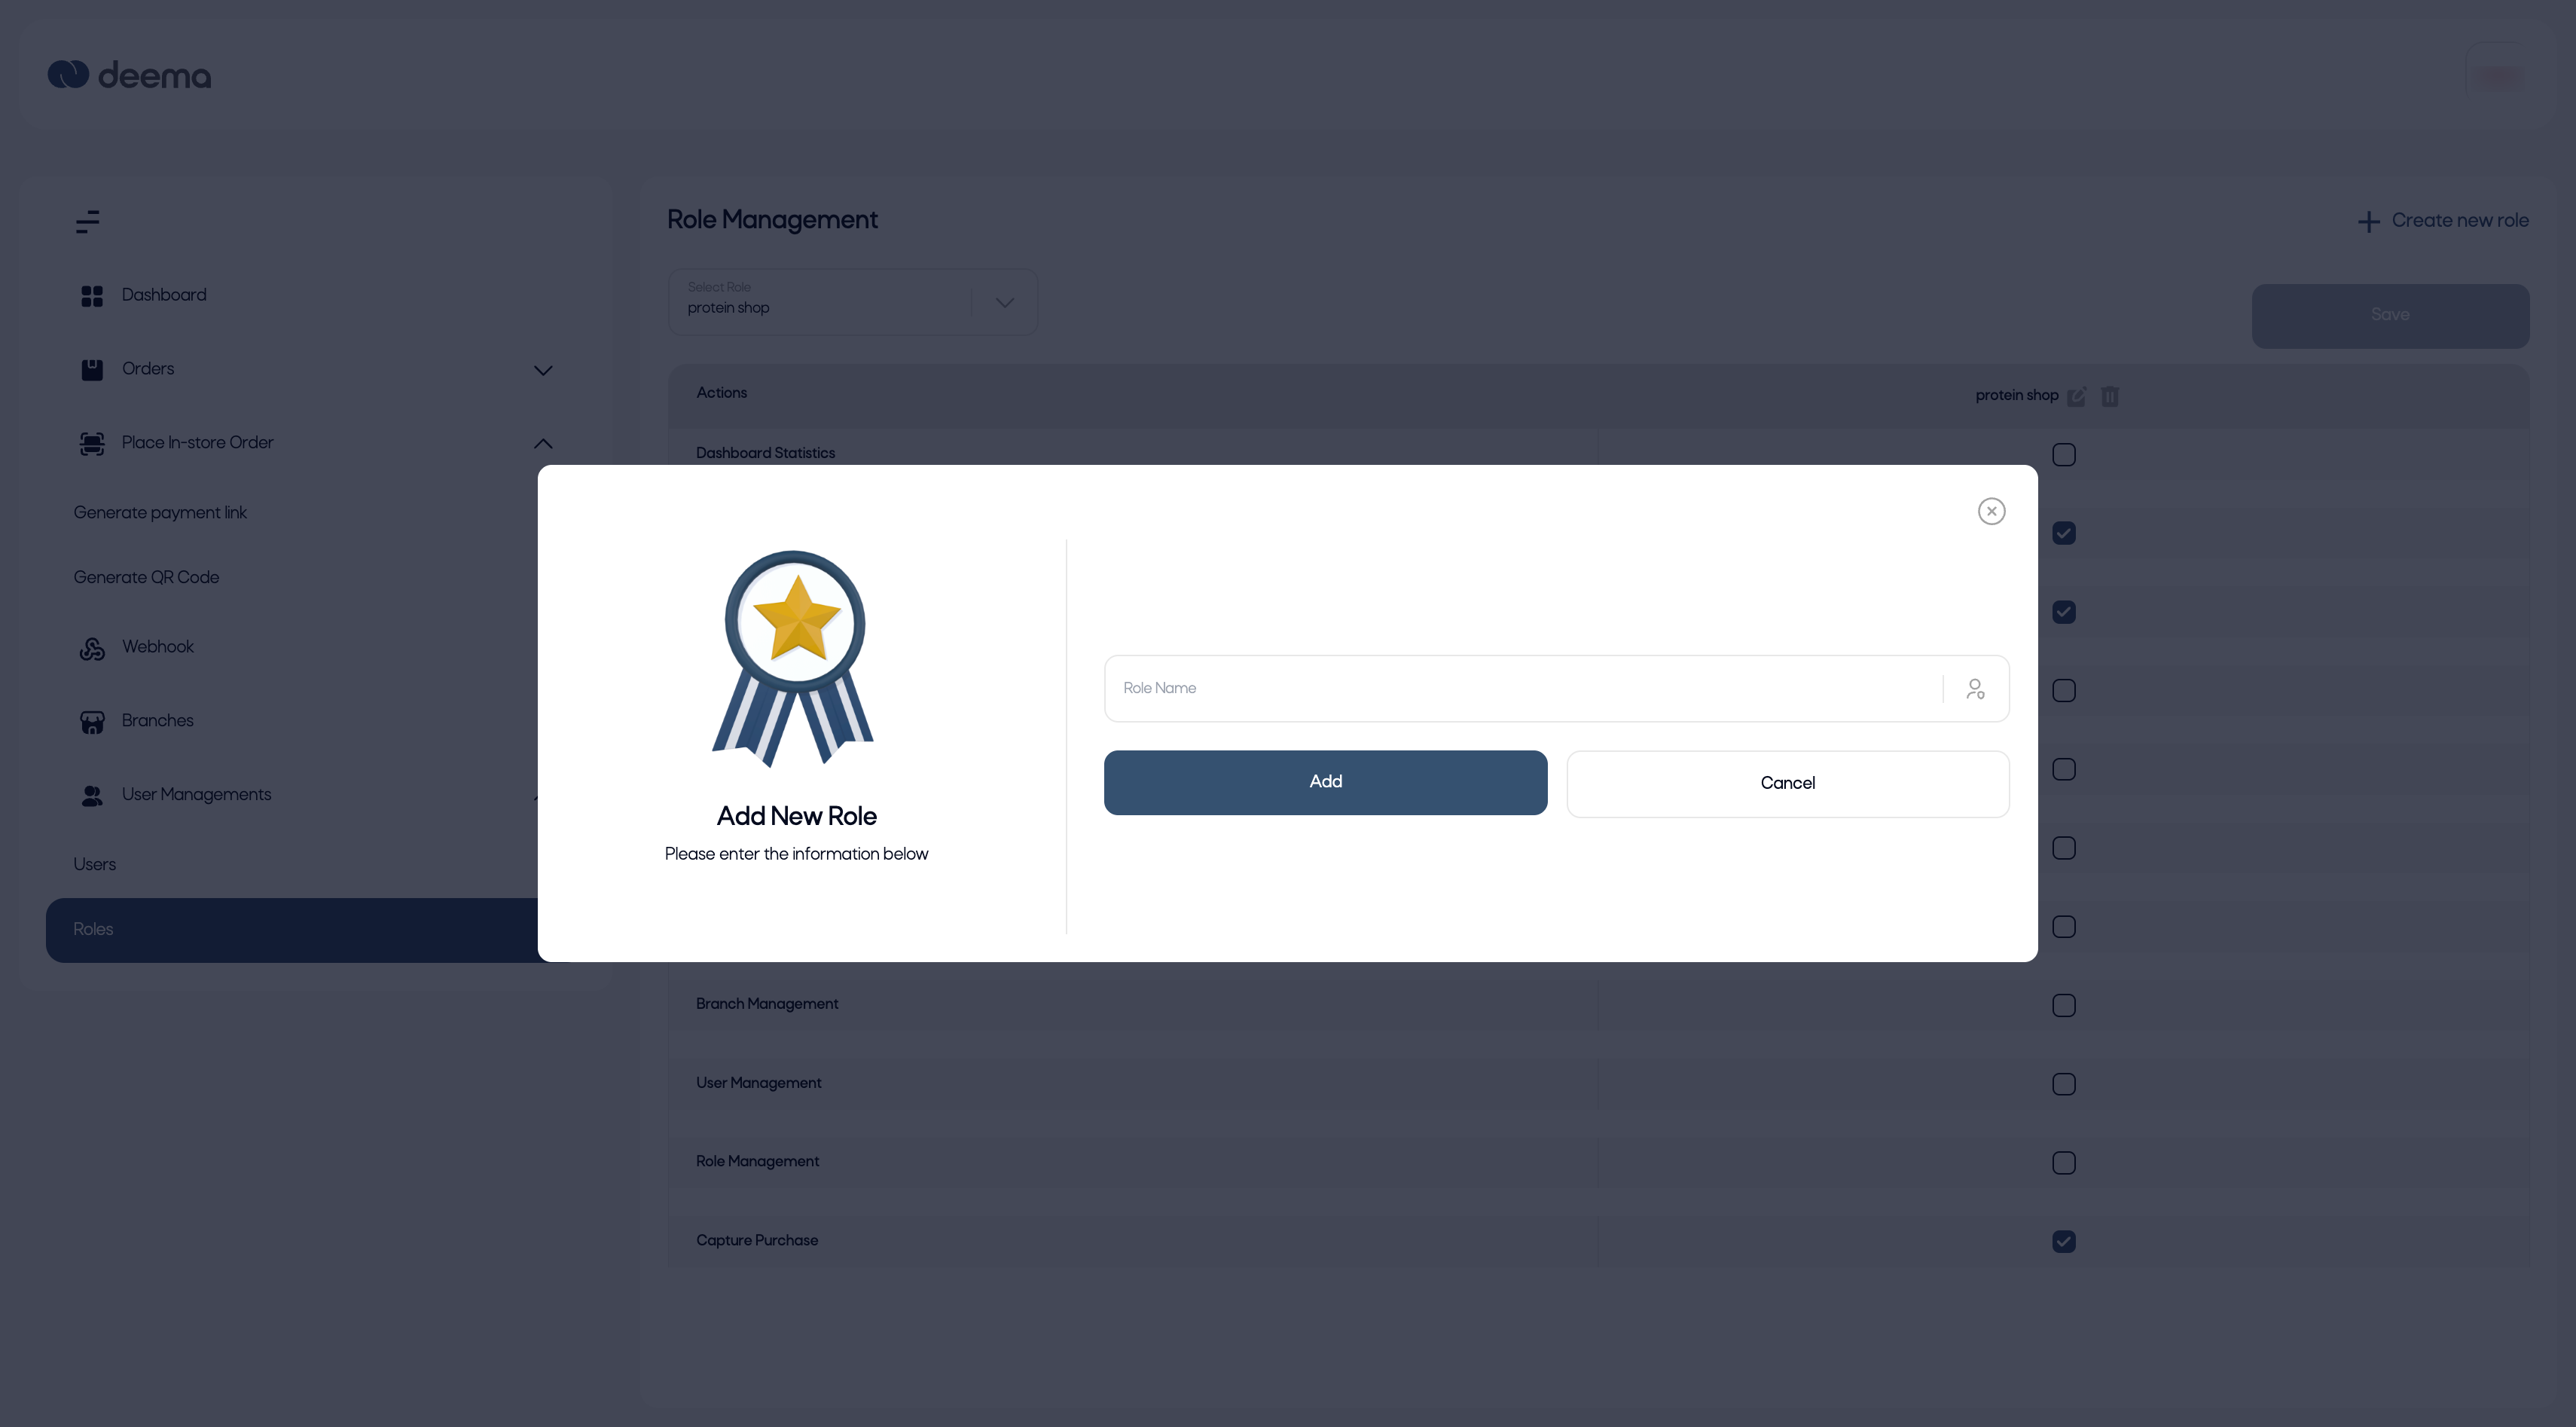
Add New Role
When clicking + Create New Role, a pop-up appears where you can enter the Role Name and click Add.
Once created, you can define permissions for that role.
Form Fields:
| Field | Description |
|---|---|
| Role Name | The name of the new role (e.g., Cashier, Branch Manager, Accountant). |
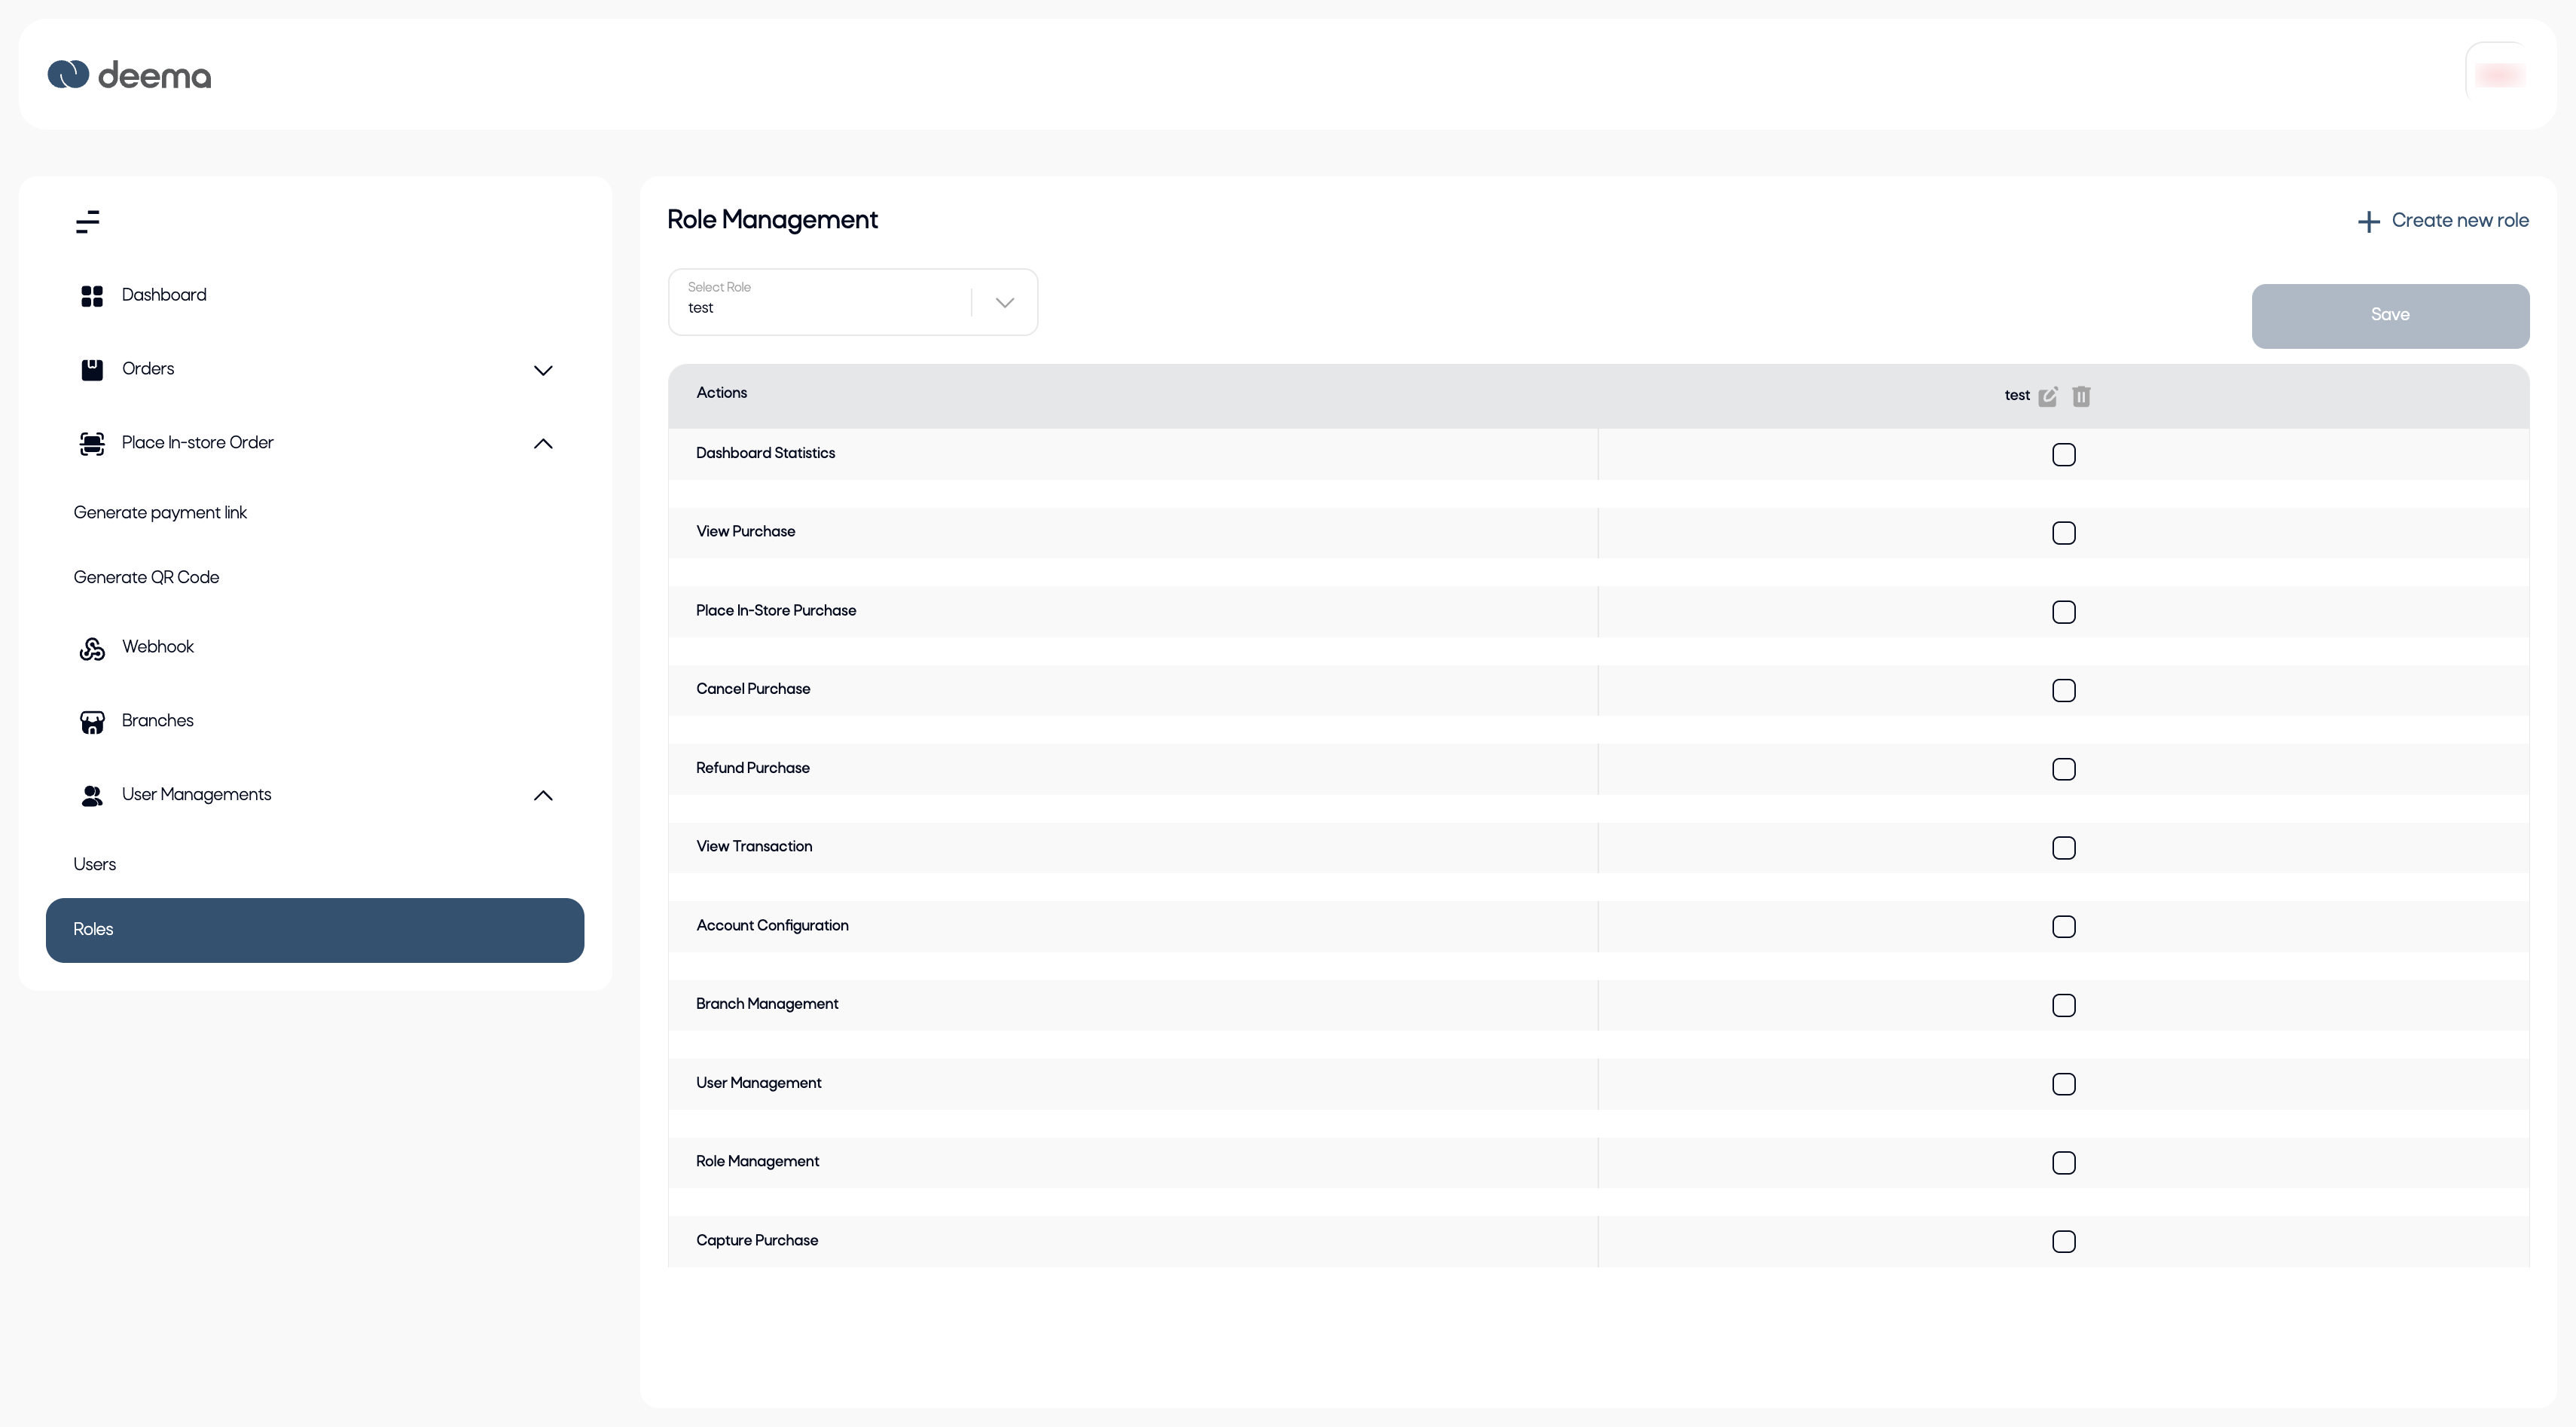
Assign Permissions
After creating a role, select it from the dropdown to assign specific actions by checking the relevant boxes.
Each checkbox represents a system permission that grants access to a specific feature or page.
Available Permissions include:
- Dashboard Statistics – View system analytics and summaries.
- View Purchase – Access purchase records and details.
- Place In-Store Purchase – Create in-store payment orders.
- Cancel Purchase / Refund Purchase – Manage order cancellations or refunds.
- View Transaction – Access individual payment transaction data.
- Account Configuration – Edit account or payment settings.
- Branch Management – Add, edit, or deactivate branches.
- User Management – Create, edit, or deactivate users.
- Role Management – Create or edit roles and permissions.
- Capture Purchase – Capture pending payments manually.
Step-by-Step Guidance
- Navigate to User Management → Roles from the sidebar.
- Click + Create New Role to add a role.
- Enter the Role Name and click Add.
- Select the new role from the dropdown menu.
- Tick the permissions you want to grant to this role.
- Click Save to confirm your changes.
Notes
- Only users with Role Management access can modify roles.
- Changing a role’s permissions affects all users assigned to that role.
- Use descriptive role names to maintain clear responsibility separation.
Users management
The Users Management section allows merchants to manage the users who have access to the merchant portal.
Each user can have different roles and access permissions depending on their responsibilities.
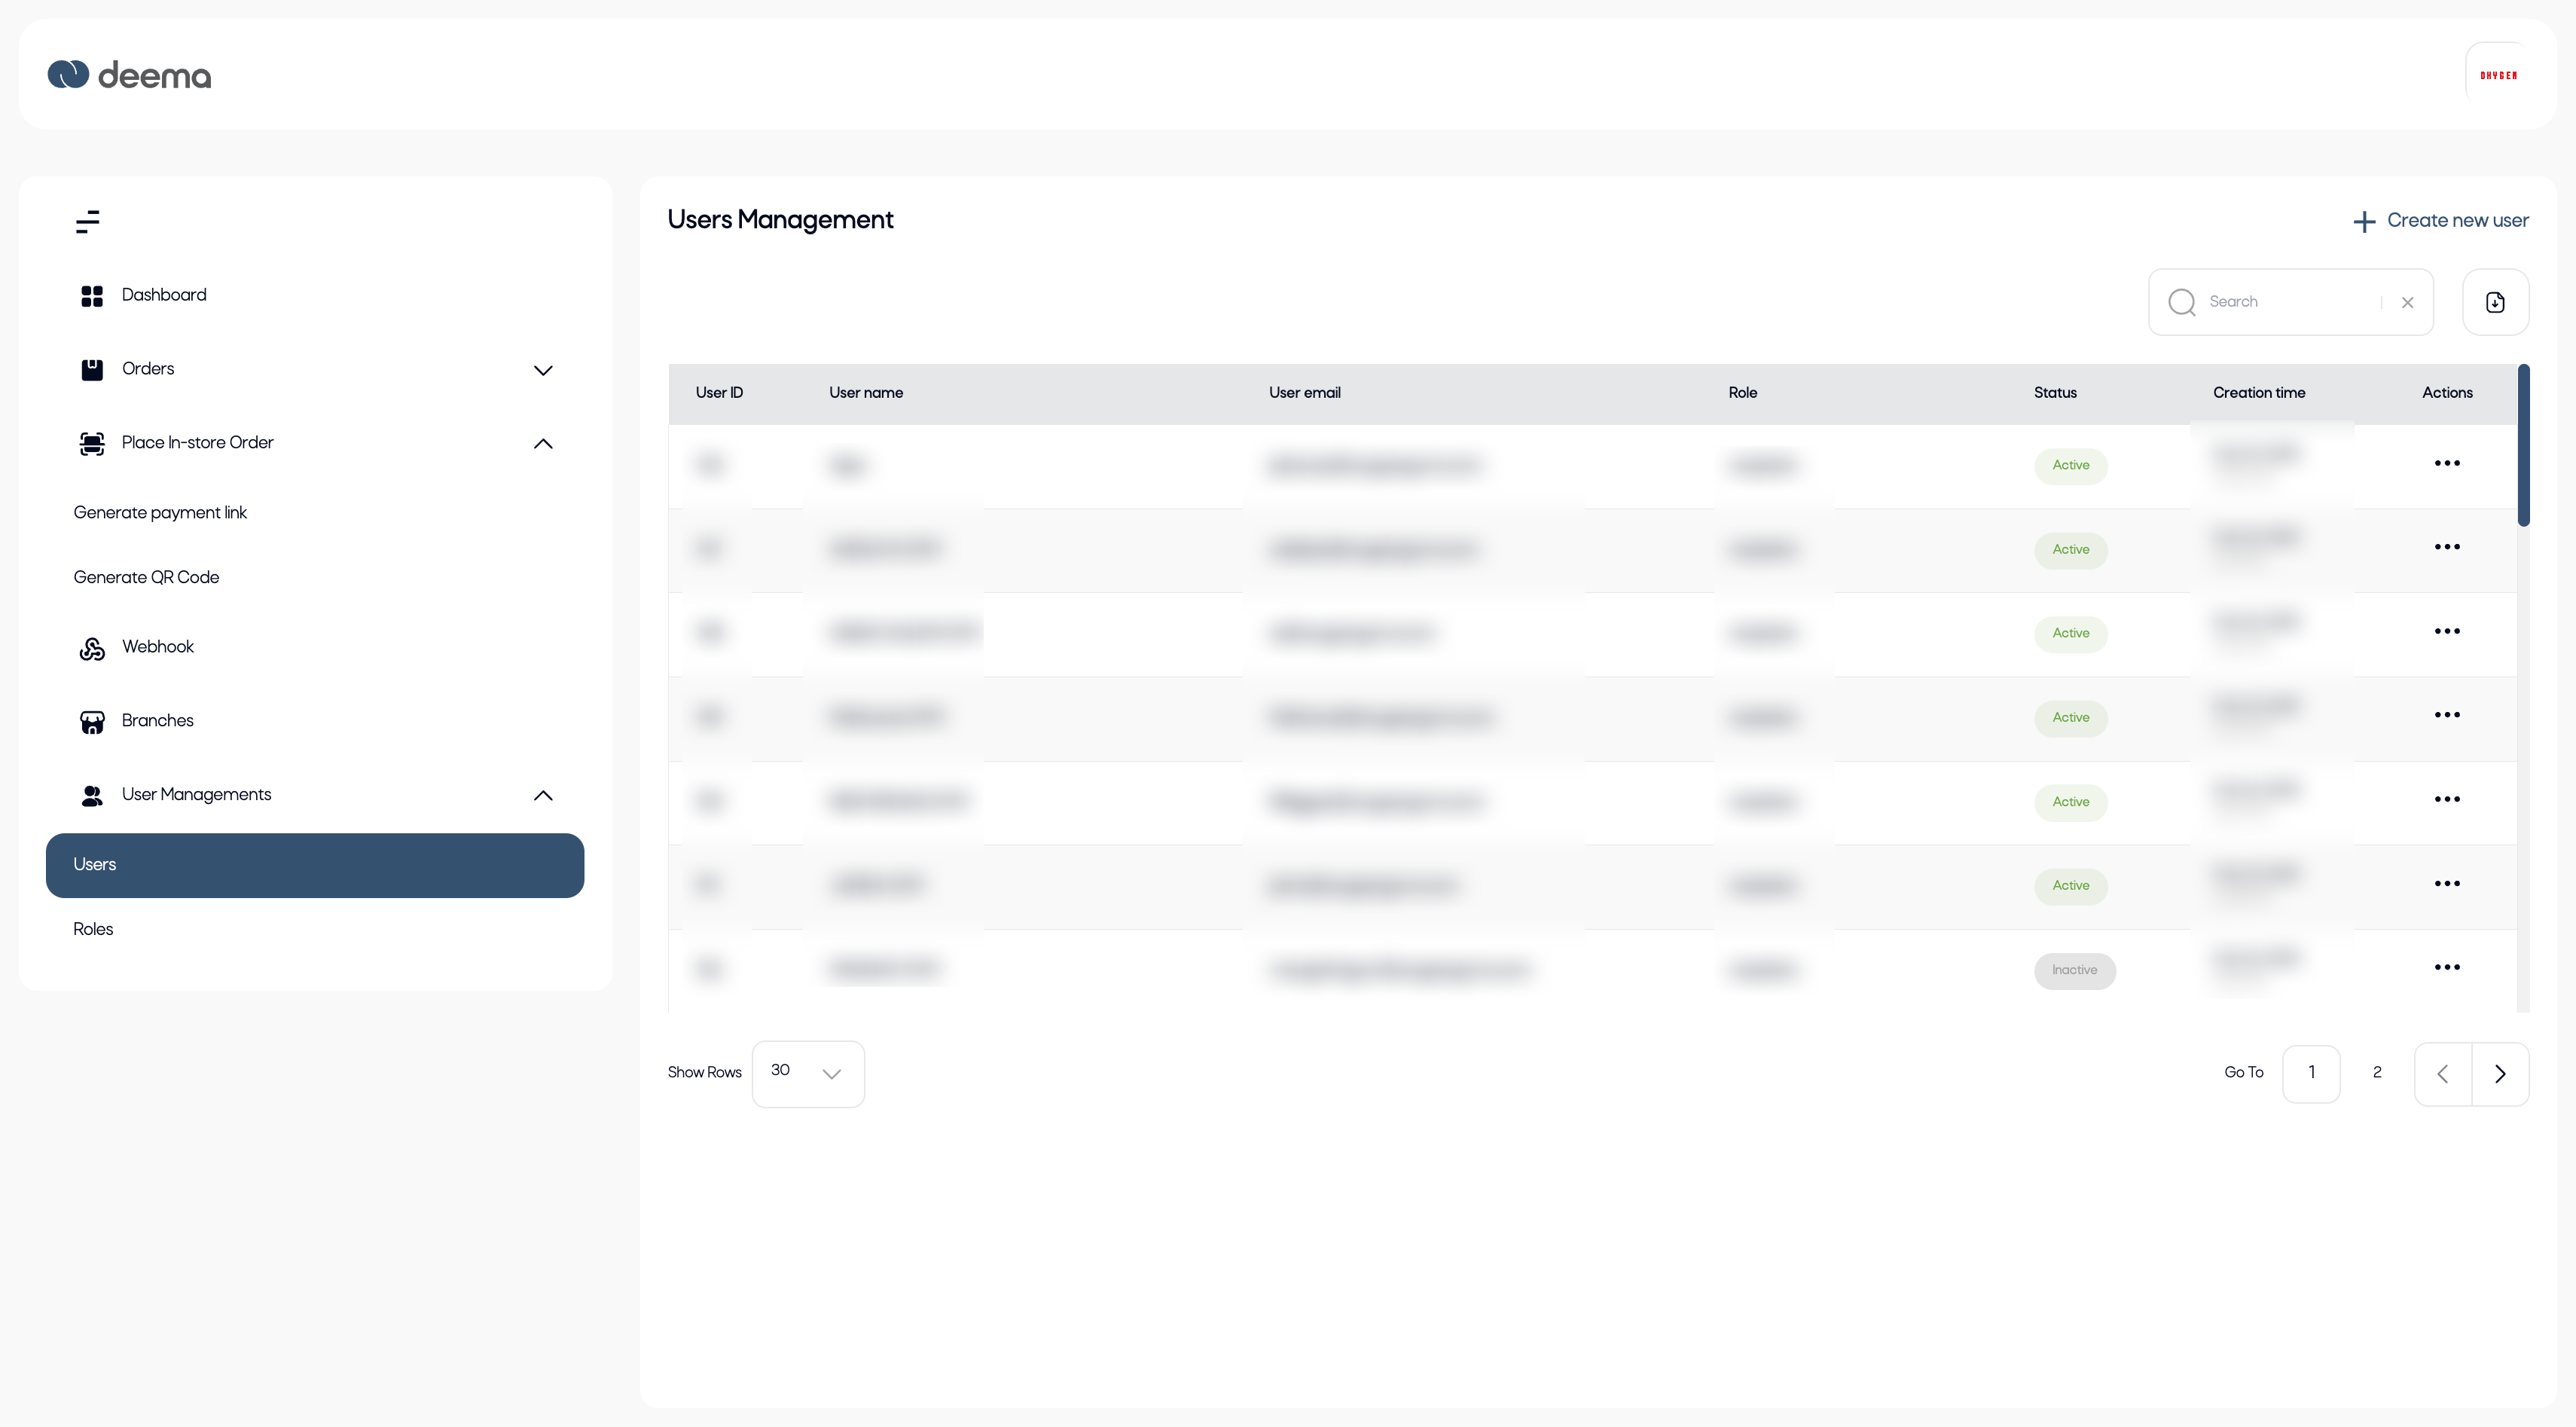
Key Features
- View all registered users with their assigned roles and status.
- Add new users and assign them to specific branches and roles.
- Edit existing users’ information and permissions.
- Activate or deactivate users when needed.
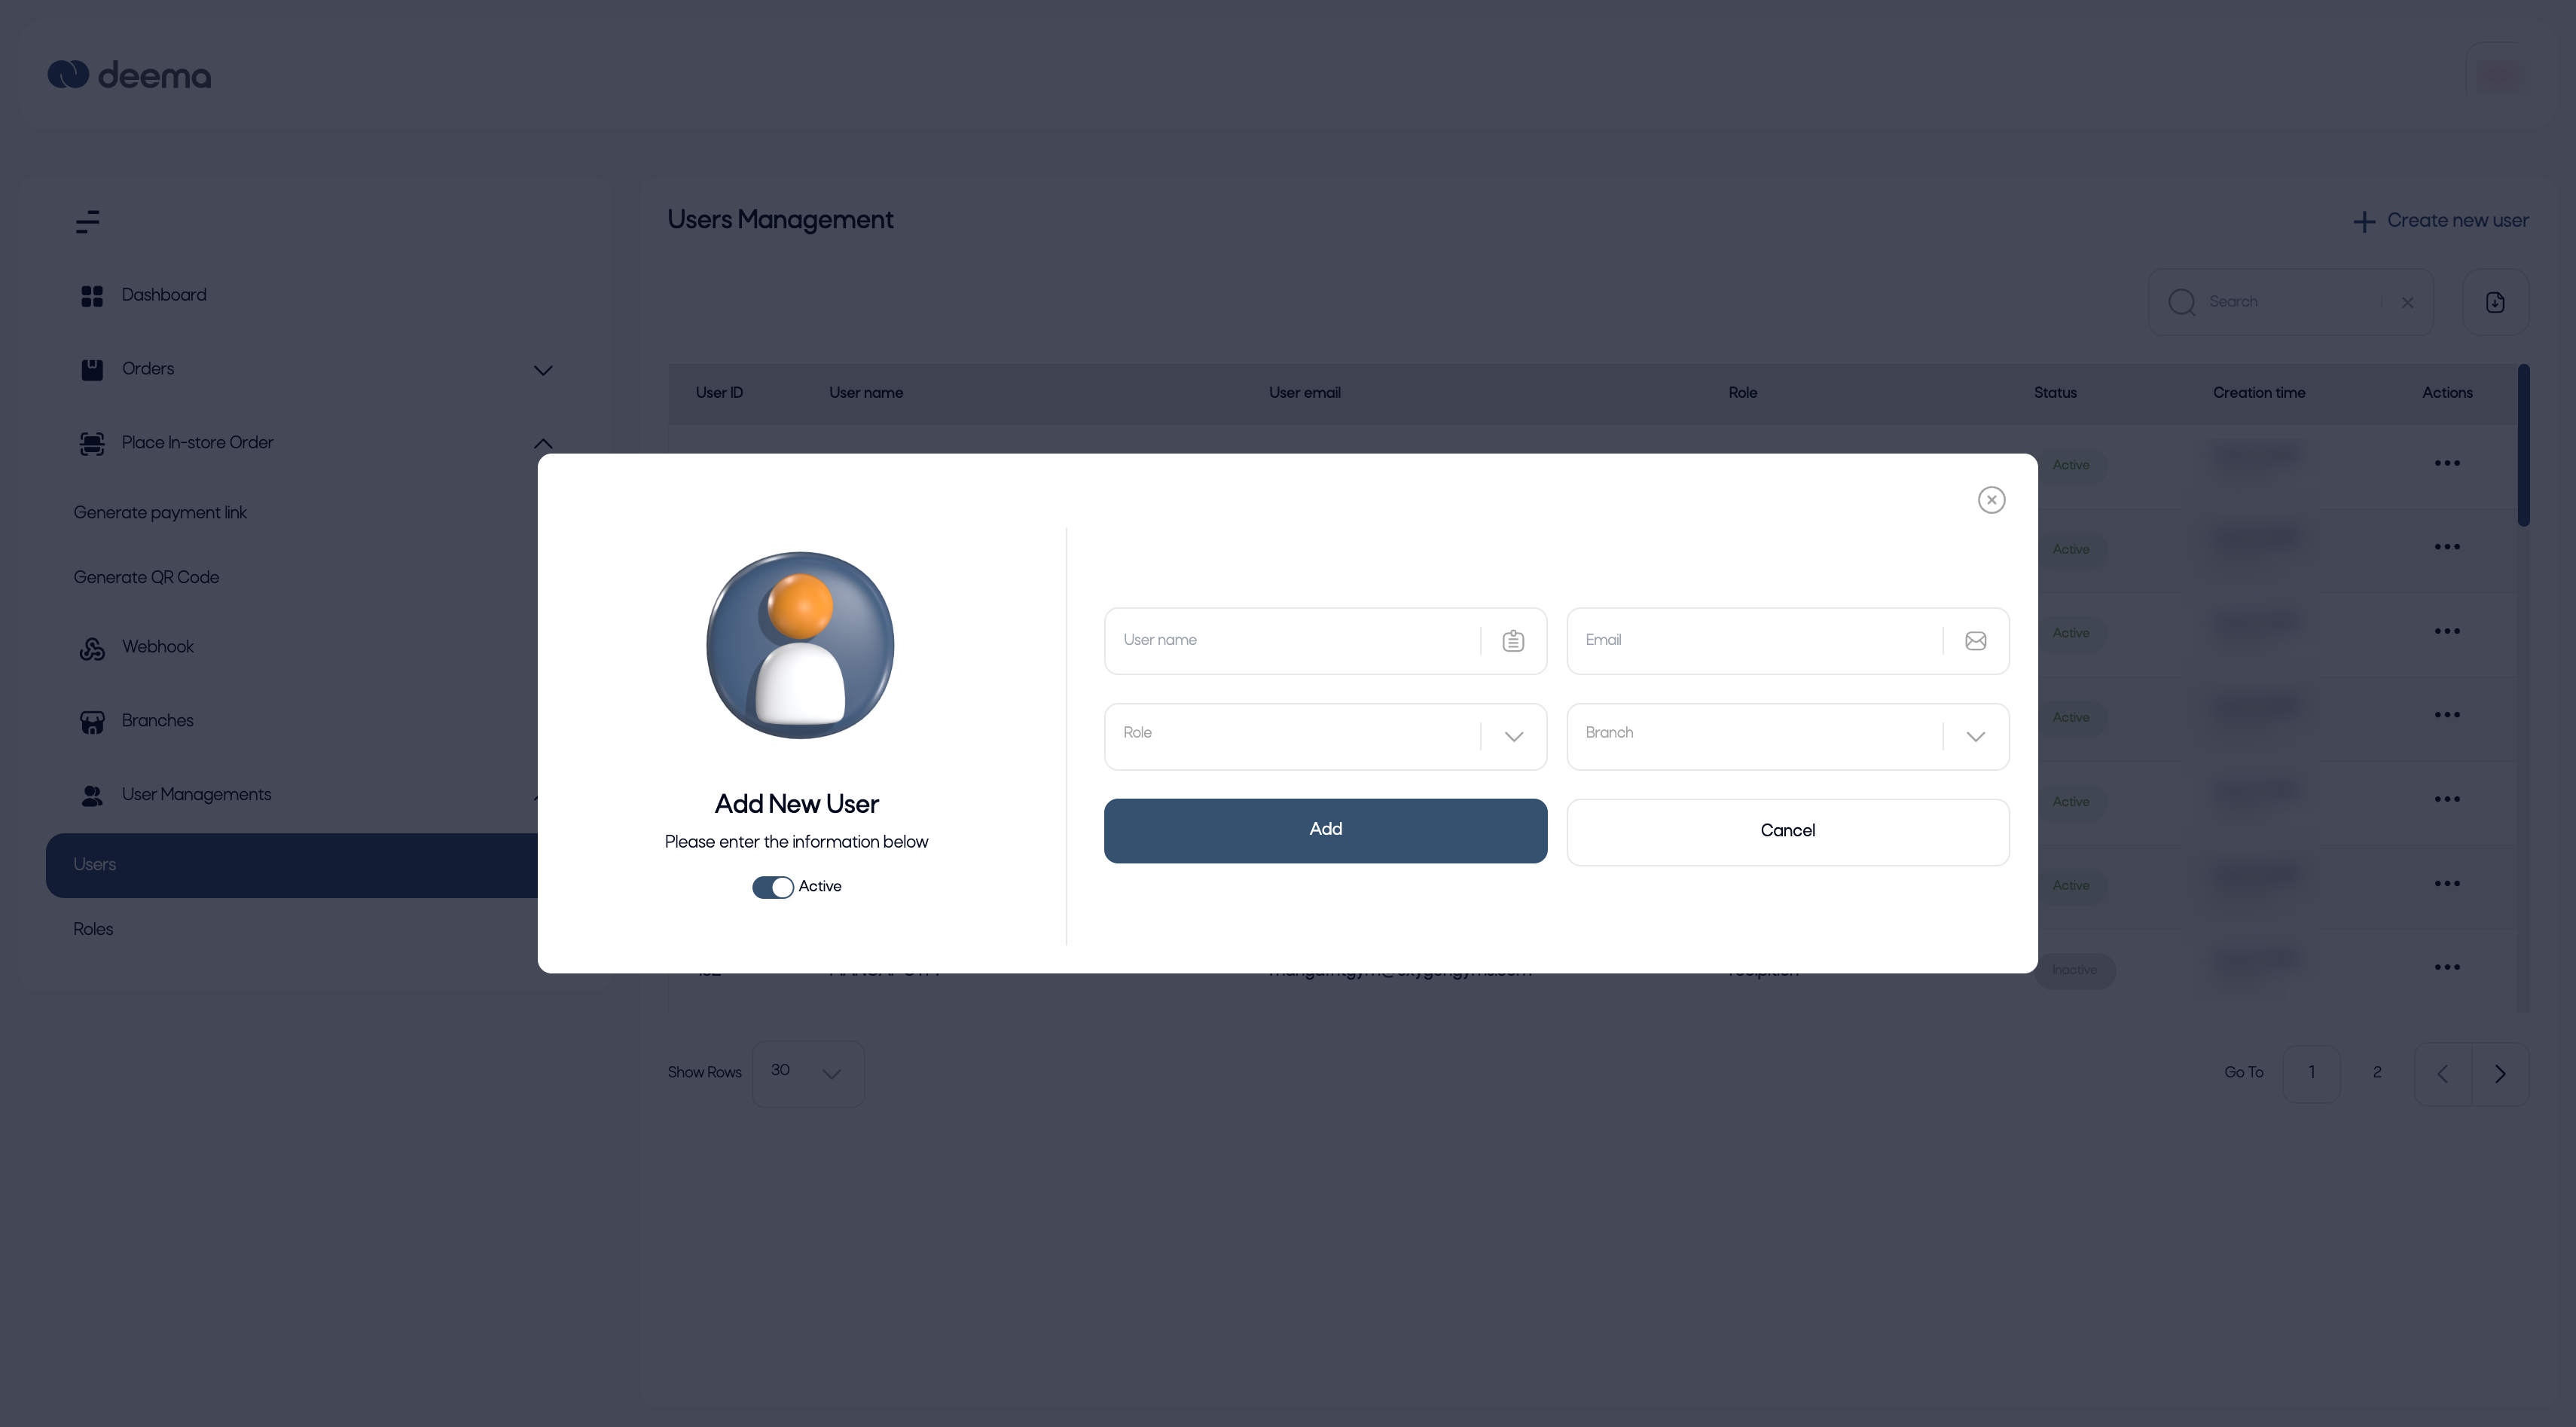
Add New User
When selecting + Create New User, a pop-up appears where the merchant can add a new user and define their access level.
Form Fields:
| Field | Description |
|---|---|
| User Name | The name of the user to be added. |
| The user’s email address (used for login). | |
| Role | Select the role from predefined roles (created under “Roles Management”). |
| Branch | Assign the user to a specific branch. |
| Active | Toggle to activate or deactivate the user immediately. |
Action Buttons:
- Add: Save and create the user.
- Cancel: Exit without saving.
Step-by-Step Guidance
- Navigate to User Management → Users from the sidebar.
- Click + Create New User.
- Fill in the required fields — Name, Email, Role, and Branch.
- Set the Active toggle to enable or disable the account.
- Click Add to save the user.
- The new user will appear in the list with their status and assigned role.
User List Columns:
| Column | Description |
|---|---|
| User ID | Unique identifier for each user. |
| User Name | Display name of the user. |
| User Email | Registered email for login. |
| Role | The role assigned (e.g., Admin, Cashier, Manager). |
| Status | Shows whether the user is Active or Inactive. |
| Creation Time | Displays when the user was added. |
| Actions | Edit or delete the user record. |
Notes
- Only users with the proper permissions can create, edit, or deactivate other users.
- Roles and permissions are controlled from the Roles Management page.
- Inactive users will not be able to log in until reactivated.
Profile Management
The Profile Management section allows merchants to update and maintain their business profile information displayed in the system.
Merchants can update visual and online identity details to ensure their brand information is always up to date.
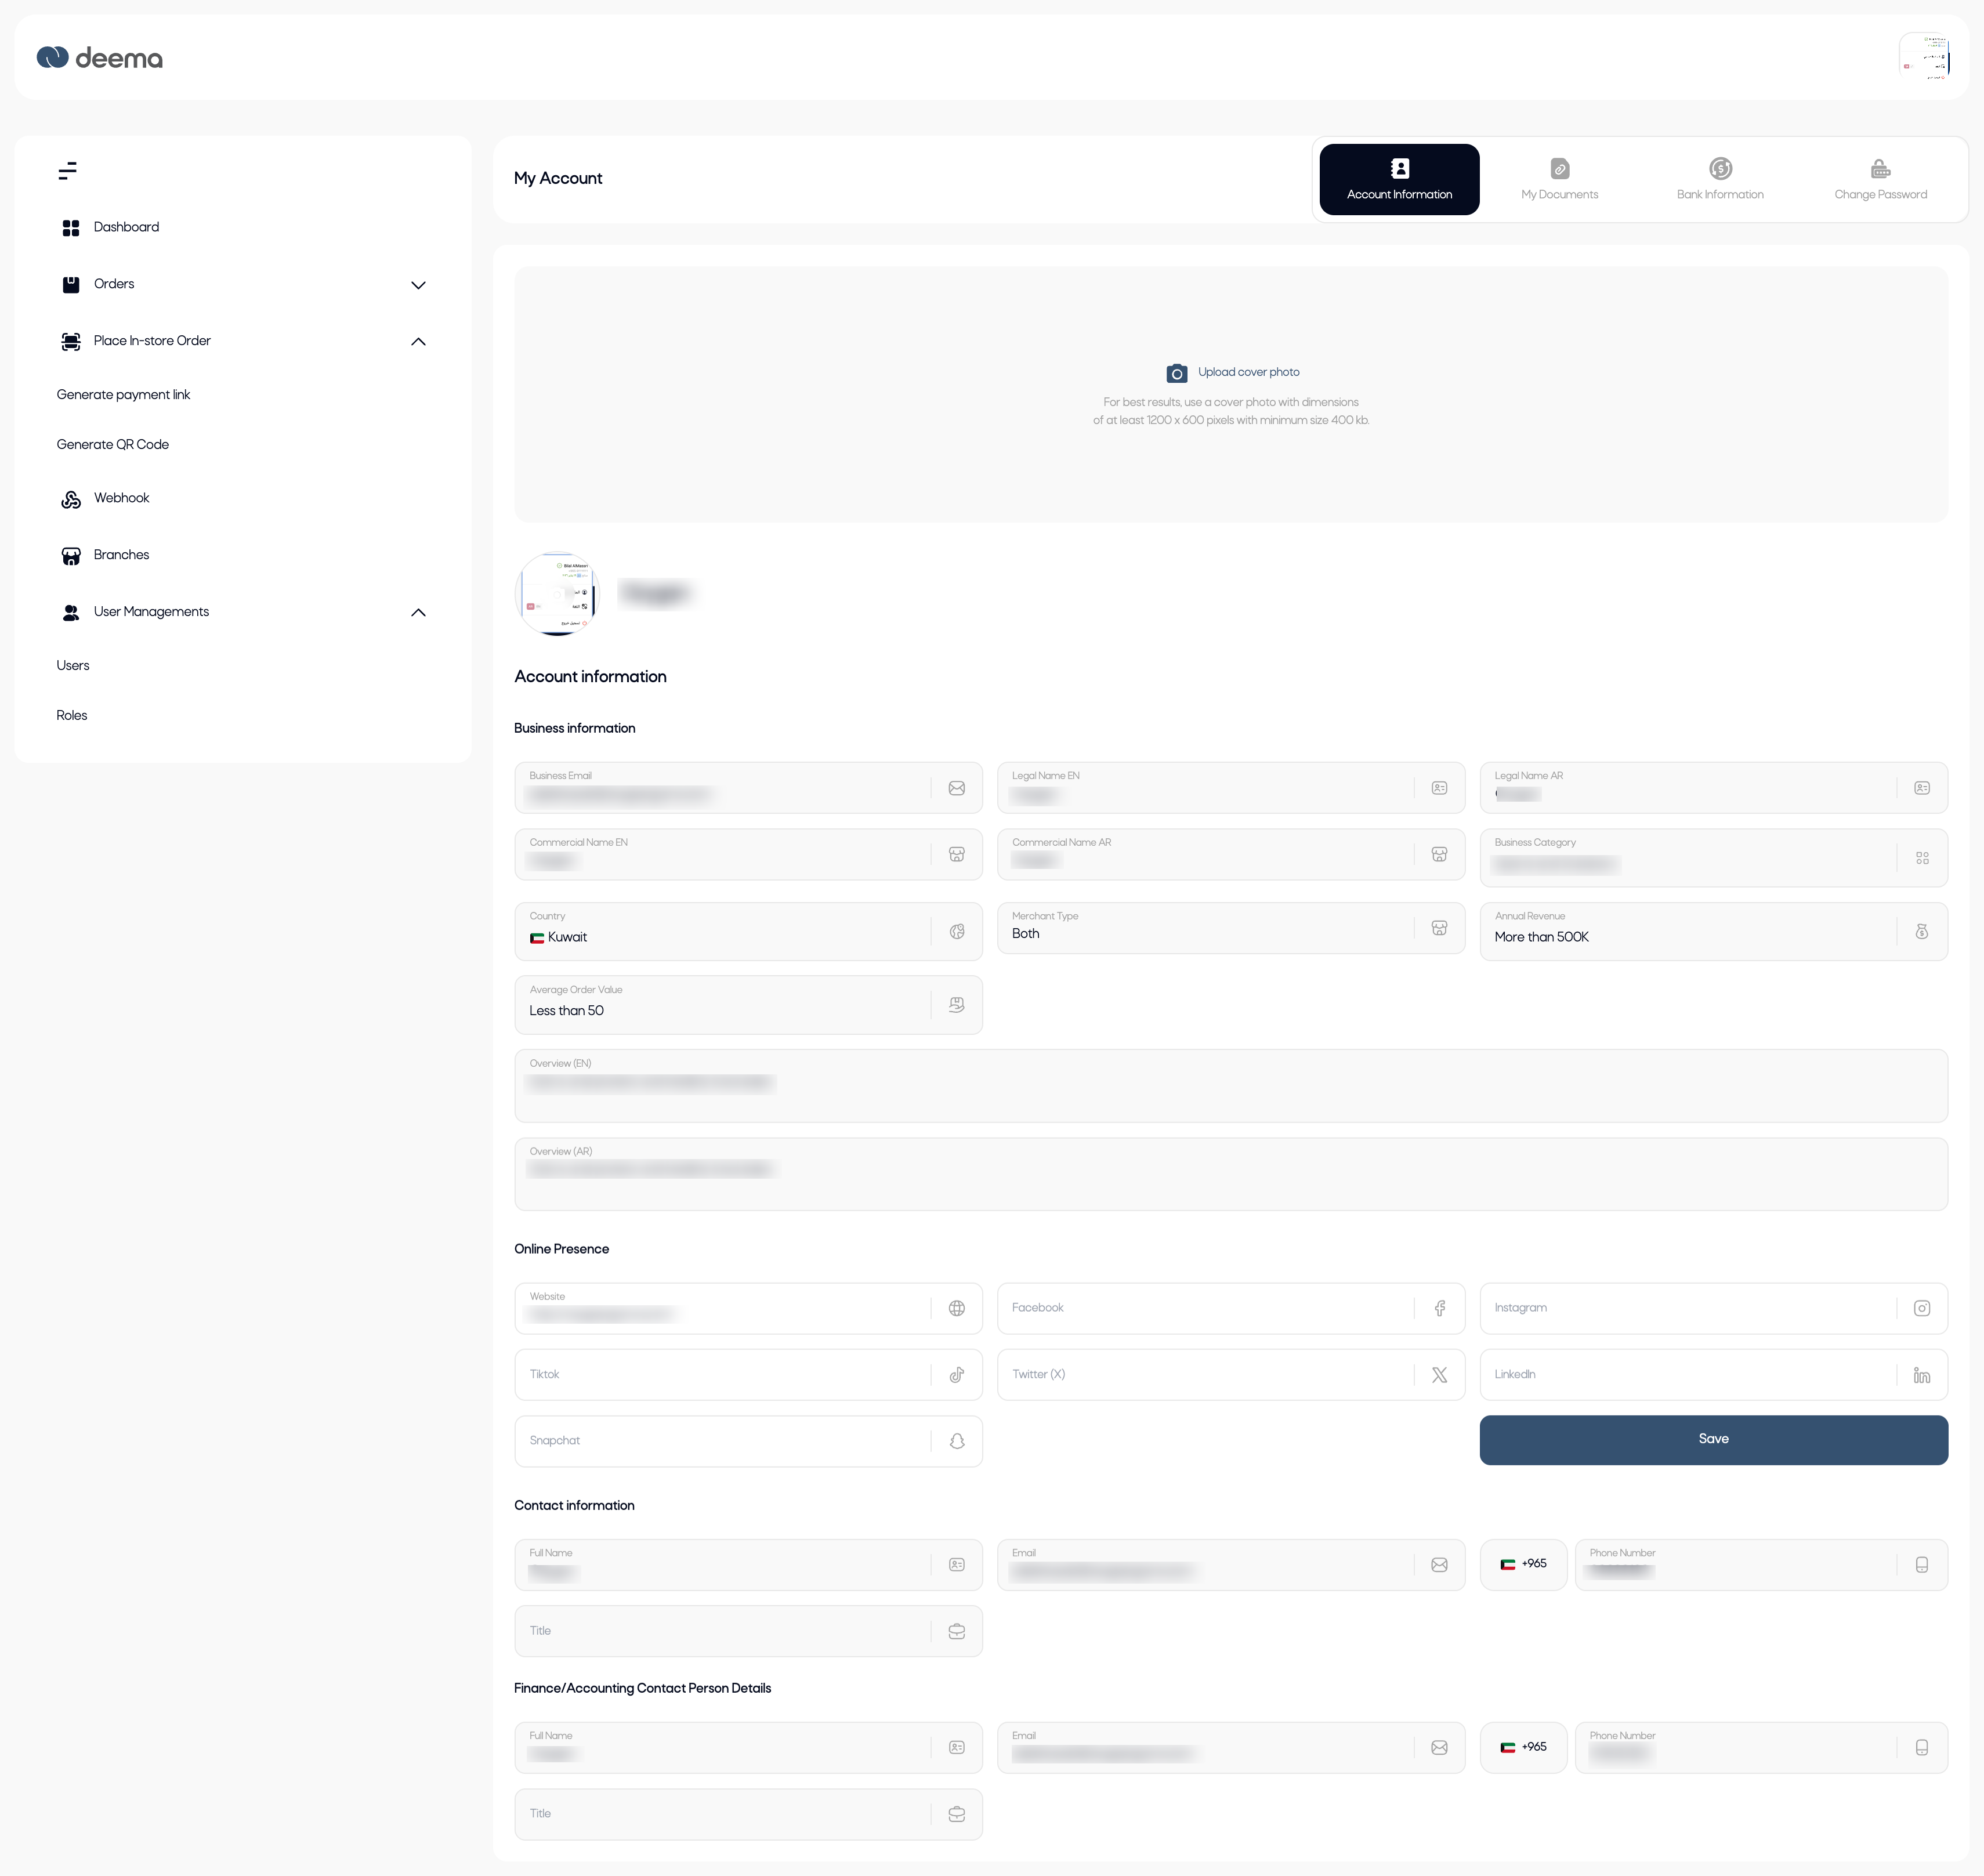
Editable Fields
Merchants can edit the following sections from their profile page:
| Section | Description |
|---|---|
| Logo | Upload or update the business logo displayed across the merchant portal. |
| Cover Image | Update the cover photo shown at the top of the merchant profile. |
| Online Presence | Add or modify website and social media links such as Facebook, Instagram, Twitter, LinkedIn, etc. |
| Change Password | Update the account password for security purposes. |
Step-by-Step Guidance
- Navigate to your Profile Page from the sidebar.
- Click Edit next to any editable section.
- Upload a new Logo or Cover Image if required.
- Update your Online Presence links (e.g., website, Instagram, Facebook).
- To change your password, go to Change Password, enter your current password, then set a new one.
- Click Save to confirm all changes.
Notes
- Only these fields (Logo, Cover, Online Presence, and Password) can be edited by the merchant.
- Other business or compliance details (such as licenses, bank details, or financial info) are managed by the admin team.
- Uploaded images should meet the platform’s file size and format requirements for optimal display.